
From winning an argument in the group chat to getting an image to edit using a photo editor on Android, the ability to take screenshots is nothing less than a superpower. Luckily, this feature is included in our Windows computers too. Do you know How to Take Screenshots in Windows 11? If yes, you might want to change the default location where they are saved too, right? In this guide, we have described the easiest way to change the default screenshot folder location in Windows 11.
Where are My Screenshots Saved in Windows 11?
The screenshots in a Windows 11 computer are saved to the following location:
This PC > Local Disk (C) > Users > (username) > Pictures > Screenshots
Since you have to change the default location for the saved screenshots, we will be changing the location for the ‘Screenshots’ folder particularly. We have mentioned the shortest way to change the default screenshot saving location in Windows 11 ahead.
Easily Change the Default Screenshot Folder Location in Windows 11
To change the location where your screenshots are saved on your Windows 11 computer, follow the below-mentioned steps:
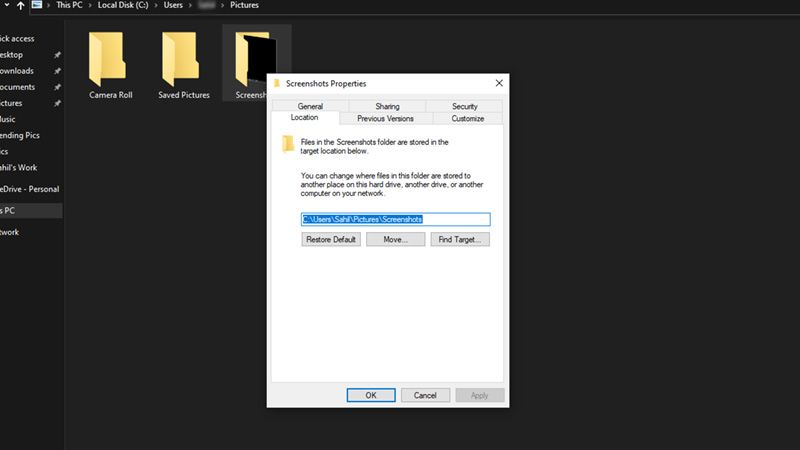
- First, you need to get to the ‘Pictures’ folder, mentioned in the previous section. Go to This PC > Local Disk (C) > Users > (username) > Pictures.
- Right-click the ‘Screenshots’ folder.
- Select ‘Properties’ from the pop-up menu.
- Select the ‘Location’ tab in the next pop-up menu.
- Click on the ‘Move’ button.
- Find and go to the folder where you want your next screenshots to be saved. Click on ‘Select Folder’.
- Click on the ‘Ok’ or ‘Apply’ button to choose the selected folder to save your screenshots from now on.
- Your Windows 11 PC will also ask you if you would like to move the previous screenshots to the new folder. You can choose as per your preference.
So, this covers everything from where your screenshots are saved on your Windows 11 PC and how to change their default saving folder. Follow the steps mentioned above and you will find your screenshots exactly where you want them to be. Till then, consider going through our other similar types of guides too – How to Take a Screenshot in Windows 10 Desktop & Laptop, and How to Make Taskbar Smaller in Windows 11.