It must be really frustrating when your computer cannot connect to the Internet even when it should be working or is already working on other devices. Thankfully, there are several fixes to this problem. If you are having this problem and your Mac won’t connect to Wifi, there are several reasons that could be causing this. In this guide, you will learn how to fix Wifi not working after the macOS Ventura update in detail below.
How to Fix Wifi Not Working After macOS Ventura Update
If you are having macOS Ventura Wifi problems, don’t worry, as we have got you covered. If the internet is not working on Mac after macOS 13 Ventura update, or if the Wifi icon is greyed out in the menu bar, below you will find various solutions that will fix this issue once and for all:
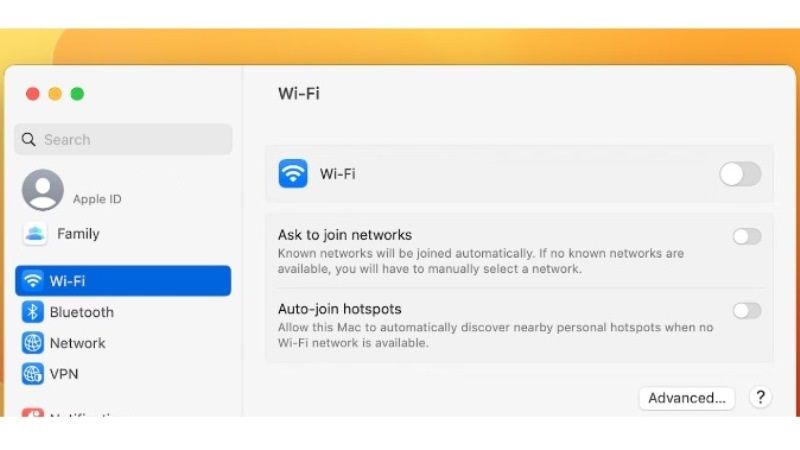
1. Activate WiFi Service on macOS Ventura
- First, you need to click the System Settings icon in the Dock or click on Apple menu > System Settings.
- After that click on Network.
- On the right-hand side, right-click on Wifi.
- Finally, select the option of “Make Service Active”. This will eventually start your Wifi network again and now you will be able to surf the internet without any troubles on your macOS Ventura.
2. Remove and Reconnect Wifi Network
If the above solution didn’t work for you, then you can also try to remove the Wifi network and reconnect it again, here’s how it is done:
- First, click the System Settings again.
- Then click on Network.
- Click on Advanced Wifi Settings.
- Then select the Wifi network that is not working and remove it.
- Click the Wifi icon which is located in the menu bar.
- Finally, you should try to reconnect to the previous Wifi network that was not working, it can be found in the Other Networks section.
3. Check your Wifi Connection
You can also try to verify that the problem is actually not with your Wifi connection. Even if you have other devices connected to the Wifi network, there is still a chance that there is an issue with your router causing your macOS Ventura to not connect to the Internet.
Step 1: Disconnect your modem and wait for 1-2 minutes before connecting it back again. Then, wait for the modem to fully start up – this can take up to 2 minutes depending on the device. After that, check if you can connect your computer to the Wifi network.
Step 2: Next, ensure that all the cables connected to your modem are properly connected. Both the network cable (usually coming from the wall) and the Ethernet cables and other cables connected to devices such as repeaters, and routers, among others.
That is all you need to know about how to fix Wifi not working after macOS Ventura update. In the meantime, do not forget to check out How to Unsend an Email on macOS Ventura, and How to fix Bluetooth Mouse Lagging after macOS Ventura Update.