Your Oculus Quest/Quest 2 has many new games and apps available to download. You can either download apps on Oculus Quest 2 from the Quest Store or Sideload Apps on the headset. But, can you update an app manually on your VR? Last time, we helped you with our guide on How to Fix Error Code Notebook in Rec Room. One of the fixes for this error includes updating the Rec Room app on Oculus Quest 2. When there’s a newer version of Rec Room available to download, you can download it on your Oculus VR headset. In this guide, we will show you how to update Rec Room on Oculus Quest 2.
How to Update Rec Room App on Quest/Quest 2

The apps on your Oculus Quest are updated automatically when you keep it charged and connected to the internet. Usually, users do not have to worry about the updating processes. Therefore, if you haven’t disabled the auto-update feature, Rec Room will be updated automatically on your Oculus Quest 2. Just turn on your Oculus Quest 2 VR headset, connect it to the internet and keep it on standby. This will auto-update all the apps. Wait, are the apps on your Quest 2 not updating automatically? No problem, here are the solutions for the same:
Method 1: Factory Reset Oculus Quest 2
This may sound a bit too extreme just to update Rec Room on your VR but it is an important step. If the apps are not being updated automatically on your Oculus Quest 2, then it needs to be fixed, and what’s better than a complete factory reset for the purpose? But before formatting your VR headset, do not forget to backup its data. Here are the steps to enable cloud backup on Oculus Quest 2:
- Power On your Oculus Quest 2 and then put on your VR headset.
- Go to Settings > System > Backup.
- Make sure that the toggle bar next to ‘Cloud Backup’ is enabled.
Now, follow these steps to factory reset your Oculus Quest 2:
- Power off your Quest headset and put it on.
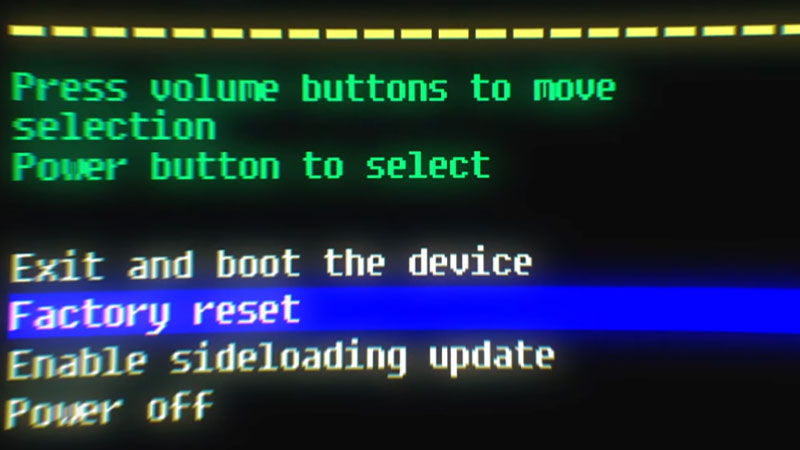
- Press and hold the ‘Power’ and ‘Volume’ buttons.
- Release the buttons when the boot screen loads.
![factory-reset-quest-2]()
- Navigate to ‘Factory Reset’ using the ‘Volume’ button.
- Press the ‘Power’ button to select ‘Factory Reset’.
![select-yes]()
- Again, highlight ‘Yes, erase and factory reset’ using the ‘Volume’ button.
- Press the ‘Power’ button to select it.

Once you factory reset your Oculus Quest 2, restore its backup. Any issue that prevented apps from updating automatically will now be fixed.
Method 2: Re-install Rec Room on Oculus Quest 2
Reinstalling the Rec Room app makes more sense as you can easily get the latest version again. Uninstall Rec Room on your VR and install it again from Rec Room’s official site or Quest Store. This will install the latest version of Rec Room on your Meta VR headset.
These are the ways to update Rec Room on Oculus Quest 2. Follow the methods explained in this guide and you can get the newest features from Rec Room easily. Here are some other guides on Oculus Quest VR that might be helpful for you: How to Sideload Apps and Games on the Oculus Quest and Quest 2 and How to Play Steam Games on Oculus Quest 2 Without a PC.