While browsing on Chromebook you might come across the contents that you might want to save for future use. The best way to capture and save content is by taking screenshots. However, new users may not know how to use this feature. Hence, to help you learn different ways of taking screenshots on Chromebook, this guide will help you.
Chromebook: How to Take a Screenshot
There are different ways to take a screenshot on Chromebook depending on what you want to capture. You can take Full-screen, Partial, and Window screenshots, and here’s how you can do it:
1. Full-screen screenshot
The full-screen screenshot will capture everything on your screen on your Chromebook, and you can do it by following these steps:
- Press the ‘Ctrl’ + ‘Show Windows’ keys on your keyboard, and a “your screenshot has been saved” notification will appear in the bottom-right corner of the screen.
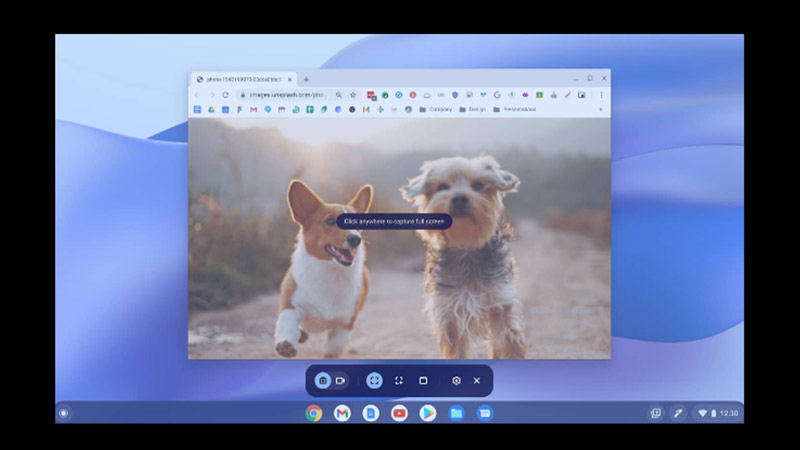
- Alternatively, you can go to ‘Quick Settings’, click the ‘Screen Capture’ button, and select the ‘Full Screen’ icon.
- Finally, click anywhere on the screen to take the screenshot.
2. Partial screenshot
If you want to select a specific area of your screen to capture, you can try taking a partial screenshot, and you can take it by following these steps:
- Press the ‘Ctrl’ + ‘Shift’ + ‘Show Windows’ keys on your keyboard.
- You will see a crosshair cursor that you can drag to select the area you want.
- Finally, click the ‘Capture’ button or press the ‘Enter’ key on your keyboard to take the screenshot.
- Alternatively, you can open the screen capture tool from ‘Quick Settings’ and select the ‘Partial screenshot’ icon.
- Then select the part of the Chromebook screen you want to take the screenshot and click the ‘Capture’ button.
3. Window screenshot
The Window screenshot will capture only the active window on your screen, such as a browser tab or an app, and you can do this by following these steps:
- Press the ‘Ctrl’ + ‘Alt’ + ‘Show Windows’ keys on your keyboard.
- You will see a list of windows that you can choose from.
- Then click on the window you want and press the ‘Enter’ key on your keyboard to take the screenshot.
- Alternatively, you can select the ‘Window’ icon from the ‘Screen Capture’ toolbar.
- Then select the window you want to capture and click the ‘Capture’ button to take a screenshot on your Chromebook.
After you take a screenshot, it will appear in the bottom-right corner of your screen that will be automatically copied to your clipboard. Also, you can find your screenshots in your ‘Downloads’ folder.
That’s everything covered on how to take a screenshot on Chromebook. Also, check out our other guides, such as How to connect Chromebook to a TV or How to rotate Chromebook Screen.