Since various services and applications on Windows 11 rely on the system time to work properly, your system clock needs to be synced according to your time zone. However, due to some technical glitch, the system clock may not sync properly on your Windows 11 desktop, and you can fix this issue with the help of this guide.
Windows 11: How to Sync Clock (2023)
You can sync your system clock on your Windows 11 desktop by following these workarounds:
1. Sync Clock from Date & Time Settings
Although your system clock syncs automatically but if these settings are off, you can Turn them ON by following these steps:
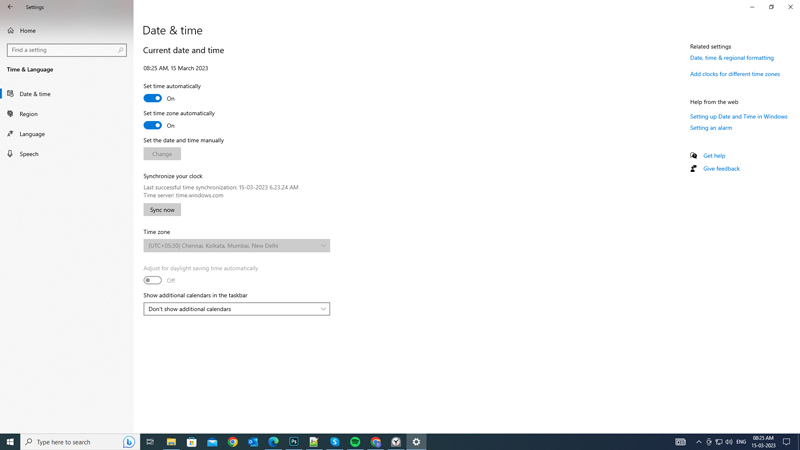
- Open the Settings app by searching it on the Start menu Search box or by pressing the ‘Windows’ + ‘I’ keys on your keyboard.
- Then, click the ‘Time & Lagugae’ tab from the Settings window.
- From the left panel, select the ‘Date & time’ tab.
- Now, turn on the ‘Set time automatically’ and ‘Set time zone automatically’ toggles.
- Finally, click the ‘Sync Now’ button below the ‘Synchronize your clock’ section.
- This will automatically sync your clock.
2. Sync Clock from the Control Panel
- Open Control Panel by searching it on the Start menu Search box, then click the ‘Clock and Region’ tab.
- Then, click the ‘Date and Time’ tab, and a new window will open.
- Here, select the ‘Internet Time’ tab, then click the ‘Change settings’ tab.
- Under the Internet Time Settings window, click the ‘Update Now’ button, then click the ‘OK’ button to save changes.
- Sometimes you might be asked for User Account Control (UAC) permission. In such cases, click the ‘Allow’ button on the prompt to give administrative access.
- The system clock will sync on your Windows 11 desktop.
3. Use the Command Prompt to Sync Time
Another swift way to sync your system clock is by running Command Prompt with administrative rights and typing the following commands:
net stop w32time
w32tm /unregister
w32tm /register
net start w32time
w32tm /resync
- Remember to press the ‘Enter’ key on your keyboard after typing each command, and after executing all the commands, restart your Windows 11 PC to sync time.
That’s everything covered on how to sync the clock on your Windows 11 desktop. Also, check out our other guides, such as How to show seconds in System Clock on Windows 10 or How to display clock on all monitors on Windows 11.