Sometimes you would like to live in a quiet moment, and at that time notifications, calls, messages, etc. are not always a good and right thing. Thankfully, there is an option on iOS and macOS devices that offers it users the Do Not Disturb (DND) function. But do you really know how to use it? Well, if you don’t know, you have come to the right place. In this guide, I will show you how to use the Do Not Disturb feature on iPhone, iPad, and Mac.
How to Schedule Do Not Disturb on iPhone and iPad
On your iPhone and iPad, you can easily program or schedule a specific period of time during which you will not receive any message, phone call, or notification. You can find the Do Not Disturb feature on iPhone and iPad inside the new Focus option. The location of this DND feature was changed in the latest update of iOS 15.
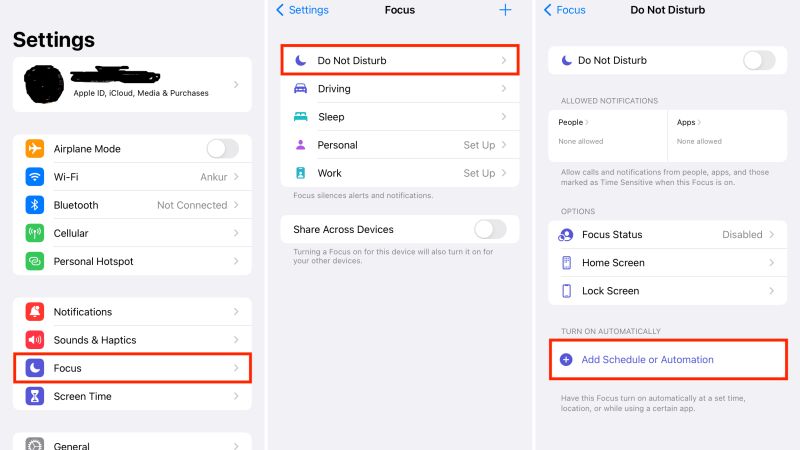
Following are the steps to schedule Do Not Disturb on iPhone and iPad:
- On your iPhone or iPad, launch Settings.
- After that scroll below and navigate to Focus.
- Under Focus, click on Do Not Disturb.
- Under Do Not Disturb, tap on Add Schedule or Automation option which is located at the bottom.
- Under New Automation, you have to select Time, Location, or App for starting Do Not Disturb.
- Now you have to set the time values of From and To and ensure to properly enter AM and PM.
- Finally, select Done to schedule DND mode on your iPhone and iPad.
How to Schedule Do Not Disturb on Mac Monterey
Now, if you want to enable Do Not Disturb on your Mac computer, there are several ways to do that. You can do this from the Notification Center with widgets, notification, and DND switch. You can also use a hotkey or even schedule DND for your preferred time.
Following are the steps to schedule Do Not Disturb on Mac Monterey:
- First of all, click on the Apple icon which is located at the top left corner.
- After that go to System Preferences.
- Now you have to click on Notifications & Focus.
- Click on the Focus tab at the top.
- Now you need to select Do Not Disturb which is at the left sidebar.
- On the right side, you will see an option of Turn On Automatically, here you have to click the “+” icon.
- Here you will get the option of “Add time-based automation”, “Add location-based automation”, and “Add app-based automation”.
- Finally, just set the time, location, or app and then tap Add to set up Do Not Disturb on your Mac computer.
That is everything you need to know about how to schedule Do Not Disturb on iPhone, iPad, and Mac. While you are here, you might be also interested to know How to Enable Do Not Disturb on Samsung Galaxy smartphone, and How to Make Folders on iPhone.