Partitioning the hard drive on your Windows 11 laptop can be a lifesaver. While parting a hard drive into smaller sections is not that common of a process, it can do many things for you. You can divide the overall storage space on a Windows 11 hard drive for storing various files such as your games and apps in one section, while the Windows OS files in another. If you ever need to reset your Windows 11 laptop, all of your files and apps will be safe as you will just have to delete the system files in a different part of the hard disk. We will talk about all these benefits in this guide on how to create a laptop hard drive partition on Windows 11.
How to Partition Windows 11 Laptop Hard Drive?
You can partition a Windows 11 Laptop hard drive by following the steps mentioned below:
Part 1: Create Unallocated Space on Windows 11 Hard Drive
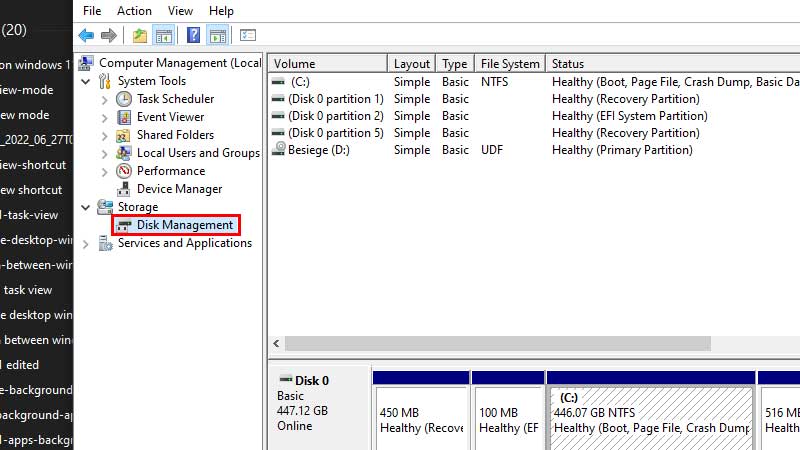
- Search ‘disk partition’ in the Start Menu and open the ‘Create and format hard disk partitions’ setting from the search results.
Or, right-click ‘This PC’ on the desktop, and go to Manage > Disk Management.
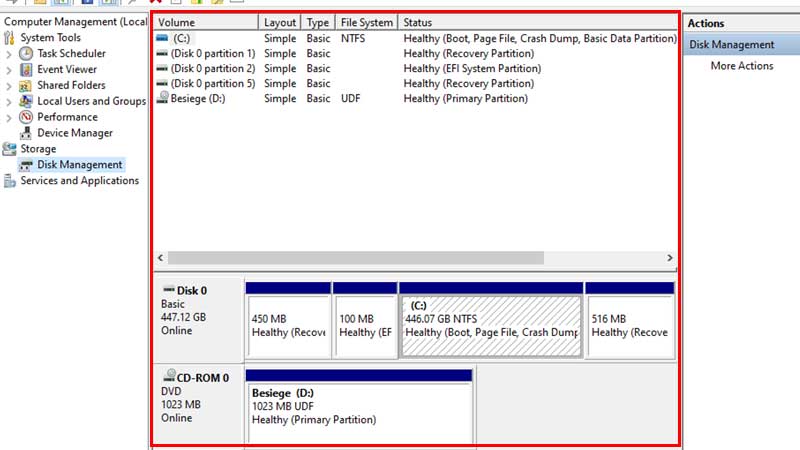
- Click the hard drive that needs to be partitioned.
- At the bottom pane, you will see the hard disk space as a whole or in partitions (if it has been divided earlier).

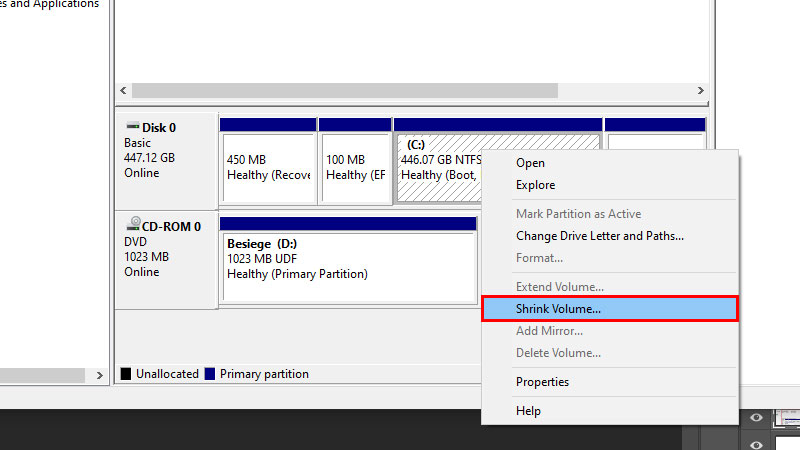
- Right-click the empty space on your Windows 11 laptop’s hard drive.
- Select ‘Shrink Volume’.

- Select the size that you need to shrink on your Windows 11 laptop.
- Click ‘Shrink’.
Complete this process to create unallocated space on the hard disk to partition it.
Part 2: Partition Windows 11 Laptop Hard Drive
- Right-click the unallocated space that you created earlier.
- Click the ‘New Simple Volume’ option.
- This will open the ‘New Simple Volume’ Wizard.
- Click Next > Next > Next.
- Change the name of the new drive section from the ‘Volume label’ field. (Optional)
- Click Next > Finish.
That’s it! This is how you can partition Windows 11 laptop hard drive.
Should I Partition My Windows 11 Hard Drive?
You can partition a hard drive without a second thought if it has enough storage. As we have mentioned in our guide on How Much Space Does Windows 11 Take, your system needs at least 120-150 GB of free storage to run smoothly. So, if the space on your hard drive is less than 500 GB, do not partition it. But it’s a good idea to partition Windows 11 hard drive if the storage is more than 500 GB.
If your Windows 11 system runs slowly because of the apps or files that you have installed, you can simply move them to other parts of the storage. This will enhance the performance of your Windows 11 device’s UI.
So, that is all you need to know about how to partition Laptop hard drive on Windows 11. Here are some more of our guides related to Windows storage: How to Enable or Disable Reserved Storage in Windows 11 and How to Delete Temporary Files in Windows 11.
