The hosts file which is already available on your computer is basically used to lookup or resolve domain names to an IP address. It is a small text document that helps to map host names to a specified IP address. The hosts file also lets you to block access to a site by pointing to an unused or internal IP address. In this tutorial, we will learn how to edit the hosts file on a Mac computer.
How to Edit Hosts File on a Mac Computer
Do you want to edit the hosts file on a Mac? In this article, you will find out how to edit the hosts file in Mac operating system. The changes made in the hosts file have priority over the DNS pointers, and therefore they are exactly right for us because they simulate a different pointing only on the computer on which they are performed, while all the others will continue to normally view the site hosted by the old one.
For Mac OSX systems it is possible to change the pointing of a domain to an IP address of our choice, different from the real one, and this allows us to do all the installations and tests on a specific already existing domain. Editing the hosts file on Mac OS X 10.2 and later is very simple, but needs to be done via the terminal. Follow the steps given below to edit the hosts file in Mac:
- First, you need to open Terminal on Mac. To do that, type Terminal on Spotlight or enter Application > Utilities > Terminal.
- Type the following command in Terminal to open the hosts file:
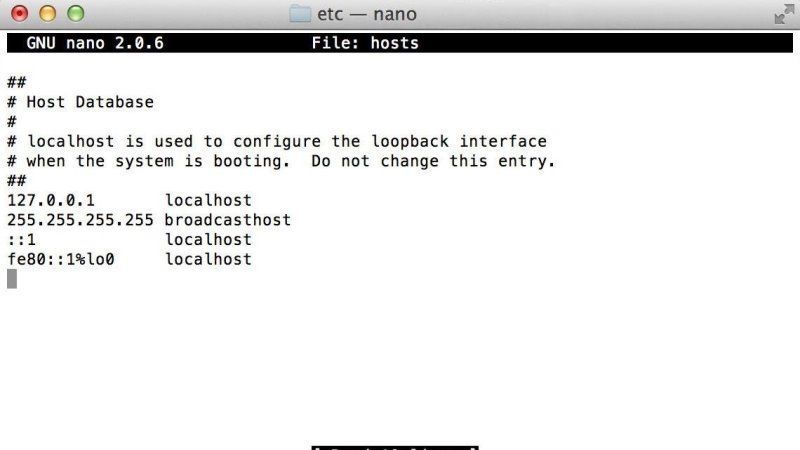
sudo nano /private/etc/hosts - You will be prompted to enter your Mac’s administrator password. Note that the cursor will not move when writing the password. This is perfectly normal, then just hit the Enter key when done.
- After that you need to edit the hosts file by inserting these two lines at the end of the file:
SERVER_IP_ADDRESS domain.com
SERVER_IP_ADDRESS www.domain.com
Replace SERVER_IP_ADDRESS with the IP that is associated with your hosting plan. Replace domain.com with the domain you want to create the dummy pointing to.
For example:
223.229.251.12 domain.com
223.229.251.12 www.domain.com
Also, you need to make sure there is at least one space between the IP and the domain. - Now you need to save the changes by pressing Control+O on the keyboard and then Enter to accept the file name. Close the editor with Control+X. This will take you back to the Terminal screen.
- At this point, it is best to clear the DNS cache of your Mac so that the domain tracking is updated immediately. To do this copy this command:
dscacheutil -flushcache
(precede the command with sudo in case it is needed again) - Finally, the editing of the hosts file on your Mac is now complete and you should be able to immediately view the contents of your hosting plan associated with this domain.
That is everything you need to know about how to edit hosts file on a Mac computer. While you are here, do not forget to check out our other Mac Guides on how to reduce PDF file size on Mac, and how to enable cookies on Safari in Mac.