PDF files are very useful since they allow you to send documents formatted exactly as they were designed, allowing those who receive them to read them perfectly and with additional advantages such as the ability to protect images and texts from unauthorized copies. Now, there are some instances where you want to upload a PDF file on some website for verification, and because of its huge file size, you are not able to upload it. In this case, you would want to reduce its file size but don’t know how to do that on a Mac computer. So, in this guide, I will explain how you can reduce the PDF file size on your Mac computer.
How to Reduce PDF File Size on a Mac Computer
It is very simple to create PDF files, especially from a Mac that supports this format directly in the operating system (from any application that allows you to print, you can export a PDF file). Now, if you are looking to reduce the PDF file size on your Mac computer, you can use ColorSync Utility to do so and apply it in Preview.
Here are the instructions on how to proceed and reduce PDF file size on a Mac computer:
- Open the ColorSync Utility application.
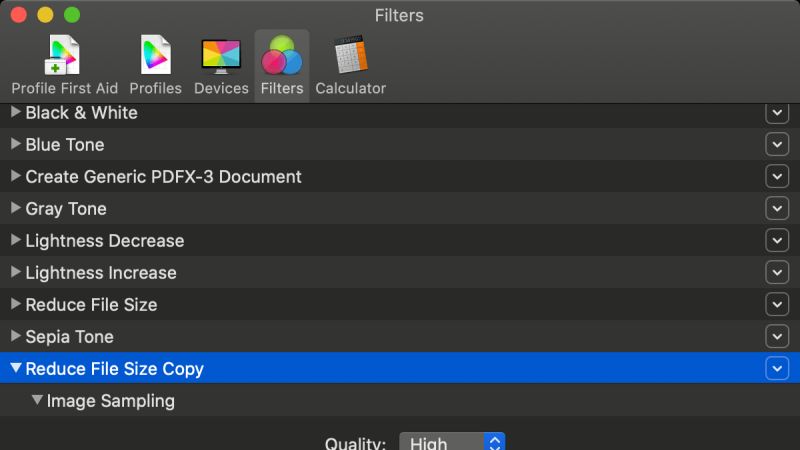
- Select the item “Filters” in the toolbar.
- Select the “Reduce File Size” item, click on the triangle to the right of the item and choose “Duplicate filter”
- Double click on the created filter to assign a new name and call it, for example, “PDF Reduction.”
- Now you need to change the parameters of the filter you just created. Click on the triangle to the left of the word “PDF Reduction”. You will see two options: “Image Sampling” and “Image Compression”. Delete the first line (just click on the “x” to the right of the name)
- At this point, the “Image Compression” option remains. Click on the triangle to the left of this name to show the compression options, move the quality slider to the intermediate position before the maximum. This is the option that normally allows you to reduce images without impacting too much on quality.
- You can close the window. The filter will now be available at any time without having to recreate it from scratch.
- To compress a file, just drag a PDF to be compressed into the “ColorSync Utility” or choose the “Open” item from the “File” menu.
- In the window that appears with the PDF, just click “Filter” in the bottom menu, choose “PDF Reduction”, click “Apply” and wait a few seconds.
- The overall size of the file will be compressed.
- To save the new compressed file just choose “Save” from the File menu.
The overall reduction that can be achieved depends on various factors, including of course the resolution of the images embedded in the original PDF. In the case of PDF documents with very heavy images, compression can be as high as 70%.
That is everything you need to know about how to reduce PDF files on a Mac computer. Also, do not forget to check out how to change the default PDF Reader on Mac, and how to share Apple Music Playlist with Friends on Mac.