
Instagram nowadays has been facing a variety of errors. These include issues like “Instagram not logging in error”, “Instagram Stories Not Working” and many more. One of the most recent issues that users have faced is the “Couldn’t Refresh Feed” error where they are not able to watch feeds on Instagram. There may be several reasons for this issue like unstable internet connection, corrupted cache, Instagram app is not updated, etc. So, how can you fix the Instagram feed related error? Check out our guide below to find out the ways.
Ways to Fix Instagram “Couldn’t Refresh Feed” Error
The Instagram “Couldn’t Refresh Feed” error can be pretty annoying and frustrating for users. Thus, we have brought the various ways to fix this error. So, go ahead and check out how to eliminate the problem.
1. Check your Internet Connection
First and foremost, users must check if they have a stable internet connection. Check if their mobile data or WI-FI network has the speed required to run Instagram efficiently. If there are any problems contact your internet service provider to fix the issue and check if the error is fixed.
2. Update Instagram
If your internet connection is stable then check if any updates are pending for the Instagram app. Having an outdated Instagram version can also result in experiencing the “Couldn’t Refresh Error”. Updating the app can remove the bugs that may be causing this error. The steps to update the Instagram app are pretty simple on iOS and Android devices. Here are the steps.
For iOS
- Open the App Store on your iOS device.
- Then, type Instagram in the search bar.
- Now, check if any update is pending for the app. Update if you find any.
For Android
- Open the Google Play Store on your Android smartphone.
- Search for Instagram in the search bar.
- Check for any pending updates and update the app if it’s outdated.
3. Clear the cache of your Phone
If you have the latest update of the app but you are still facing the Instagram “Couldn’t Refresh Feed” error then try clearing your cache data. Cache data is stored by apps to improve the overall experience. However, having a corrupted cache can result in various types of errors. Hence, it is suggested to clear your Instagram cache to fix this error. Here are the steps to clear cache data on your iOS and Android devices.
For iOS
However, the iPhone does not have the feature to clear cache data. iOS users can clear their cache by offloading the Instagram app.
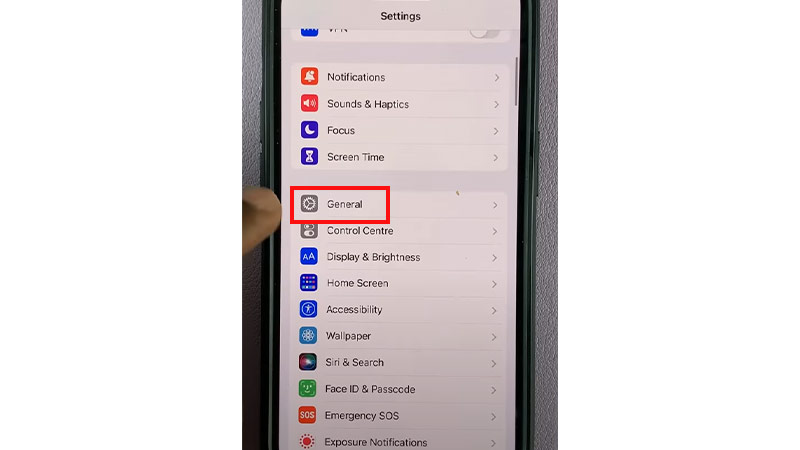
- Go to Settings.
- Tap on General.
- Then, tap on iPhone Storage.
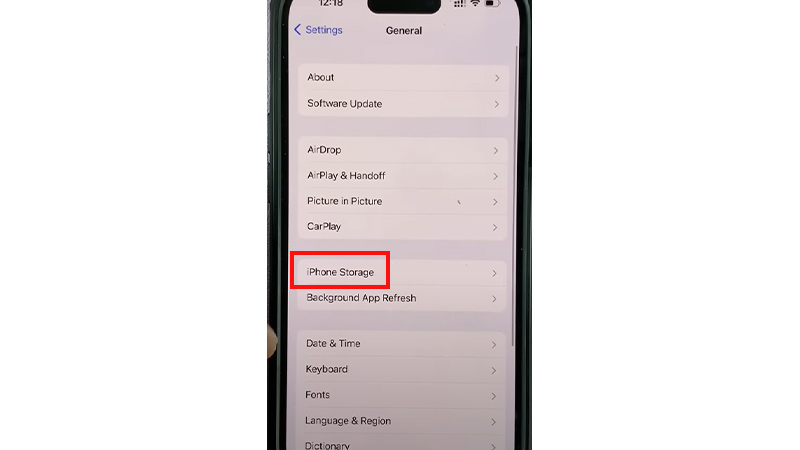
- Find the Instagram app and tap on it.
- Then, Tap on Offload App.
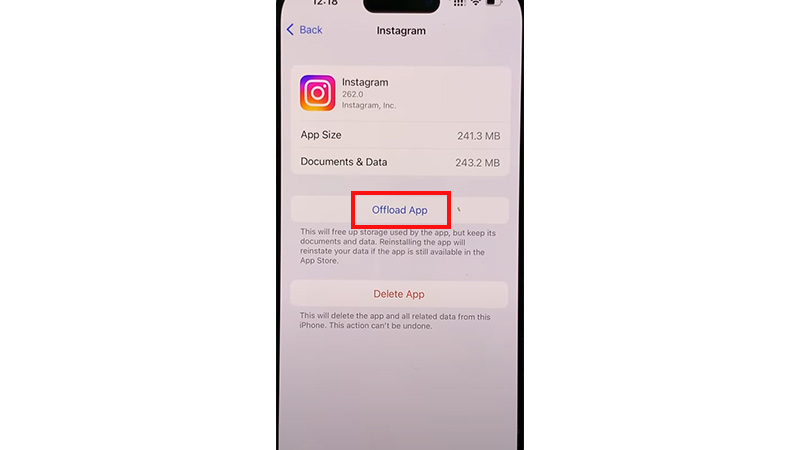
- Tap Offload App again on the confirmation pop-up.
Now, after you offloaded the app tap on the Reinstall App option and present the same position where the Offload App option was located. The newly downloaded app will have the cache data deleted.
For Android
- Open Settings.
- Then, tap on the Apps panel.
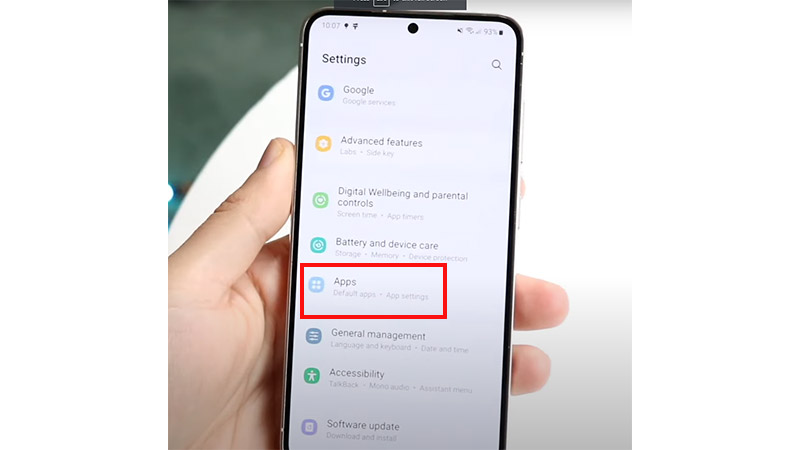
- Scroll down and tap on Instagram.
- Then, tap on the Storage option.
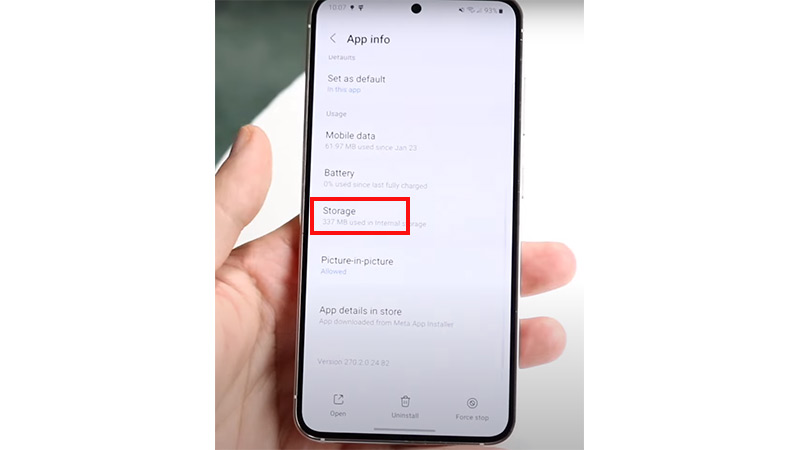
- Tap on the Clear cache option.
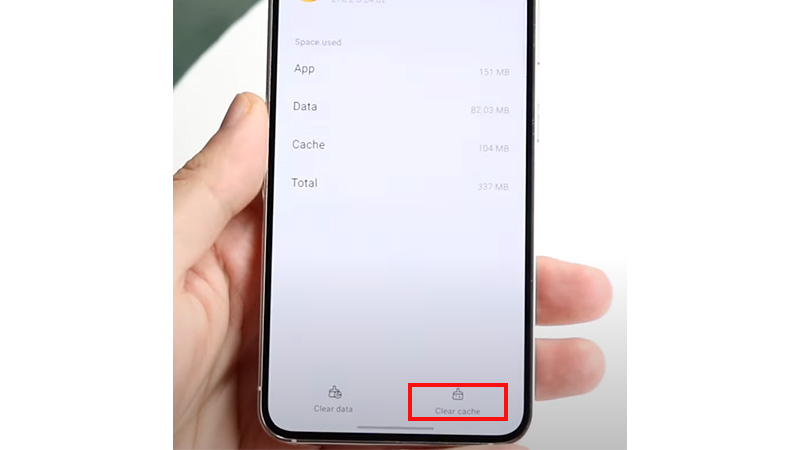
After clearing cache data open the Instagram app and check if the problem still exists.
4. Delete and Reinstall the Instagram App
Many users have reported that deleting and then reinstalling the app has been a good method to get rid of the Instagram “Couldn’t Refresh Feed” error. The steps to delete them are pretty simple and the same for both Android and iPhone.
- Find the Instagram app on your phone.
- Press and hold on to the app.
- A set of options will appear on the screen.
- Tap on the Uninstall/Remove App option.
- Now, go to Google Play Store or App Store depending on your device.
- Search for Instagram in the search bar.
- Then, tap on Install.
5. Contact Instagram Support
If none of the above methods work for you then the only option left is to contact Instagram support. Follow the steps to contact Instagram support.
- Launch the Instagram app on your mobile.
- Then, tap on the Profile icon located at the bottom right corner.
- Tap on the three lines at your screen’s top right corner.
- Select Settings.
- Press on the Report a Problem option.
- Then, follow the on-screen instructions to report the issue.
That’s it, these were the ways to fix Instagram’s “Couldn’t Refresh Feed” error. Hope you found this guide of some help. If you liked this guide then check out our other articles dedicated to Instagram like How to Turn ON/Off Sound on Instagram Stories? and How to Fix Instagram Keeps Logging Out Issue only on TechnClub.