The fixboot and boot recovery utilities on your Windows desktop help to create a new compatible boot sector on your System’s partition. This is helpful especially when you want to replace the damaged boot sector. Although sometimes users experience the ‘bootrec /fixboot access is denied‘ error on Windows. This error can be easily fixed, and this guide has some tips and tricks to help you with the same.
Fix: Windows ‘bootrec /fixboot access is denied’ Error (2023)
To fix the Windows ‘bootrec /fixboot access is denied’ error, here are two essential methods mentioned below:
Method 1: Recreate EFI Partition
You can recreate the EFI partition to fix the ‘bootrec /fixboot access is denied’ error on Windows in three steps:
- Boot into Windows Recovery Environment
- Find EFI Partition (Extensible Firmware Interface)
- Assign the Volume for EFI
1. Boot into Windows Recovery Environment
- Insert your Windows installation media (e.g., USB drive or DVD) into your computer and restart the system.
- Open the Boot menu by restarting your Windows desktop by pressing the Boot key, which is different for different motherboard manufacturers.
- Once the Windows installation screen appears, click on the ‘Next’ option.
- Click on the ‘Repair your computer’ button on the screen.
- Select the ‘Troubleshoot’ option and then click on the ‘Advanced options’ button from the screen.
- Click on the ‘Command Prompt’ to access the Windows Recovery Environment.
2. Find EFI Partition
- Type ‘diskpart’ without quotes on the Command Prompt screen and press the ‘Enter’ key to perform the function.
- The ‘diskpart’ prompt will open.
- Here, type ‘list disk’ without quotes and press the ‘Enter’ key on your keyboard.
- Note down the list of disks and their respective numbers.
- Now type the following command in the Command Prompt:
sel disk X
- Note that you need to replace ‘X’ with the actual disk name of the Boot Drive.
- Type ‘list vol’ without quotes.
- The list of all volumes in the selected partition drive will be shown.
- Note down the volume numbers and their respective letters.
- Now type ‘select volume X’ without quotes. Also, note that you need to replace the letter ‘X’ with a drive letter that indicates your EFI partition.
- EFI partitions will be in the FAT32 file system format, which must be easy to identify.
3. Assign the Volume for EFI (Extensible Firmware Interface)
- Type the following command:
assign letter=X:
- Again here ‘X’ represents a letter, it can be any letter even ‘X’ as per your wish. The only condition is that the assigned letter must not be previously assigned to any Volume disk on your system.
- Now exit the diskpart by typing ‘exit’ without quotes and pressing the Enter key on your Windows desktop.
- On the Command Prompt, type the following command and press the ‘Enter’ key from the keyboard:
bcdboot C:\windows /s X: /f UEFI
Note that here ‘X’ represents the assigned EFI partition’s volume letter.
- Type ‘exit’ without quotes on your Command Prompt and press the ‘Enter’ key on your keyboard to execute the command.
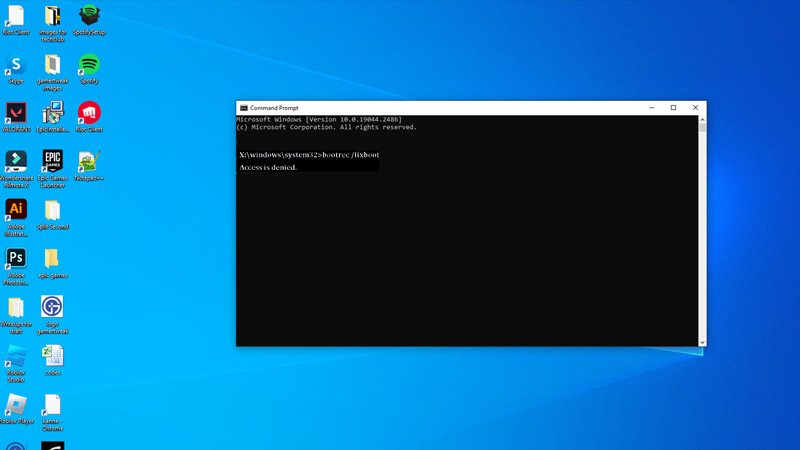
- Now restart and try to run the fixboot command on the Command Prompt with administrative rights to see if the ‘bootrec /fixboot access is denied’ error is fixed.
Method 2: Rebuild the BCD Store
- Type the following command in the Command Prompt and press the ‘Enter’ key from your keyboard:
bootrec /fixmbr
This will repair the Master Boot Record (MBR)
- Then type the following command and press the ‘Enter’ key from your keyboard:
bootrec /fixboot
The following command will repair the boot sector
- Now type the following command and press the ‘Enter’ key from your keyboard:
bootrec /scanos
This will scan for installed operating systems and add them to the boot menu.
- Now type the following command and press the ‘Enter’ key from your keyboard:
bcdedit /export c:\bcdbackup
The following command will back up the current BCD store.
- Type the following command and press the ‘Enter’ key from your keyboard:
bcdedit /import c:\bcdbackup
This will restore the BCD store.
- Now type ‘exit’ without quotes and press the ‘Enter’ key on your keyboard to close the Command Prompt.
- Restart your system to fix the ‘bootrec /fixboot access is denied’ error.
With this, the errors should be fixed, but if the issue persists, you may want to consider reinstalling Windows or seek further assistance from a professional.
That’s everything covered on how to fix the ‘bootrec /fixboot access is denied’ error on your Windows desktop. Also, check out our other guides, such as How to fix DISM error 87 on Windows 10/11 or How to fix the dual Boot option not showing in Windows 10/11.