
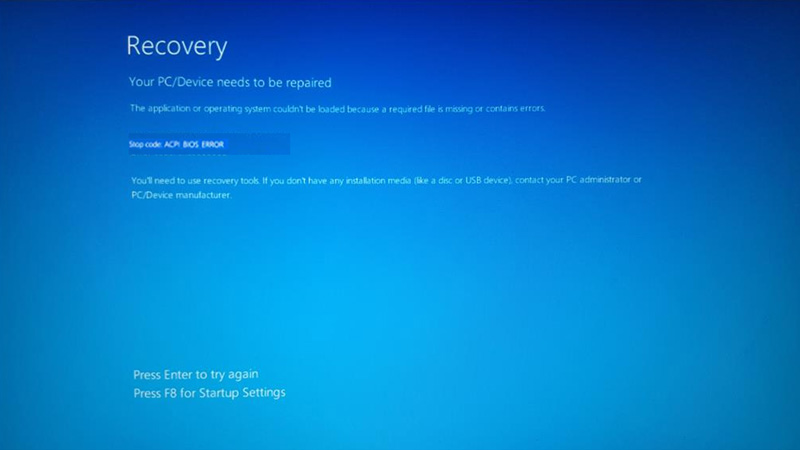
The Advanced Configuration and Power Interface (ACPI) is an open standard used by operating systems to control the power consumption of a desktop. But when you change the BIOS configuration, or the system drivers are outdated, you can see an ‘ACPI BIOS Error’ on Windows. This is a BIOS error, and it’s unlike other common BSOD errors, such as an Inaccessible boot device error on a Windows desktop. When your system encounters an ‘ACPI BIOS error‘ the system automatically reboots without letting you access the troubleshooting. If you are facing this error, you can fix it with the help of this guide.
Fix: Windows ‘ACPI BIOS Error’ (2023)
If you are facing the ‘ACPI BIOS Error’ on your Windows desktop, then the following reasons are responsible for the error:
- Outdated BIOS firmware or System drivers
- System Configuration is improper
- Modified BIOS setup configuration
- Corrupted Windows registry files
Hence, you can fix this BIOS error by following the workaround given below:
1. Update BIOS
Since different motherboard manufacturers have their own unique workarounds to Update the BIOS firmware to fix the ‘ACPI BIOS Error’, here are some general steps to follow:
- Restart your Windows desktop and go to the website of your Motherboard manufacturer.
- Follow the instructions mentioned on the website and download the latest BIOS firmware.
- Now restart your desktop to fix the BIOS error.
2. Update System drivers to fix the ‘ACPI BIOS Error’
- Boot your Windows desktop on the ‘Safe’ mode from recovery mode by going to Troubleshoot > Advanced options > Startup Settings > Enable Safe Mode > Restart.
- Now right-click on the ‘Start’ icon. A menu will open.
- From the menu, select the ‘Device Manager’ option.
- Now double-click on the driver you want to update.
- From the properties window, select the ‘Driver’ tab.
- Now click on the ‘Update driver’ button.
- Click the ‘Search automatically for drivers’ option from the prompt window.
- The driver will be updated automatically.
- Now restart your Windows desktop to fix the BIOS error.
3. Change AHCI Mode to IDE
Even though ‘The Advanced Host Controller Interface (AHCI)’ allows high throughput when reading or writing data, it can be the reason to cause ACPI BIOS errors. You can easily fix this by changing the AHCI Mode to other standard modes like IDE or SATA from the BIOS setup, and you can do it by following these steps below:
- Restart your PC and enter the BIOS mode by pressing the BIOS key on your keyboard.
- Now navigate to the ‘Integrated Peripheral’ settings or the ‘Storage options’ settings on the advanced BIOS settings menu.
- Below the ‘SATA Configuration’ settings, you will find the configuration setting with ‘AHCI‘ mode.
- Change it using arrow keys to IDE.
- Press the ‘F10’ key and press ‘Y’ to save and exit the BIOS menu.
- Restart your Windows desktop to fix the BIOS error.
That’s everything covered on how to fix the ‘ACPI BIOS Error’ on Windows. Also, check out our guides, such as How to fix error code 0xc000000e on Windows or How to fix the PNP detected a fatal error on Windows.