")
For advanced security that restricts your Windows desktop from booting to untrusted malicious drives, enabling Secure Boot is essential. When you upgrade to Windows 11 from Windows 10, some system requirements become mandatory. As these features might be new even for veteran Microsoft users, this guide will help you to enable Secure Boot on Windows 11.
Windows 11: How to Enable Secure Boot (2023)
To Enable Secure Boot on your Windows 11 desktop, follow these steps:
- Open Settings on your Windows 11 desktop by pressing the ‘Win’ + ‘I’ keys on your keyboard.
- Now open the ‘Updates and Security’ tab from the list.
- From the left panel, select the ‘Recovery’ option and select ‘Restart now’ under the Advanced startup section.
- Your system will restart now, and on a new screen, a few option tabs will open.
- Select the ‘Troubleshoot’ tab and go to the ‘Advanced options’ tab.
- Select ‘UEFI Firmware Settings’ and select the ‘Restart’ option.
- On the new window, go to the ‘Boot’, ‘Security’, or ‘Advanced’ sections as per the Motherboard manufacturer’s layout.
- Using the arrow keys, go to ‘Secure Boot’ and select the ‘Enable’ option, and press the ‘Enter’ key on your keyboard.
- On some computers, you will need to set the password from the ‘Security’ tab to access the ‘Secure Boot’ option.
- Note down the password somewhere, as you will need to enter it the next time to access BIOS mode.
- Now ‘Save and Exit’ the BIOS mode and restart your PC to enable Secure Boot.
How to Check if Secure Boot is On
To check if Secure Boot is on, follow these steps:
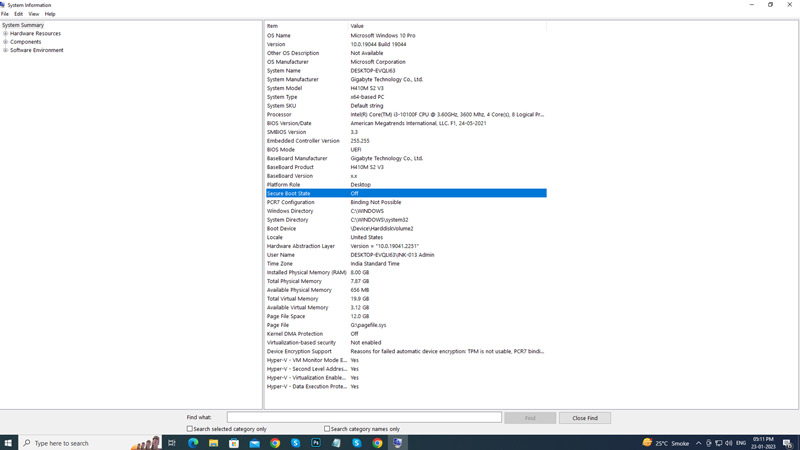
- On your ‘Start’ menu’s search box, type ‘System Information’ without quotes and open the tab with the same name.
- Select ‘System Summary’ from the left panel.
- Now scroll and search for the Secure Boot State option from the list and right next to it see if ‘On’ is written to know if the feature is enabled.
Apart from System Boot for updating Windows 11, you will need to enable TPM 2.0, and as a pre-requisite requirement, the BOIS mode should be on UEFI mode. If you cannot turn on Secure Boot on your desktop, the only reason would be the ‘Legacy’ BIOS or ‘CSM’ mode being enabled.
That’s everything covered on how to enable Secure Boot on Windows 11. Also, interfering with BOIS can lead to errors, like the ‘Trusted Platform Module has malfunctioned’ error on your Windows 11 desktop or Dump File Creation failed due to an error in the creation of Dump File’ on Windows 11, so check out our guides that will help you to fix them.