DNS is basically called Domain Name System which is a technology used to power the web. The DNS server is used to make the link between a domain name and the IP address of a server connected to the Internet. Usually, you are assigned by a default DNS server provided by the ISP on your different devices whether it is a computer or an Android mobile phone. Sometimes this DNS server will be slower compared to other third-party DNS providers like Google DNS, for example. Therefore, in this guide, I will teach you how to change the DNS setting on your Android phone to Google DNS.
How to Change Your Android Phone DNS Server to Google DNS
If you are using an Android phone or tablet, you can easily change their DNS server if they are connected to a WLAN network. To get started, follow the steps given below:
- First of all, on your Android phone launch the Settings menu.
- After that go to WiFi.
- Now, press and hold the WiFi network to open the WiFi settings.
- After that tap on Modify Network.
- You will now come across two options: Show Password, and Show Advanced Options.
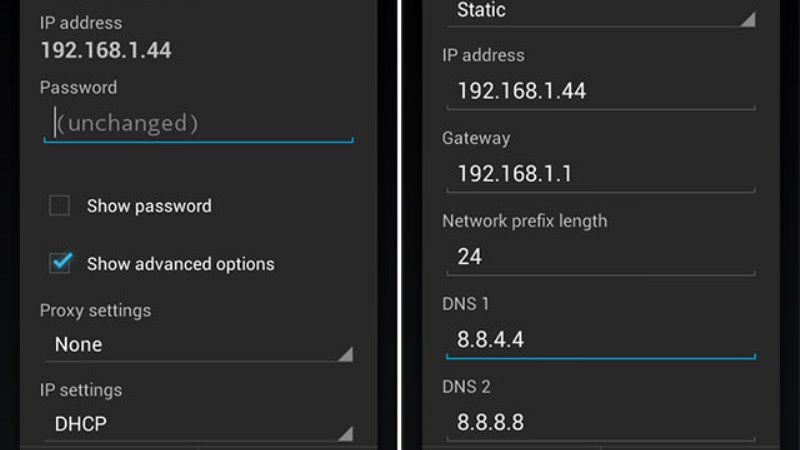
- Here, you need to press on the second option called Show advanced options.
- Search for the IP Settings option. It should be set to DHCP by default, so what you need to do here is that tap on that and select the Static option.
- After that scroll down a bit and you will see the IP address, Gateway, etc. Here you just need to fill all the details in the same area with the required information.
- Again, scroll down a bit and enter these Google DNS addresses:
DNS 1: 8.8.8.8
DNS 2: 8.8.4.4 - Finally, click on Save and exit to go to the home screen. This way you have now changed the default DNS server on your Android phone to Google DNS.
Now, all you need to do is just open the web browser (Google Chrome) on your Android phone and surf the Internet, and enjoy the boost. You will notice that both the video content and web pages will be loading faster now. This will help you to enjoy smoother surfing on the internet now.
That is everything you need to know about how to change your Android phone DNS server to Google DNS. While you are here, you might be also interested to know How to change DNS on Windows 11, and How to Speed Up Your Internet Connection.