Apple iPhone has several unique features that make it different from other smartphones. It can be anything from Siri to Focus mode and Sleep mode. One of these unique features Apple is giving to its users on the iPhone is AssistiveTouch. For users who are new to the Apple ecosystem and don’t know what is AssistiveTouch and also don’t know how to use it, then don’t worry we have got you covered in this guide on how to use AssistiveTouch on iPhone and iPad.
Steps to Use AssistiveTouch on iPhone and iPad
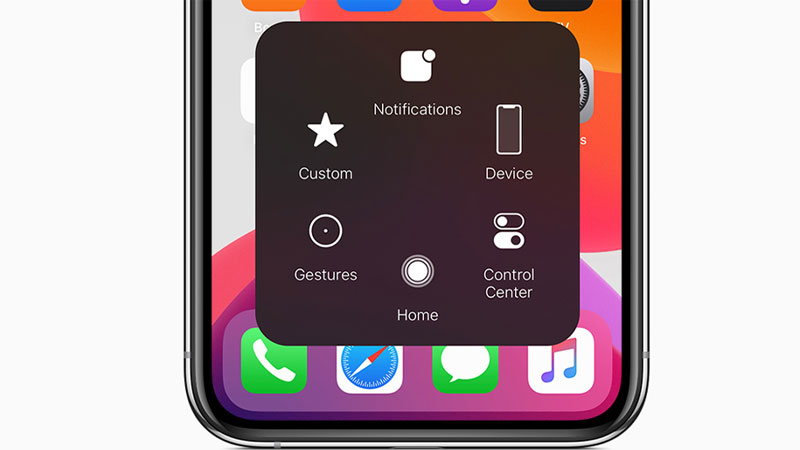
AssistiveTouch is a feature that allows you to access some features like the control center, Siri, and many more from a small circle (button) available on your iPhone screen. If you don’t have that AssistiveTouch button on your iPhone and iPad then you can enable it by following these simple steps.
- First of all, open the “Settings” app.
- In the “Settings” menu, tap on the “Accessibility” option.
- In the next window, scroll down and select “Touch”.
- In the “Touch” menu, tap on the “AssistiveTouch” option.
- In the next tab, toggle the switch next to “AssistiveTouch” to enable the button on your screen.
After this, you will see a small button on your iPhone screen. Now tap on it to enlarge the options available. The default options available are Notification Center, Device, Control Center, Home, Siri, and Custom mode. You can quickly access these features from AssistiveTouch on your iPhone and iPad. You can also drag the button anywhere on your screen by simply using the press and drag method. You can customize the options by following these simple workarounds.
- Open the “Settings” app and go to the “Accessibility” option.
- In the “Accessibility” menu tap on the “Touch”.
- In the next window, tap on the “Customize Top Level Menu”.
- In the next window, tap on the “Plus” sign to add a box to the menu.
- Now, tap on the “Plus” button in the box to add a feature.
- Now, select any feature that is available in the list in the next tab and tap on “Done” to confirm the addition.
With this, you have customized your AssistiveTouch on your iPhone and iPad. You can also set gestures by clicking on one of the three options available under the “Custom Actions” section. You can also create your own gestures by choosing the “Create New Gestures” section. You can adjust the transparency of AssistiveTouch by clicking on the “Idle Opacity” option. These methods are the same for iPads.
This is all you need to know on how to use AssistiveTouch on iPhone and iPad. If you are sharing your iPhone or iPad with someone and don’t want them to access some apps installed on your iPhone and iPad, then here is a guide on How to Hide an App on Your iPhone or iPad.