
There are many Steam Deck gaming console users with only 64GB storage space who would like to know how to expand their SSD so that they can install as many games as possible. This handheld gaming console, halfway between the portable console and the PC, allows you to take your Steam games library to play everywhere, and its Linux SteamOS operating system makes it truly versatile. But did you know that it is possible to upgrade SSD yourself in order to increase the storage capacity of the Steam Deck? In this guide, we are going to perform the operation in this article, follow read the full steps given below.
How to Upgrade Steam Deck SSD Storage (2023)
The Steam Deck is available in 3 versions: 64 GB, 256 GB, and 512 GB and the prices are respectively $359, $476, and $584. Upgrading the SSD saves money, in fact, you can find a 256 GB SSD for around $30, a 512 GB for around $70, and a 1 TB version for $170 approximately. Here are the compatible SSDs for Steam Deck:
- NVMe 2230 256GB SSD
- NVMe 2230 512GB SSD
- NVMe 2230 1TB SSD
By installing an SSD in a 64 GB Steam Deck, you are not only saving money by giving but also expanding the storage space at a cheaper rate. The operation is really interesting since it makes it possible to obtain a higher capacity of storage space for less price.
Be careful when selecting your SSD, as they must be specifically NVMe type, and in 2230 format (22mm wide and 30mm long). Longer SSDs, like the 2242 for example, are strongly not compatible. Indeed, even if the assembly is physically possible, they consume and heat more and their use could significantly reduce the life of the console.
Steam Deck upgrade: Precautions
Disclaimer: Any kind of opening or modification of the Steam Deck will not be supported by the manufacturer and the guarantee/warranty will be void. If you choose to disassemble your Steam Deck, you do so at your own risk.
If you have recently purchased your Steam Deck, it is always good to turn it on for the first time before the upgrade to check that the screen is fully functional and does not show any defects such as dead pixels, for example. Once this is done, turn off the console before starting to disassemble it.
Also, be careful not to try to remove the shell if a micro SD card is inserted in the slot provided for this purpose, it must be removed before dismantling.
Necessary Tools to Disassemble Steam Deck
To perform the disassembly of the Steam Deck, you can use the following equipment:
Tivoly Technic smartphone and tablet dismantling box (this box also contains Tri-wing bits, suitable for dismantling a Nintendo Switch)
Plastic wedges for opening smartphones.
Check that your screwdriver has a good grip on the Phillips screws because the shape of the recess is a bit unusual and forcing it with a bad bit could round them. The yellow tips of the Tivoly box are perfectly adapted. If you don’t have a small plastic wedge, an old bank card or an equivalent plastic card will do.
Steam Deck Upgrade: Disassembly
- First, you need to switch off the Steam Deck, then turn it over. It will need to be placed on a suitable surface, such as a cloth or bubble wrap.
- After that remove the 8 Phillips screws that hold the hull from the back. The screws on the sides are longer, and those in the center are shorter, remember their positioning during reassembly.
- Once the screws have been removed, the shell must be unclipped. To do this, start with the upper part, gently pulling it apart with the appropriate tool.
- Then use the tool to unclip by advancing gently all around the hull, then the hull will separate. You can then access the interior of the Steam Deck.
- Now you can use small pliers to lightly peel off the adhesive on the metal cover.
- The adhesive must not be removed, when reassembling it is important to put it back on because it is used to maintain the flow of air from the fan inside the cover.
- You can then remove the 3 screws that hold the cover and remove it.
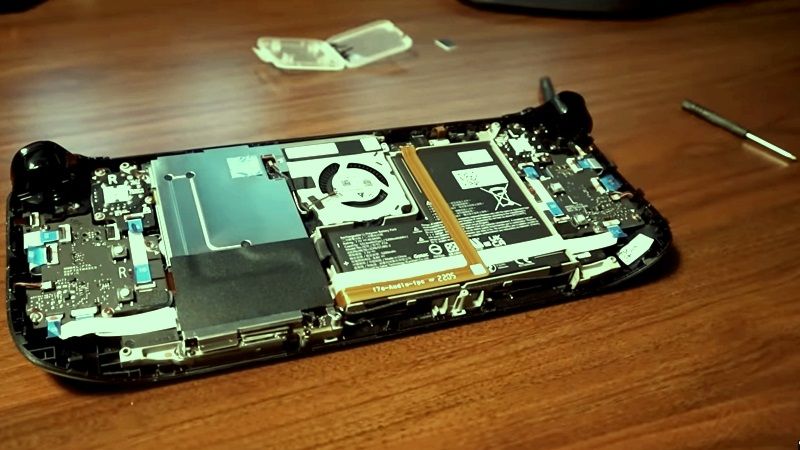
- You will be finally able to see the original SSD, that you need to replace it with.
- At this point, it is recommended to disconnect the battery connector to avoid mishandling.
- You can now remove the screw that holds the SSD, then remove it.
- Place the cache around the SSD.
- This little protective coat is actually used to avoid interference between the SSD and the Wifi module which is located just below. It is therefore important to reassemble it.
- If your new SSD is slightly thicker than the old one, don’t panic just peel off the back part of the protective screen, then roll it up on the new SSD.
For Steam Deck Reassembly, proceed in the reverse order:
- Installing the protective screen around the SSD.
- Replacing the SSD.
- Reconnect the battery connector.
- Refitting the metal cover.
- Refitting the rear hull.
That is all you need to know about how to upgrade Steam Deck SSD storage space. If you are searching for more Steam Deck Guides, check out similar types of articles here: 5 Steam Deck Tips & Tricks To Try First – Shortcuts, Cloud Play, Etc, and How to Take a Screenshot on Steam Deck.