There are several files that Windows 11 hides by default from its users to protect them from messing up with their system. These hidden files are generally important system files. But, sometimes you need to access these files to resolve some issues. So, today in this guide I am going to explain to you how to show these hidden files in Windows 11.
Steps to Show Hidden Files in Windows 11
You can easily view hidden files on your Windows 11 computer by following the method mentioned below in detail:
- Open the “File Explorer” app.
- Now, click on the “Three Dots” in the top corner.
- In the drop-down menu, click on the “Options” section.
![step show hidden files windows 11]()
- In the next window, select the “View” section.
- Now in the “View” section, check the circle next to “Show hidden files, folders, and drives“.

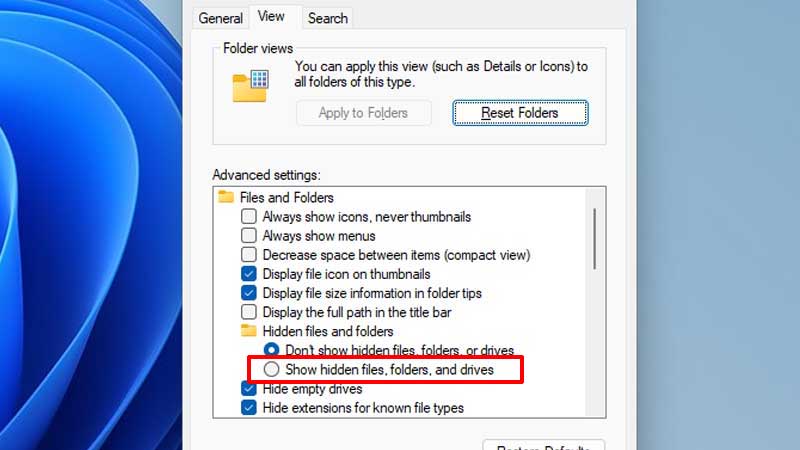
By doing this, you can now see all the hidden files on your Windows 11 PC. You can also view protected hidden files by unchecking the box next to “Hide protected operating system files” and then confirming the process by clicking on “Yes” in the next alert box. If you want to check for some empty drives then you can untick the box next to “Hide empty drives“.
You can even enable hidden folders from the “Settings” app of Windows 11 by clicking on the “Privacy & Security” section and then selecting “For Developers” and then clicking on “Show Settings” next to “Change settings to show hidden files“, this will take you to “File Explorer” options, here you can uncheck the box next to “Show hidden files, folders, and drives“.
This is all you need to know on how to view hidden files in Windows 11. If you want to see a file path or location in the list of files in File Explorer then here is a guide on How to Show File Extensions in Windows 11.