
As you very well know (or don’t know yet), file name extensions are used to find out the type of file (whether it is text, image, video, etc.) in question and the program that should open it in Windows 11. For instance, let us take an example of “image.jpg”: image is the file name and jpg is its extension. So, the .jpg extension specifies that it is an image-type file. And in Windows 11, by default, the .jpg extension is associated with the Photos application. In this tutorial, we will see how to show file extensions in Windows 11 using File Explorer and more.
How to Show File Extensions in Windows 11
Like any other Windows operating system, Windows 11 also hides file name extension by default. It is done deliberately to avoid overloading the display because, many times, it seems that the file icon is too long.
On some occasions, there is various malware that can also intentionally use the icon associated with another type of file to trick you into infecting your PC. However, with the extension, you are certain of the application that will be launched by double-clicking on the file in question.
Therefore, in this article below, I will explain how you can view file name extensions by using various methods listed below.
How to View file name extensions in Windows 11 via File Explorer
- The safest and the best way to display file name extensions is to use the File Explorer display options.
- First, open File Explorer on your Windows 11 PC. To do that, on your Taskbar, click on the File Explorer button.
- Otherwise, you can also right-click on the Start menu and then click on File Explorer to open it.
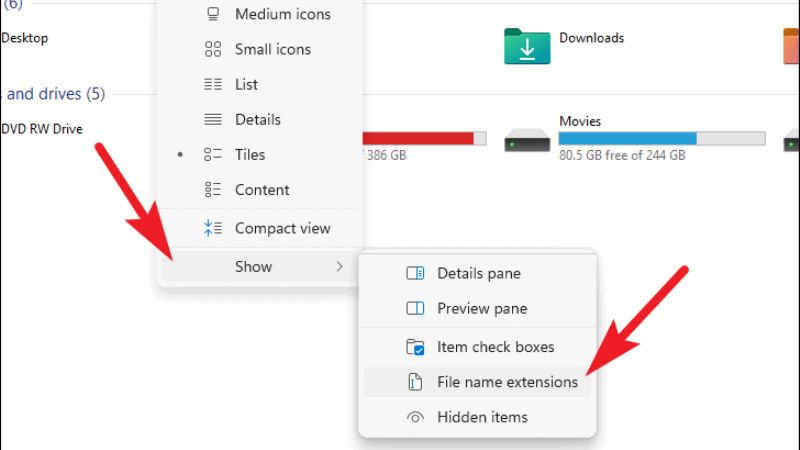
- On the Toolbar at the top, click on View > Show and then click on File Name Extensions.
- Done
How to View file extensions in Windows 11 via Control Panel
If you want to show the filename extension on Windows 11, you can also go through the Control Panel, here’s how to do that:
- In the search bar, type Control Panel and then open it.
- After that click on Appearance and Personalization.
- Now, click on File Explorer Options.
- A window will pop up, just click on the View tab.
- Under the View tab, scroll down and then uncheck Hide extensions for known file types and then click Apply and OK.
How to View File Extensions in Windows 11 using Registry Editor
You can also use the Registry Editor and change the setting here:
- Press the Windows+R keys together to launch the Run utility.
- Type in “Regedit” without quotes in the Run utility and press Enter key.
- After the Registry Editor opens, go to the key mentioned below:
Computer\HKEY_CURRENT_USER\Software\Microsoft\Windows\CurrentVersion\Explorer\Advanced - Search for the HideFileExt DWORD entry. Once you find it, simply double click on the same DWORD entry and set its value to 0.
- Now you will be able to see the hidden files extensions.
That is all you need to know about how to view file extensions in Windows 11. If you are interested in getting more details on the latest operating system of Microsoft, check out our other Windows 11 Guides right now.