
There are many people who are having a question regarding how do you add sound to your video on iPad while screen recording. Well, there is an inbuilt tool that you can use to make an iPad screen recording with sound or add your voice to the videos. Either way, now it’s easier than ever to create a screen recording on iPadOS. In this guide, we will tell you how to screen record on your iPad with sound in easy steps.
iPad: How to Screen Record with Sound (2023)
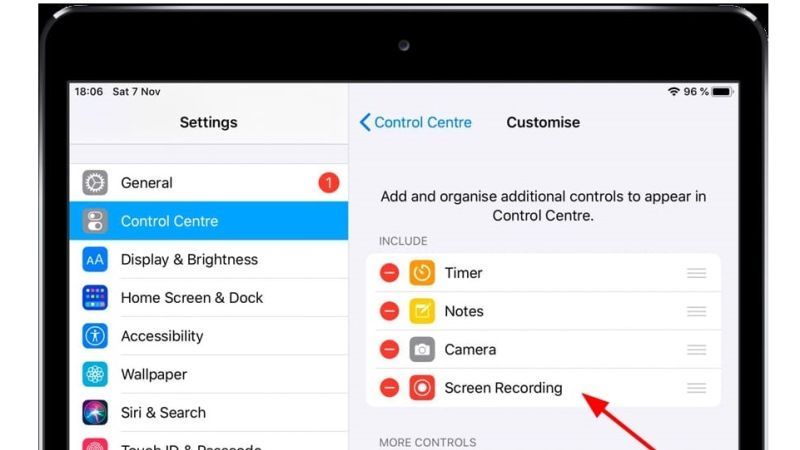
You can use a built-in screen recording tool on iPad to easily screen record with sound. To do that first you need to activate the function and add it to the Control Center, here’s how it is done:
- On your iPad, open the Settings app.
- Then go to Control Center.
- Here, ensure to turn on Access Within Apps.
- Under the More Controls section, tap Screen Recording and add it to the Included Controls section that will appear in Control Center.
Once you have enabled the screen recording feature by adding it to your Control Center, just follow the steps given below to perform the screen capture while recording the internal and microphone audio of the device.
- From any screen on your iPad, bring the Control Center into view. To do this, if you have a device with a home button, swipe upwards from the bottom edge of the screen. If you are on an iPad with iPadOS 12 or later, swipe down from the top-right corner of the screen.
- Now tap and hold the Record icon (a circle with a dot inside).
- On the new screen, enable microphone capture by tapping on the corresponding icon; it will turn red confirming it is activated.
- Tap Start Recording to start recording.
- After a 3-second countdown, everything passing through the screen, along with the internal audio and the one captured by the microphone, will be recorded.
- While recording is in progress a red bar will be displayed at the top of the display or around the clock.
- To end the recording, tap the top bar or the red bubble around the clock.
- That’s it, you have learned how to make this type of screen recording on your iPad with sound.
Once the recording is finished, all content can be accessed through the device’s camera roll, in the Photos app, and can even be edited. Note, however, that in some apps – such as FaceTime, this method will not be able to capture audio, being limited to video. In others, such as Netflix, although it can be executed, the displayed content will not be recorded, respecting the rights of the work.
That’s all you need to know about how to screen record on your iPad with sound. While you are here, you might be also interested to know How to Make an iPad as a Second Screen on Mac Ventura, and How to Enable and Allow Cookies on an iPad.