Using computers and smartphones with different operating systems is something that we tech enthusiasts long for. Fortunately, we can create virtual machines on our computers to experience different OS. You can even use VM on your Mac to get another OS on your system. Nope, we aren’t talking about Intel Macs only; you can now run VMware Fusion in macOS Monterey on M1 Mac too. Let us show you how you can do that.
What is VMware?
VMware is one of the biggest platforms that provides virtual machine support to different computers such as Windows or Mac. You can choose from different OS to install on your computer using VMware.
Is VMware Fusion Available on M1 Mac?
Earlier, VMware was compatible with only Intel-based Macs which made things difficult for M1 Mac users. Luckily, VMware recently rolled out the Fusion beta to run on M1-based Mac. Today, we will explain how you can use it on your MacBook.
How to Run VMware Fusion in macOS Monterey on M1 Mac
Using VMware on your latest Mac is a cakewalk. Follow these steps for the same:
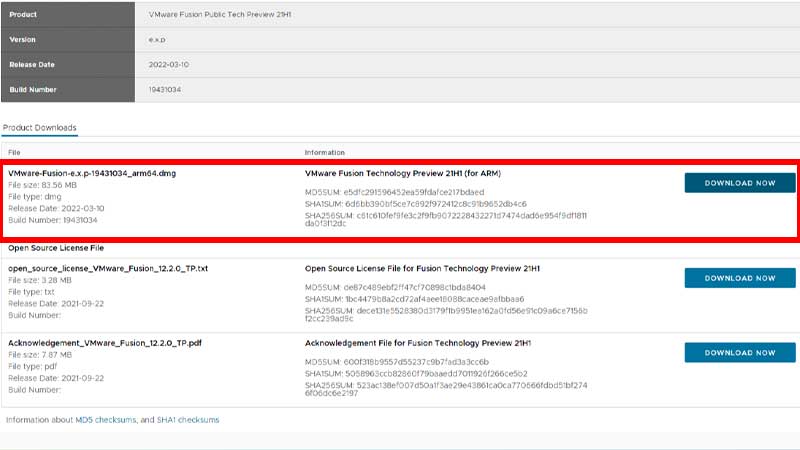
- Open a browser on your Mac and visit VMware.
- You will see the file “VMware Fusion Technology Preview 21H1 (for ARM)”. Click ‘Download Now’ right next to it.
- You will get to the sign-in page. Log in using your VMware ID or create a new account to continue.
- Once you log in to your VMware account, the download will automatically begin.
- Lastly, install the app like usual.
Once you complete this procedure, you will be able to run VMware Fusion in macOS Monterey on your M1 Mac. You will now be able to use VMware Fusion to install any OS of your choice on your M1 Mac easily. Try checking out our guides on other topics too: How to Install Windows on Mac and How to Play Windows Games on a Mac.