")
You are bound to use a mouse and a keyboard on your computer to either open a program, play games, or do many things. However, there might be some time that the mouse may experience unexpected problems. It could be related to anything, for example, clicking on the mouse not working or dragging the mouse pointer getting stucked in one place and not moving on the computer screen. Thankfully, if you want to fix this problem, there are many solutions you can try out, one of which is to reset it. So, in this guide, I am going to show you how to reset mouse settings in your Windows 11 or Windows 10 computer.
Reset Mouse Settings to Default in Windows 11/10 (2023)
There is a quick way for resetting the mouse settings to default in your Windows 11 or Windows 10 computer, just follow the steps given below:
- First, you need to open the Settings app, to do that, press Windows + I keys together on your computer.
- Find the Devices option and open it to find a list of other settings.
- Now you need to choose Mouse options from the list.
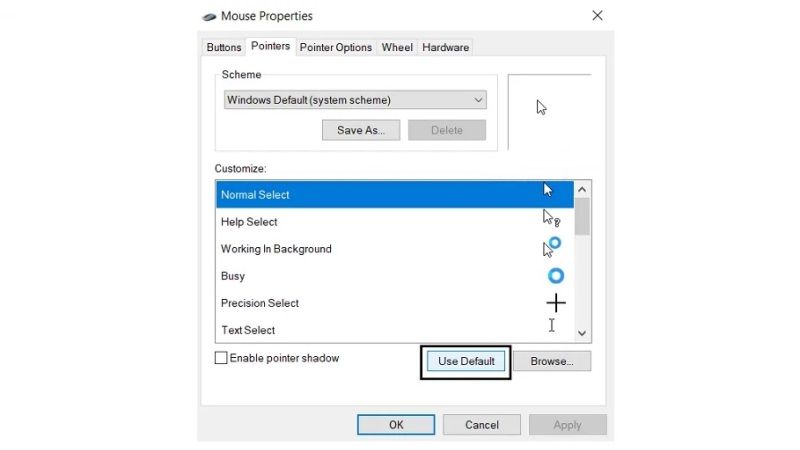
- After that click on Additional Settings.
- You will see a tab called Pointers, under that click the Use Default option.
- Finally, Save the changes done and exit. That’s it, the mouse settings on your Windows 11 and Windows 10 computer will be reset to default.
How to Reset Mouse DPI (Sensitivity) Settings in Windows 11/10
There are also a few users who are having trouble with the sensitivity levels of the mouse, which is actually a measure of the mouse’s DPI. To solve this problem, you can even try to modify the sensitivity level of the mouse you are using on your computer by going into the Mouse settings. Here are the methods on how to do that:
- In the Search bar type Control Panel and open it.
- Now click on the Mouse option (click on View by: Small icons or Large icons on the top right side)
- After opening the Mouse option, click on the tab called Pointer Options.
- The first option you will come across will be Motion, here you need to slide the speed and sensitivity of the mouse you are using. If you slide more towards the Fast option then your mouse will react quicker following your commands, and the Slow option will do the opposite.
- Finally, click on Apply and then click on OK to save the settings.
That is everything you need to know about how to reset mouse settings in Windows 11 or Windows 10. While you are here, you might be also interested to know How to Customize Mouse Cursor on Mac, and How to Drag Click with Any Mouse.