
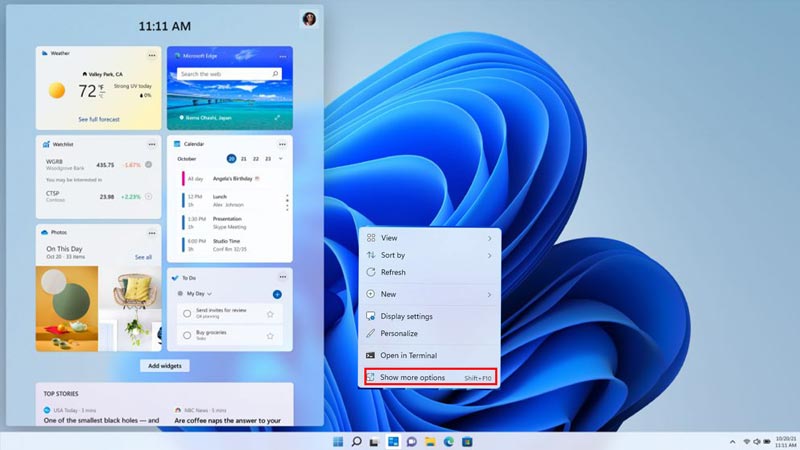
Windows 11 has brought many features that made the desktop look aesthetic and clutter-free. Even though the aesthetics are pretty, it might confuse the users. Especially in the case of the context menu, many essential options are hidden, and to access them you might need to click on the ‘Show More Options’ every time. This can be annoying for users who are used to the classic context menu. Hence, to remove the ‘Show More Options’ from the context menu on Windows 11 desktop, this guide will help you.
Windows 11: How to Remove ‘Show More Options’ from the Context Menu (2023)
Using the File Explorer settings, Command Prompt, or by making changes in Windows Registry Editor, you can disable the ‘Show More Options’ on your Windows 11 desktop. Here’s the detailed workaround for the same:
1. Use File Explorer to remove ‘Show More Options’
- Open File Explorer by pressing the ‘Windows’ + ‘E’ keys on your keyboard.
- Click on the three dots from the top of the screen to open the menu.
- Select the ‘Options’ tab from the menu, and the Folder Options window will open.
- Click on the ‘View’ tab from the ‘Folder Options’ window.
- Now select the ‘Launch folder windows in a separate process’ option.
- Click the ‘Apply’ button to make changes, and then click on the ‘OK’ button.
- Restart your computer and check if the ‘Show More Options’ is disabled.
2. Use the Command prompt to get the Old Context Menu
- Open Command Prompt as Administrator from the ‘Start’ menu.
- If User Account Prompt (UAC) prompts appear, click on the ‘Yes’ option. This will give Command Prompt the administrative privilege.
- Now type the below command on your Command Prompt and press the ‘Enter’ key on your keyboard:
reg add “HKCU\Software\Classes\CLSID\{86ca1aa0-34aa-4e8b-a509-50c905bae2a2}\InprocServer32” /f /ve
- Now right-click on the Taskbar and select the ‘Task Manager’ tab from the pop-up menu.
- Right-click on the ‘Windows Explorer’ from the Task Manager window and select the ‘Restart’ option.
- Now close the Task Manager and right-click on the open screen to see if the context menu is removed.
3. Use Registry Editor to remove ‘Show More Options’
You can also use the ‘Registry Editor’ to remove the ‘Show More Options’ from the context menu. However, you should back up the registry before making any changes to prevent any errors and then follow these steps:
- Open the Registry Editor by typing ‘regedit’ in the ‘Run’ dialog box.
- Now type the following path on your Registry Editor address bar:
HKEY_CURRENT_USER\Software\Classes\CLSID
- On the right pane, right-click with your mouse to open a menu.
- Hover your cursor on the ‘New’ tab, and a sub-menu will open.
- Select ‘DWORD (32-bit) Value’ from the menu.
- Now right-click on the key and select the ‘Rename’ option from the menu.
- Type ‘UndockingDisabled’ without quotes and press the ‘Enter’ key on your keyboard.
- Now double-click on the renamed key, and type ‘1’ in the ‘Value data’ text box.
- Click the ‘OK’ button to save changes.
- Now restart your Windows 11 desktop to disable ‘Show More Options’ from the context menu.
That’s everything covered on how to remove the ‘Show More Options’ from the context menu on your Windows 11 desktop. Also, check out our other guides, such as How to enable and install Internet Explorer 10 on Windows 11 or How to turn off mouse acceleration on Windows 11.