
McAfee is an antivirus software that is already installed on your computer if you have purchased it from a different manufacturer other than Microsoft. But, some users who have already subscribed to a different anti-malware program do not want two software to slow the performance of their PC. If you are one of these users then here is a guide on how to remove McAfee from Windows 11.
Steps to Remove McAfee from Windows 11
If you want to install a different anti-virus program and remove the pre-installed McAfee from your computer, then you can do this by following these simple workarounds. So, let’s see how to uninstall McAfee from your Windows 11 computer.
Removing McAfee from Windows 11 Using Settings App
You can remove McAfee from your computer using the Settings app of Windows 11 by following these steps.
- Open the “Settings” app on your computer.
- Now, go to the “Apps” section and select “Apps and features“.
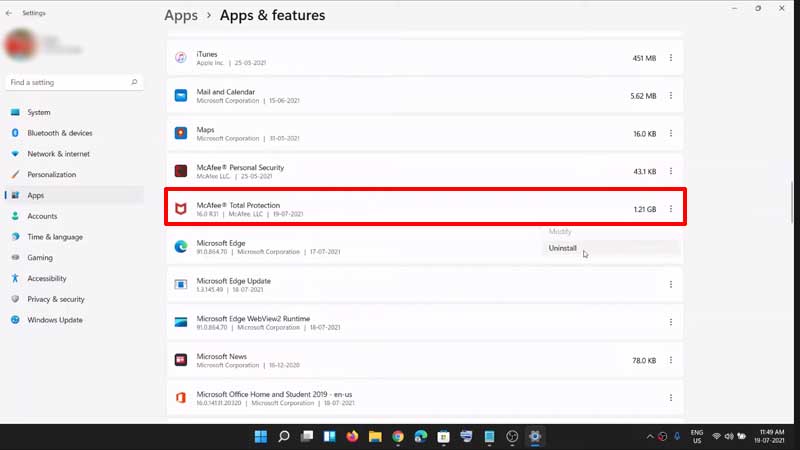
- On the next page, you will see all the apps installed on your computer.
- Now search the McAfee app in the list and click on the three dots next to the app.
- In the drop-down menu, select “Uninstall“.
- In the next dialogue box, check the box next to remove all files for this program and then click on “Remove“.
With this, you have successfully removed McAfee from your Windows 11 computer.
Removing McAfee from Windows 11 Using Control Panel
You can completely uninstall McAfee software from your Windows 11 PC using the Control Panel app by following the tricks mentioned below:
- Open the “Control Panel” app on your computer.
- Now, click on the “Program” section and then select “Uninstall a Program“.
- Here, find the McAfee app in the list of programs installed on your computer.
- Now, right-click on the app and select “Uninstall” and follow the on-screen instructions.
After the process is complete you have successfully removed McAfee from Windows 11.
Removing McAfee Using McAfee Product Removal Tool (MCPR)
McAfee has a tool that can help you remove it from your computer. To uninstall the anti-virus software from your computer follow this simple method:
- Install the “McAfee Product Removal Tool” on your computer.
- Now, log in with your Lock screen credentials and follow the on-screen instructions.
- After completing the process the tool will uninstall the app on your Windows 11 computer.
This is how you can uninstall McAfee from Windows 11. If you want to delete widgets on your computer then here is a separate guide on How to Remove Widgets from Windows 11.