Linux operating system is becoming very popular among users due to its incredible performance and many features packed in a tiny package and apart from everything else, this operating system is free. Now people are often confused about how to install Linux on your laptop, desktop PC, notebook, or Chromebook. On a laptop or desktop PC, it’s easy to figure out how to install the various Linux distros but if you ever need to install Linux on your Chromebook, things get more difficult. So, in this guide, I will explain to you how you can install Linux on your Chromebook.
How to Install and Run Linux on your Chromebook in 2022
If you have purchased a new Chromebook, not only you can experience Windows on it, but it can be used to run Linux operating system too. So, in order to help you install Linux on your Chromebook device, I have written this article that describes all the procedures for this.
Here are the steps to install Linux on Chromebook:
- First of all, enable Developer Mode on your Chromebook. To do this, hold down the Esc and Refresh keys, then tap the Power button to enter recovery mode. For older versions, there may be physical buttons to enter developer mode.
- Now, in system recovery mode, press “Ctrl + D” and then accept the prompt that appears. This would boot your device into developer mode. While entering Developer Mode, the Chromebook’s local data will be erased. This would take around 15 minutes to clear all system data, so you have to wait.
- From now on, every time you start your Chromebook, you’ll see a warning screen where you need to press Ctrl + D or wait another 30 seconds to continue booting. This just happens to remind you that you are using the Chromebook in developer mode.
- Now download and install the Crouton we would work with, but you might as well try the ChrUbuntu build. After downloading the Crouton, press Ctrl + Alt + T in Chrome OS to open the crosh Terminal. Now type the command “shell” in the terminal and then press the Enter key. This would take you to Linux Shell mode, but if the command doesn’t work, you’re probably not in developer mode yet, so try entering developer mode and then retry the command.
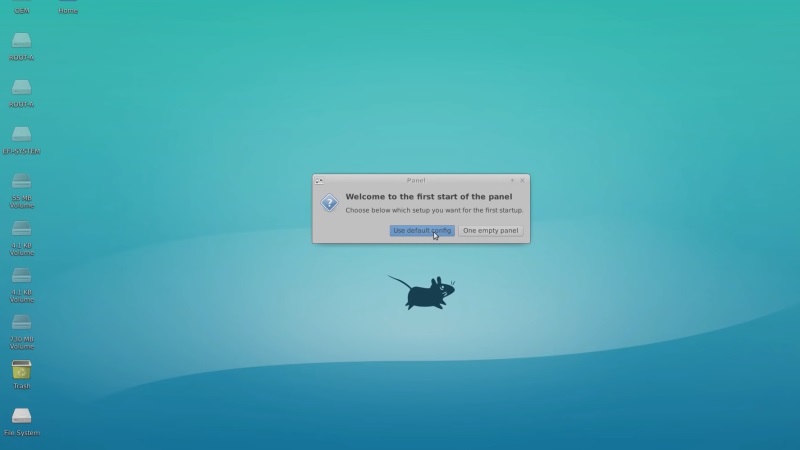
- To access your Xfce session after the entire installation process, run the following commands:
“sudo enter-chroot startxfce4” and then “sudo startxfce4“ - To switch between environments or operating systems, press the Ctrl + Alt + Shift + Back and Ctrl + Alt + Shift + Next keys. In the case of the forward and back keys, the browser’s navigation keys are used and not the arrow keys on the keyboard. This was for the ARM Chromebook while for the Intel x86/AMD64 Chromebook press Ctrl + Alt + Back and Ctrl + Alt + Forward plus Ctrl + Alt + Refresh.
To exit the chroot, use the Shutdown command, but if you want to re-enter the chroot, execute the ‘sudo startxfce4’ command. To reset your Chromebook, turn off Developer Mode and restart your device.
So, here in this article, you have started the whole process of installing and running the Linux operating system on the Chromebook. This method is meant to work with most Chromebook devices, and by using this method, you will be able to run both Chromebook OS and Linux OS which could easily be changed with just one click at any time.
That is everything you need to know about how to install Linux on Chromebook. While you are here, you might be also interested to know How to Reset Chromebook, and How to install iTunes on Chromebook.