Random Access Memory, aka RAM, is a form of temporary memory storage that is used for all the programs currently running on your Windows 11 PC, but how do you free up unwanted RAM usage? Optimizing your RAM usage is one of the main pillars of increasing your performance output on your PC. The more available RAM you have, the faster and smoother the performance will be. Find out here how you can make that happen in Windows 11.
Best Methods to Free up RAM in Windows 11
RAM is affected by many factors which you will need to free up in Windows 11. However, it is quite simple and easy to do so. Once you use all the methods, you will have a lot of free RAM available to you. Here are the best methods to free up RAM in Windows 11:
- End unwanted Processes
- Reduce the number of Background Applications
- Adjusting Visual Effects Performance
- Disable SysMain service
End unwanted Processes and Applications
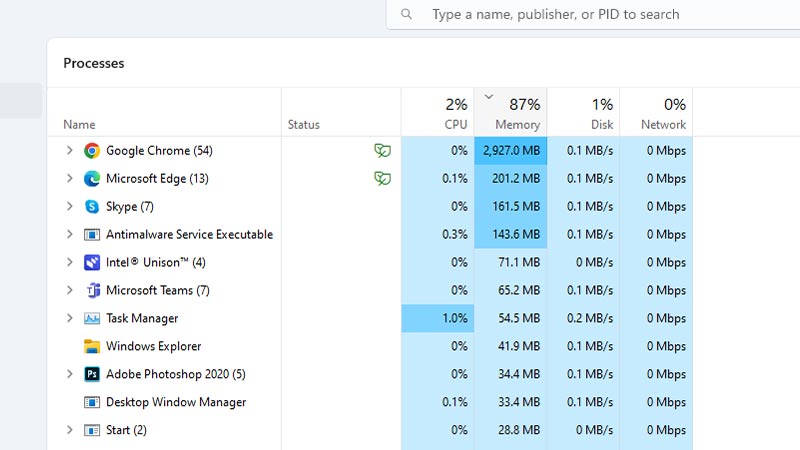
Ending processes and applications that are taking too much RAM is the most easy and quick way to free up a lot of RAM. This is made easy especially due to Task Manager. In Task Manager, you can easily pinpoint the processes that are using a lot of RAM and end them with a click. You won’t realize how many processes are going on simultaneously until you check the list in your Task Manager.
Here is how you can use Task Manager to end unwanted processes and free up RAM in Windows 11:
- Open Task Manager by pressing Ctrl+Shift+Esc or Ctrl+Alt+Del.
- Click on the Processes tab.
- Sort applications by Memory.
- Once you have found your unwanted program, right-click on it and select End Task.
- It will now be closed and any RAM being used by it will now be freed.
Reduce background Applications
Closing background applications that you don’t need can also be a quick way to free up RAM in Windows 11. Many times apps like Skype, Steam, etc, will be running in the background even when you are not actively using them. This uses RAM constantly and blocks it from the applications you are currently using.
Here is how you can disable applications in the background in Windows 11:
- Go to Windows Settings.
- Here, go to the Privacy section.
- Next, go to the Background Apps from the left panel.
- You will now be presented with a list of applications. Disable applications that you do not want to be running in the background.
- You will now have more RAM due to fewer background applications.
Adjusting Visual Effects Performance
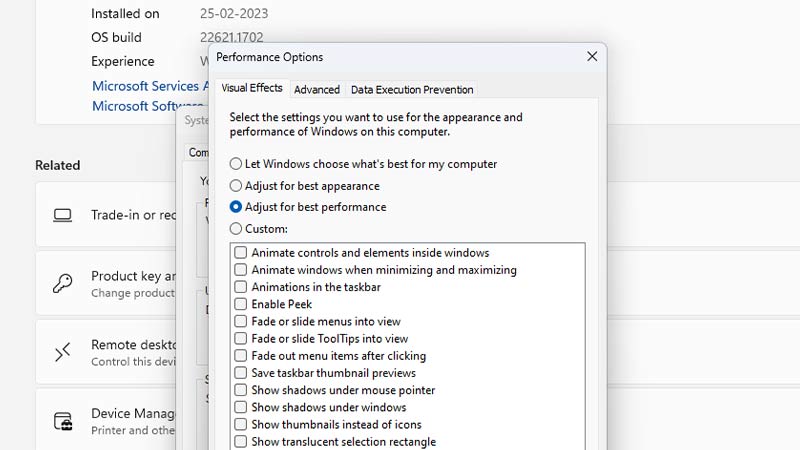
Windows 11 has high-quality visual effects in its GUI in order to make it look good and appealing. Traditionally, Windows OS has been focused more on practicality but Windows 11 takes a more focused approach to visual effects and appearance. But, this in turn also increases RAM usage, as showing these high-quality effects and other visual stuff takes RAM.
Here is how you can optimize Visual Effects for more performance in Windows 11:
- Open File Explorer.
- Click on This PC on the left panel.
- Here, click on Properties.
- Now, Click on “Advanced System Settings” and go to the Advanced tab.
- Select the Performance option and choose “Adjust for best performance”.
- This will optimize for more performance rather than visuals, freeing up RAM in the process.
Disable SysMain service
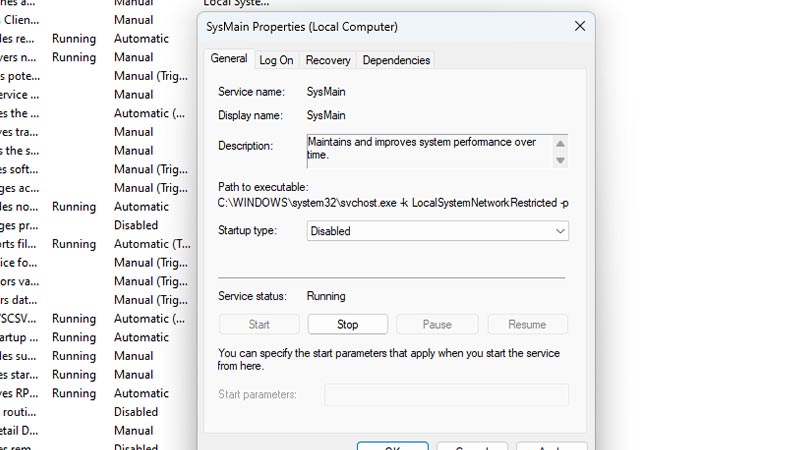
SysMain, also known as SuperFetch, is a service used by Windows 11 to identify the most frequently used apps and make them start faster. While this makes it more convenient, the difference in speed isn’t that noticeable. Disabling it is the way to go if you want more RAM to be free in Windows 11.
Here is how you can disable the SysMain service in Windows 11:
- Open the Run window by pressing the Windows key + “R”.
- Type “services.msc” and press enter or click OK.
- Find the SysMain service from the list, sorting by name will help.
- Right-click and select Properties from the drop-down menu.
- Here, click on the Startup type option and choose “Disabled”.
- In the Service Status section below it, click on the Stop button.
- Wait for it to stop and then press OK.
- It will now be disabled and won’t start unless done manually.
Those are all the things you can do to free up RAM in Windows 11. For more topics related to Windows 11, check out our other guides on the best gaming settings for Windows 11 and where are fonts stored in Windows 11.