In Windows, you will find different in-built troubleshooting tools that can be used to scan your PC for different kinds of problems. One such tool is System File Checker (SFC) which usually finds out corrupt system files and replaces them with the proper files. However, when doing a scan with these tools on Windows, sometimes users get an error message that says “Windows Resource Protection found corrupt files but was unable to fix some of them”. So, in this guide, we will tell you how to resolve this error on your PC forever.
Fix: Windows Resource Protection Found Corrupt Files Error (2023)
There are various methods to fix the “Windows Resource Protection found corrupt files but was unable to fix some of them” on your Windows 10: you can either run the DISM tool from CMD to resolve this issue or run Check Disk to solve this issue. Below you will find both workarounds to resolve this issue.
Run the DISM tool from CMD
DISM (Image Deployment and Management Service) is an inbuilt Windows 10 tool that can repair damaged system files instantly. You can use this tool via the command prompt by following the steps given below:
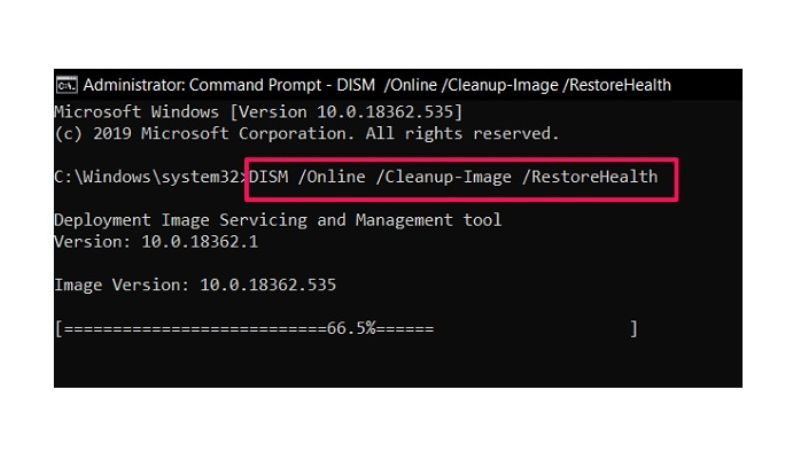
- First, click on the Search bar and type Command Prompt (CMD).
- Open Command Prompt in administrator mode from the list given.
- Type the following command mentioned below in CMD and then press Enter key:
dism /online /cleanup-image /restorehealth - Now, you should wait for the repair process to reach 100%. It may take 10 to 15 minutes to complete, so please be patient.
- Finally, after the scan finishes, reboot your computer and then try to run the SFC command again to check if the error is resolved.
Run Check Disk Commands
- First of all, click on the Search bar and then type CMD.
- Open CMD from the top list in administrator mode.
- Type the following command mentioned below and then press the Enter key (C is the drive that you want to perform the check disk command on):
CHKDSK /C - Once the scan is finished, you can then check for the status of the scan.
- If you would like, you can use the same check disk procedures on all the drives on your PC.
- Finally, close the scan if it is properly done and then check if the error is fixed.
That is all you need to know about how to fix “Windows Resource Protection found corrupt files but was unable to fix some of them” on Windows 10. In the meantime, do not forget to check out our other guides only on TechNClub.com: How to Remove Cisco EAP-FAST Module, and How to fix Feature Update to Windows 10 Version 1903 Error 0x80080008.