Using a printer with your Windows 10/11 computer is quite simple. But, things get irritating when you face errors while using a printer with your Windows PC, right? Recently, many users have reported the error of “Windows cannot connect to the printer error 0x0000011b” on their PCs. The error code 0x0000011b does not let the users connect their printers with their computers. Facing the printer error 0x0000011b on Windows PC also means that you cannot use your printer without solving this issue. So in this guide, we will show you how to fix Windows cannot connect to the printer error 0x0000011b on your Windows 10/11 computer.
How to Fix ‘Windows Cannot Connect to the Printer Error 0x0000011b’ on Windows 10/11?
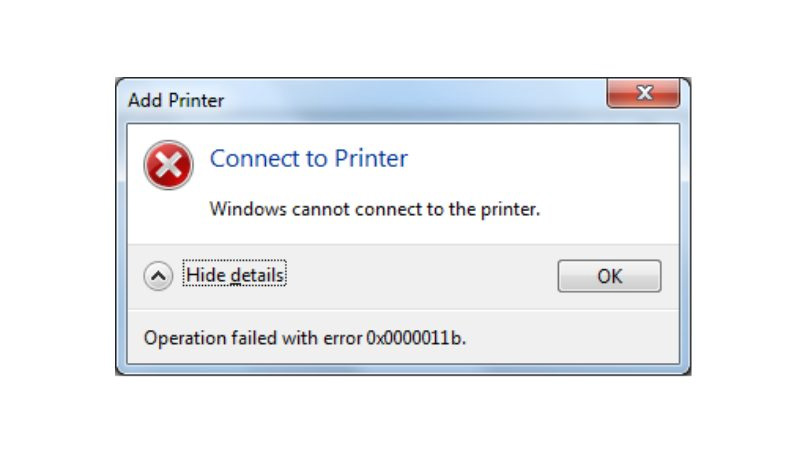
The printer error on Windows 10/11 says: “Windows cannot connect to the printer” and “Operation failed with error 0x0000011b.”
There can be many reasons why your printer may not connect to your computer but the error 0x0000011b is caused most likely by Microsoft itself. Earlier this year, Microsoft rolled out a security update for Windows to safeguard their users from issues related to the Windows print spooler. Though the new security patch update saved Windows users from print spooler-related problems, it also made them vulnerable to the printer error code 0x0000011b. Below some best methods are mentioned that you can try to fix the Windows Cannot Connect to the Printer Error 0x0000011b:
Method 1: Add Your Printer to the Local Port on Windows 10/11
- Open the ‘Control Panel’ from the ‘Start’ menu on your PC.
- Go to ‘Device and Printers’ > ‘Add a printer’.
- Let the scan complete and click ‘The printer that I want isn’t listed‘.
- Click ‘Add a local printer or network printer with manual settings’.
- Select ‘Next’.
- Click-check the ‘Create a new port:’ option.
- Choose ‘Local Port’ from the drop-down menu right next to the ‘Create a new port:’ option.
- Select ‘Next’.
- Type the port name (file path and name) of your printer.
- Click ‘OK’.
- Next, click-select your printer and its driver from the given list.
- Click ‘Next’.
- Name the local printer driver that you just created.
- Click Next > Finish.
That’s it! This will add your printer to the local port on your Windows 10/11 computer. If this fix did not help you, try the next fix.
Method 2: Update Windows
Since this error is caused after a security patch update on the Windows OS, Microsoft may soon launch another update to fix the error code 0x0000011b on Windows 10 and Windows 11. Do check your Windows PC for updates and install them, if any. When Microsoft rolls out an update for the Windows OS, it will most likely get users rid of the Windows cannot connect to the printer error 0x0000011b.
These are the best possible fixes that you may try to solve the printer not connecting issue on your Windows 10/11 computer. The error code 0x0000011b may have other solutions too, but they either do not work or may have other consequences. So, try these fixes on your Windows 10/11 PC as they are safer and more reliable. Here are some other guides from us on similar topics: How to Fix Error 740 While Adding Printer on Windows 10/11 and How to Update Printer Drivers on Windows 10.