")
On Zoom, while trying to connect to a video conference or a meeting, you might often encounter “Unable to Connect” with an Error code 5003. Mostly, this issue is seen on the Windows Desktop application. If you locate an “Unable to Connect” error on Zoom and want to know how to fix it, look no further, as this guide has all the steps to help you.
Fix: “Unable to Connect” Error on Zoom (2023)

The “Unable to Connect” Error on Zoom seems to be caused due to a misinterpretation of the Windows Security system or due to a network issue. To fix this issue and access Zoom, follow these steps:
1. Check Zoom Server Status
Before panicking, make sure that others are facing the same issue. As Zoom works on cloud networking to connect calls due to some technical reason or high traffic load, the servers may crash. To check the Zoom server status live, click on this link.
2. Check for Internet Connection
To let Zoom Work, you need a stable internet connection. Check if the router is working, and if you are connected to Zoom via a mobile hotspot network, try shifting to a Wi-Fi network for stable internet. On Android and iOS devices, you might encounter this issue, due to unstable internet. You should also turn off the data saver mode on your Smartphones to allow Zoom for unrestricted data usage.
3. Restart Zoom
Sometimes you might be shown “Error Code: 5003” when the ‘Unable to Connect’ dialog box pops up on your Windows desktop due to some minor bugs. Restarting the app during such cases can fix the issue instantly. To restart Zoom, follow these steps:
- Right-click on an empty space in the Taskbar to open a menu.
- Click on the ‘Task Manager’ option to open a window.
- Right-click on Zoom meetings from the list of ‘Processes’ tab.
- Click on the ‘End task’ option from the menu.
- Now open the Zoom app again and try to connect to the video call to see if the issue is fixed.
4. Disable Firewall and Antivirus software
If there are any firewall restrictions or antivirus software that has restricted Zoom from launching, disabling those options or even temporarily disabling the firewall or antivirus of your device can solve this issue. To disable the firewall or any other antivirus software on your desktop, follow these steps:
- Open Task Manager by right-clicking on the Taskbar and selecting the option from the menu.
- Click on the ‘Startup’ tab to open the list.
- Tap on ‘Windows Security’ and then tap on the ‘Disable’ option.
- Repeat the steps for all the running antivirus software on your device to disable them.
This is a risky step as you are leaving your desktop vulnerable. So, it is advised to enable them, as soon as you are done using the Zoom app.
5. Change to the different DNS server
Changing the DNS server is easy, and can quickly fix the issue. Also, it might give you high internet speed that can solve any video lagging issues. To change the DNS server on your desktop, follow these steps:
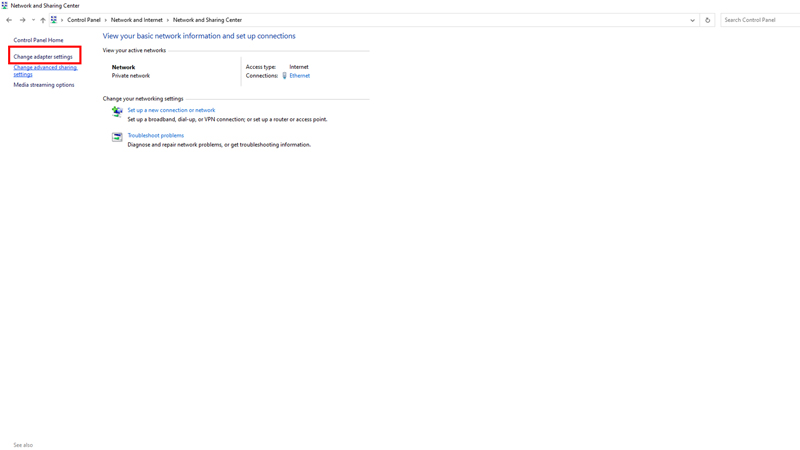
- Go to Control Panel > Network and Internet > Network and Sharing Center > Select Change Adapter Settings from the left-hand panel’s hyperlink.
- A new Network Connection window will open.
- Right-click on the internet connection you are currently using, and a menu will open.
- Click on the “Properties” option, and a window will open.
- On the Properties window, select ‘Internet Protocol version 4 (TCP/IPv4)’ and then click on the ‘Properties’ option.
- Select ‘Use the following DNS Server addresses’ from the ‘General’ tab of the IPv4 properties window.
- Now on the Preferred DNS server text box, type the following text – 1.1.1.1
- For the Alternative DNS server text box, type the following text – 1.0.0.1
- Click on ‘OK’ to apply changes and launch Zoom to see if the issue is resolved.
Apart from this, if you are connected to any Proxy network or VPN, disable them to fix the issue if none of the above steps work out.
That’s everything covered for fixing the “Unable to Connect” error on Zoom. Also, check out our guide for fixing the Camera not working issue on zoom or check out how to change DNS on Windows 11.