After the macOS 13.4 Ventura update the way of handling DisplayPort connections has changed. This might cause an issue where your external monitor is no longer detected. This can be frustrating especially when relying on a second screen for your work or entertainment. Fortunately, there are some possible solutions that you can try to fix the external monitor no longer detected in macOS 13.4 Ventura error, and this guide will help you with it.
How to Fix External Monitor Not Detected in macOS Ventura 13.4?
You can fix the external monitor no longer detected in macOS Ventura error by following these steps:
1. Force Mac to use SST Mode
In previous versions of MacOS, the system would automatically detect the mode of your DisplayPort connection and adjust accordingly. However, in MacOS 13.4 Ventura, the system defaults to MST mode for all DisplayPort connections, regardless of whether your monitor supports it or not. This means that if your monitor only supports SST mode, it will not be recognized by your Mac. Fortunately, you can force your Mac to use SST mode for your DisplayPort connection, and here’s how you can do it:
- Firstly, disconnect your external monitor from your Mac.
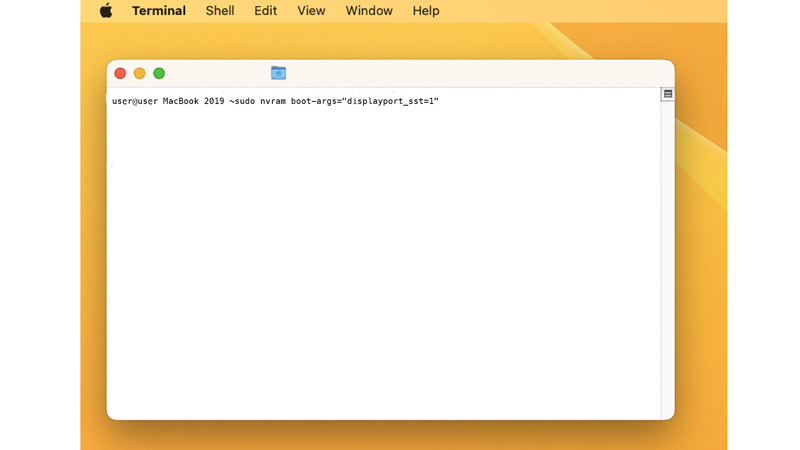
- Open Terminal and enter the following command:
sudo nvram boot-args=”displayport_sst=1″
- Enter your password when prompted and press the ‘Enter’ key on your keyboard.
- Then restart the PC and reconnect your external monitor to your Mac.
- Your external monitor should now be detected by your system and work as expected.
- If you want to revert this change, you can repeat the steps above but use the command:
sudo nvram -d boot-args
2. Reset NVRAM
NVRAM is another component that stores some information related to your display, among other things. Resetting them can help fix some glitches that may prevent your monitor from being detected. To reset the NVRAM on your Mac, hold down the Option, Command, P, and R keys while restarting your Mac until you hear a second startup sound.
3. Reset SMC

SMC is another component that stores a few display settings that might cause the external monitor not to detect an error on Mac. Mac computers with T2 or Apple Silicon chipsets don’t need to reset SMC. However, if you have Intel-based Mac, follow these instructions to reset SMC:
On MacBook with Intel Chip
- Firstly, shut down your MacBook as you normally do.
- Then press and hold the ‘Shift’ + ‘Control’ + ‘Option’ keys on your keyboard along with the power button.
- Release all four keys after 10 seconds and press the power button again to restart your MacBook.
On Mac Computer with Intel Chip
- Firstly, shut down your Mac computer and unplug the power cord.
- After 15 seconds replug the power cord and wait for 5 seconds.
- Then restart your Mac computer by pressing the power button to reset SMC.
4. Update your Drivers and Software
Make sure that you have the latest drivers for your monitor and the latest version of MacOS 13.4 Ventura installed on your Mac. You can check for updates by going to System Preferences > Software Update or by visiting the website of your monitor manufacturer.
5. Contact Apple Support
If none of the above steps work, you may have a hardware issue that requires professional assistance. You can contact the Apple support team or visit your monitor manufacturer service center to fix the external monitor not detected error on your Mac.
Those were a few ways to fix the external monitor no longer detected in macOS Ventura 13.4 error. Also, check out our other guides, such as How to fix cannot open PDF files after the macOS Ventura update or How to fix MacBook freezing after the macOS Ventura update.