Chromebooks can be useful for anyone whose primary demand is not gaming. Someone who uses their computer for gaining information and sharing purposes knows the value of a Chromebook. But did you know that your Chromebook when combined with the Live Caption features can be extra useful for you? Let us show you how to enable and use Live Captions on Chromebook.
What are Live Captions on Chromebook?
Google included the Live Caption feature in their Chromebooks so that users can understand any content that they consume. Once enabled, Live Captions will convert any audio directly to subtitles for you to understand things better. But, this feature works only when you play a video on Google Chrome. Even if a YouTube video does not have subtitles by default, you can use Live Captions to help yourself. And the best part is, Live Captions are available even when you are offline.
How to Enable Live Captions on Chromebook
Here are the steps to enable Live Captions on your Chromebook:
- At the bottom right corner of your Chromebook’s desktop, click the ‘Time’ section.
- Click the ‘Gear’ icon. It is the Settings App on your Chromebook.
- Next, select Advanced > Accessibility > Manage accessibility features.
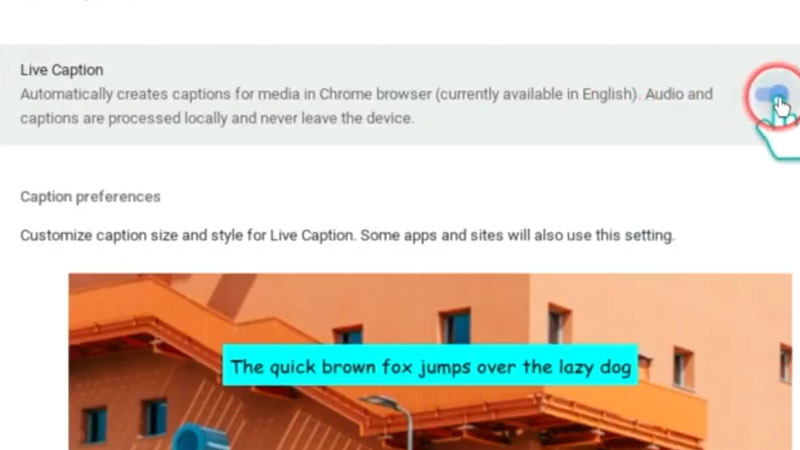
- Select ‘Captions’ right under ‘Audio and Captions’.
- Enable Live Captions on your Chromebook.
For those users who are not able to find this setting in their Chromebooks, this feature may not be available on your device yet. Now, it will be better for you to learn how to customize captions on your Chromebook, right?
How to Customize Live Captions on Chromebook
Here are the different ways in which you can customize the Live Captions on your Chromebook:
- Get to the ‘Captions’ section as explained earlier.
- Select the font size that you prefer for the captions which will be displayed on your Chromebook.
- When the captions appear on your screen, drag them around the window to place them anywhere you want.
- You can even resize the entire caption box when the Live Captions appear on your Chrome Browser.
So, this was everything that you need to know about using the Live Captions on your Chromebook. Now, whenever a video will be played on the Chrome browser using your ChromeOS device, you will see the subtitles for the video too. Once you enable Live Captions on your Chromebook, you will get subtitles with every video that you play. Try going through some other guides from us, related to Chromebook:: How to Reset Chromebook and How to Change Wallpaper on Chromebook.