
Windows 11 is so full of new features that sometimes it feels like a completely new OS, nothing like its predecessors. From using Android apps on Windows 11 to using emojis in notepad, things have changed completely with the new version of Windows. Speaking of change, do you know that using desktop stickers is possible now? Nope? Then let us show you how to enable and use desktop stickers on Windows 11.
How to Enable Desktop Stickers on Windows 11
Windows 11, as of now, allows users to use the stickers on their desktop-only and it is not available by default. One has to make a few changes in the registry editor for the purpose. So, follow these steps to get desktop stickers on Windows 11:
- In the Start Menu, search for ‘Regedit’. Open the topmost search result; it is the ‘Registry Editor’ on your Windows 11 PC.
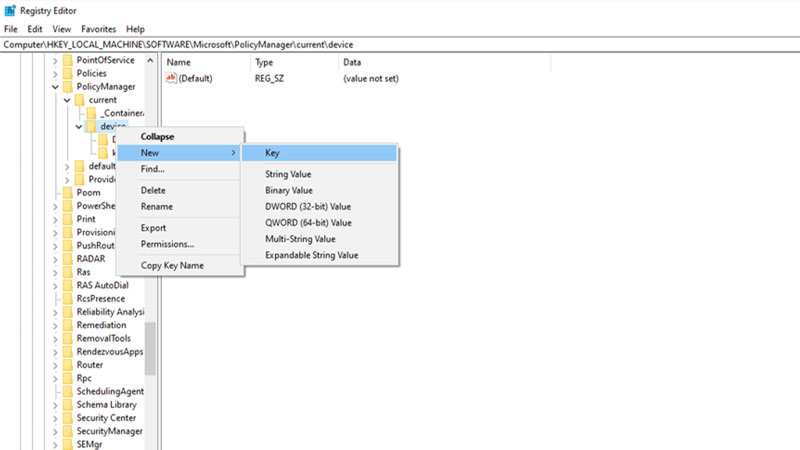
- Click on the address bar at the top of the Registry Editor and type/copy and paste the following address – “HKEY_LOCAL_MACHINE\SOFTWARE\Microsoft\PolicyManager\current\device”
- Use this address without the punctuation marks.
- Right-click ‘Device’.
- Hover the cursor over ‘New’. Select ‘Key’. This will create a new Registry Key.
- Now, change the name of this new registry key to ‘Stickers’.
- Double-click ‘Stickers’, our new Registry Key.
- Right-click the empty area in the right pane.
- Again, hover the cursor over ‘New’.
- Select ‘DWORD (32-bit) Value’.
- It will create a new value; rename it to ‘EnableStickers’.
- Double-click ‘EnableStickers’.
- Click on the ‘Value Data’ bar and type ‘1’.
- Select ‘Ok’.
- Lastly, restart your Windows 11 PC.
This is it. You have enabled desktop stickers on your Windows 11 computer. But you might not be knowing how to use desktop stickers on Windows 11, right? Let us show you how.
How to Use Desktop Stickers on Windows 11
Using the desktop stickers on Windows 11 is the easiest part. Once you have enabled them, follow these steps to use desktop stickers on your Windows 11 computer:
- Right-click anywhere on the desktop.
- Select ‘Add or edit stickers’.
- You will see a small window containing many stickers. You can choose one from them or use the search bar to look for a different sticker.
- Click on the sticker that you want to see on your desktop.
- The sticker will now be available on the desktop of your Windows 11 PC.
- Click the sticker to move it anywhere around the desktop or to change its size.
How to Remove a Desktop Sticker on Windows 11
Removing a desktop sticker is equally easy as using it. Simply click on the sticker that needs to be removed, click the ‘Trash bin’ icon and then click on the ‘X’ icon.
So, that is pretty much it about using the desktop stickers on Windows 11. Follow the steps mentioned above to give a completely new look to your Windows 11 computer. Also, check out our other guides on similar topics: How to Change Lock Screen Wallpaper on Windows 11 and Windows 11 Wallpaper Download – Original 4K HD Stock Wallpapers