
If you are looking to install Windows 10 with a USB flash drive, it is considered to be the most convenient way as well as being necessary for those computers without a DVD player. On the web, you can find various applications to create a bootable USB drive to install Windows 10. There is also an official tool from Microsoft to install Windows 10 with Media Creation Tool. However, in this guide, we will discuss how to create a Windows 10 Bootable USB drive with Rufus software.
Steps to Create a Windows 10 Bootable USB Drive with Rufus
Creating a bootable USB of the Windows 10 operating system is certainly a great idea to have a copy at hand, easily transportable and that keeps all our data safe. Rufus is a free, simple, and functional program to create a Windows 10 bootable USB drive. Obviously, to create a bootable USB flash drive you already need to have a Windows 10 ISO image that you can easily find on the internet.
If you do not have an ISO image available and/or want to download the latest version of Windows 10, then you can follow this guide on How to Download Windows 10 Media Creation Tool.
Before starting, you will need some materials to create a bootable USB drive to install Windows 10 via USB, such as the Rufus software, a Windows 10 ISO image, a USB drive of at least 16 GB. After that, follow the steps given below.
Preparing the USB Drive to Install Windows 10 Using Rufus
- First, you need to download Rufus software from its official website, here is the direct link to the portable version of the program.
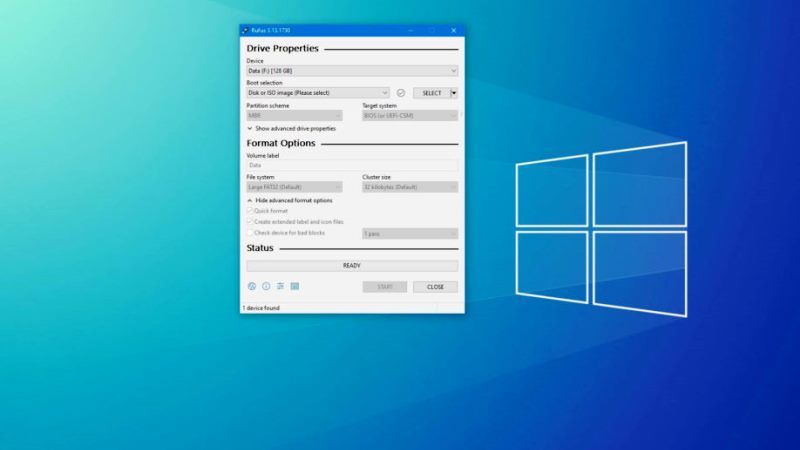
- After the download is complete, connect your USB drive to the computer, then move to the folder where you saved the application and click on the Rufus.exe program.
- Under Device, select the USB drive to prepare for the installation of Windows 10.
- In Boot selection, select Disk image or ISO. Click the SELECT button to select the Windows 10 image file that you should have previously downloaded.
- Choose the Windows 10 ISO image and then click Open.
- ln Image Option select Standard Windows installation.
- Under the Target system select BIOS (or UEFI CSM) if you will use the USB drive to install Windows 10 on computers based on BIOS (older computers) or UEFI (newer computers). This type of preparation is compatible with all computers, but remember that to install Windows 10 on a UEFI-based computer you will need to activate CSM (Compatibility Support Module) in the computer’s Bios Setup.
- Otherwise, if you will use the USB drive to install Windows 10 only on recent UEFI-based computers, in the Target system select UEFI (not CSM).
- Once you have made your choice, you can assign a Volume Label, that is, give a name to the USB drive, even if most of the time Rufus changes it.
- Now everything is ready for preparing the USB drive to install Windows 10 via USB, so click START.
- Any data on the USB drive will be destroyed, if you are sure click OK to continue.
- The preparation of the USB drive takes several minutes, even about an hour, depending on the speed of the USB port, the type of pen drive used, and the potential of the computer.
- At the end of the preparation click CLOSE and then eject the pen drive.
- Finally, you have now created a Windows 10 bootable USB drive using Rufus software.
There are also other tools like SYSGeeker WonderISO that you can use to create a Windows 10 bootable USB drive. This software is available for both Windows and Mac operating systems. It is a very simple application that requires no experience whatsoever to create the bootable drive and also supports two boot modes namely UEFI and Legacy boot mode.
That is everything you need to know about how to create a Windows 10 bootable USB drive with Rufus. While you are here, you might be also interested to know How to Find Your PC’s Model Number on Windows 10, and How to do a Clean Installation of Windows 10.