Windows Subsystem for Linux (WSL) is a feature that allows you to run Linux applications and commands on Windows 10/11 computers. Currently, WSL has two versions, i.e., WSL1 and WSL2. WSL1 is based on a translation layer that converts Linux system calls to Windows ones, while WSL2 is based on a lightweight virtual machine that runs a real Linux kernel. WSL2 has many advantages over WSL1, such as faster performance, full system call compatibility, and support for Docker containers. However, some users may prefer WSL1 for certain scenarios, such as better integration with the Windows file system and network. Hence, to know which version of WSL you have installed on your Windows 10 desktop, this guide will help you.
Windows 10: How to check the WSL version of all the installed Linux Distribution (2023)
You can check the WSL version of all the installed Linux Distribution on your Windows 10 desktop by following these steps:
- Open the Start menu and in the Search bar type Command Prompt or PowerShell, then right-click on the top result and select the ‘Run as administrator’ option.
- In the command window, type in the following command and press the ‘Enter’ key on your keyboard:
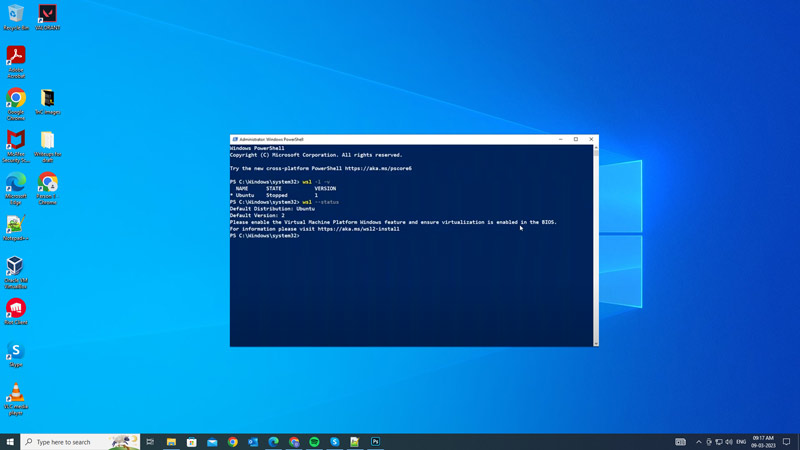
wsl –list –verbose
- Also, you can enter the shorter version of the above command as mentioned below:
wsl -l -v
- You will see a list of all the Linux distributions installed on your device, with their corresponding WSL version in the Version column. For example:
NAME STATE VERSION
*Ubuntu-20.04 Running 2
Debian Stopped 1
How to Change the WSL version of a specific distribution
To change the WSL version of a specific Linux distribution, follow these steps:
- First, open the Command Prompt or Windows PowerShell as an administrator.
- Then type in the following command and press Enter:
wsl –set-version <distribution name> <version number>
- Note that you will have to replace ‘<distribution name>’ with the name of the Linux distribution you are using and ‘<version number>’ with the WSL version you want to change. For example, if you are using the Debian Linux distribution with WSL 1 version, you can change it to WSL 2 version by typing the following command:
wsl –set-version Debian 2
How to Set the default WSL version for all future installations
To set the default WSL version for all future installations, you can run the following command on your elevated Command Prompt or Windows PowerShell:
wsl –set-default-version <version number>
In the above command, make sure to replace <version number> with the version number you want to set as the default WSL version. For example, if you want to set your WSL version to 2, you can type:
wsl –set-default-version 2
That’s everything covered on how to check the WSL version on your Windows 10 desktop. Also, check out our other guides, such as How to install Microsoft Teams on Linux or How to install Linux on Chromebook.