
Windows 11 provides more personalized customization features compared to its predecessor. However, there ain’t a straightforward method to change the user folder name. But it’s less complicated on Windows 11 compared to other versions. Hence, this guide will teach you to change the user profile folder name on your Windows 11 desktop in a few easy steps.
Windows 11: How to Change User Profile Folder Name (2023)
The first step in changing the user profile folder name on your Windows 11 desktop is to sign in to another profile with administrative rights. This is because Microsoft doesn’t allow you to modify existing profiles with the same account. If you don’t have another profile account on your desktop, follow these steps to create a new one:
- Type ‘Accounts’ on the Start menu and open the Accounts settings.
- Now, on the Accounts settings window, click on the ‘Family & other user’ option.
- Scroll down to the other user’s section and click on the ‘Add account’ button next to the ‘Add other user’ tab.
- Click on the ‘I don’t have this person’s sign-in information’ hyperlink.
- Now, on the new prompt window, click on the ‘Add a user without a Microsoft account’ hyperlink.
- Fill in the name field, leave the password field empty, and click on the ‘Next’ button.
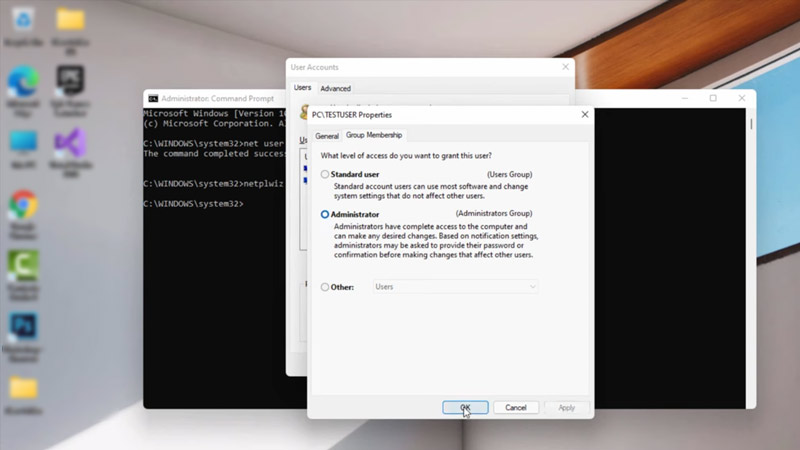
- Now click on the ‘New account’ that you just created and select the ‘Change account type’ option.
- Click on the drop-down and select the ‘Administrator’ option.
- Click on the ‘OK’ button to save changes, and now login to your new account.
Now, you can follow the below-mentioned workaround to change the user profile folder name:
Change User Profile Folder Name using Registry Editor
- Open the elevated Command Prompt on your newly made account and type the following command and press the ‘Enter’ key on your keyboard:
wmic useraccount get name, SID
- This will show the Security Identifier(SID) of your user account, note it down as you will need it further in this method.
- Now open the ‘Registry Editor’ by searching it from the Start menu and type the following path in the address bar:
HKEY_LOCAL_MACHINE\SOFTWARE\Microsoft\Windows NT\CurrentVersion\ProfileList
- Expand the ProfileList and click on the key name that matches your SID.
- Right-click on the ‘ProfileImagePath’ from the right pane and select the ‘Modify’ option.
- Now enter the desired name you want for the profile folder, and then click the ‘OK’ button.
- Close the Registry Editor and Command Prompt and open the File Explorer at the same time.
- Navigate to your ‘users’ directory on your C: drive and single-click on your profile to select it.
- Press the ‘F2’ key from your keyboard to rename it and type the new name that matches the one you entered in Registry Editor.
- Click on the open space to reveal the ‘Folder Access Denied’ prompt and click ‘Continue’ to save changes by giving administrative permissions.
- Now sign in to your original account and navigate to the ‘users’ directory from File Explorer, and the user profile folder name should be changed.
That’s everything covered on how to change the user profile folder name on Windows 11. Also, check out our other guides, such as How to remove ‘Show More Options’ from the context menu on Windows 11 or How to enable XMP on Windows.