Photoshop is a powerful and popular image editing software that can handle various tasks, such as photo retouching, graphic design, and more. However, to get the best performance out of Photoshop, you may need to adjust some settings related to your graphics processor (GPU). But, not all GPUs are created equal. Some GPUs are more powerful than others and can handle more complex tasks faster. If you have a laptop or a desktop computer with multiple GPUs installed, such as an integrated GPU and a dedicated GPU, you may want to change the default GPU for Photoshop to use the high-performance one, and you can do it with the help of this guide.
Photoshop: How to change default GPU to High-performance GPU (2023)
To change the default GPU for Photoshop to a high-performance GPU on your Windows desktop, follow these steps:
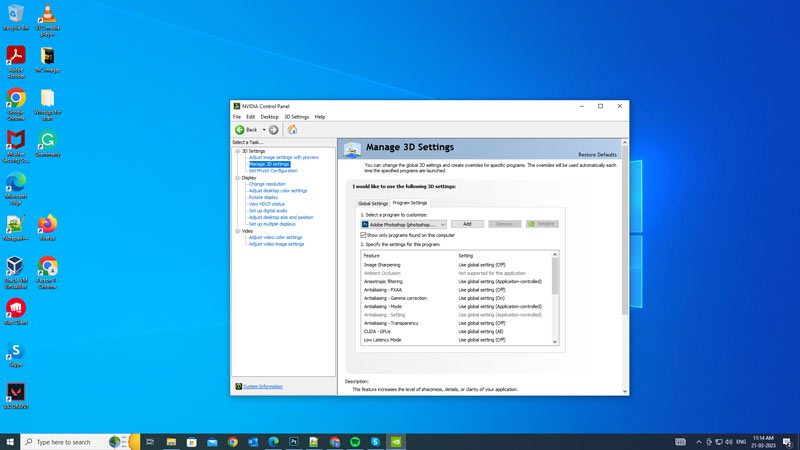
- Right-click on an empty area of your desktop home screen and select your graphic card Control Panel from the context menu. For example, if you are using an NVIDIA GPU, click the NVIDIA Control Panel option.
- On your graphic card’s Control Panel window, click the ‘Manage 3D settings’ option.
- Now navigate to the ‘Program Settings’ tab and select the ‘Adobe Photoshop’ app from the ‘Select a program to customize’ drop-down list.
- If Adobe Photoshop is not part of the default list, click the ‘Add’ button, select the ‘Photoshop.exe’ option from the list, or click the ‘Browse…’ option, navigate to the following location, and select the “Photoshop.exe” option:
C:\Program Files\Adobe\Adobe Photoshop <version>
- Under ‘Select the preferred graphics processor for this program’, change the option from ‘Use global setting’ to ‘High-performance NVIDIA processor’ in case you are using NVIDIA GPU or if you use some other graphic card, such as AMD Radeon you can see similar options as mentioned in the previous example.
- Click the ‘Apply’ button in the bottom right corner of the window to save your changes.
- Also, you may need to add another program called “sniffer.exe” which is used by Photoshop to detect your GPU capabilities. You can do this by going to your graphics card Control Panel and repeating the above steps to open the ‘Add’ dialog box and then select “sniffer.exe” instead of “Photoshop.exe”, now click on the ‘Apply’ button to save the changes.
How to Check if Photoshop is running on high-performance GPU
To check if Photoshop is running on a high-performance GPU, follow these steps:
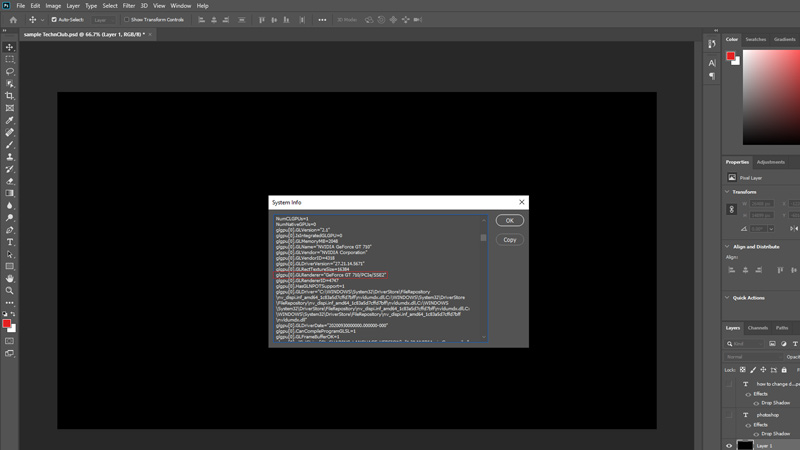
- Launch Adobe Photoshop and create or open an image document.
- Now click the ‘Help’ tab to open the help menu and select the “System Info…” option.
- In the System Info dialog box, scroll down until you see the “OpenGL Drawing: Enabled” section.
- Under this section, look for a line that says “Renderer: Graphic card model”
- If you see the above line with your graphics card model name, such as NVIDIA GTX 1050 Ti, it means that Photoshop is using your high-performance GPU processor as expected.
That’s everything covered on how to change the default GPU for Photoshop to a high-performance GPU. Also, check out our other guides, such as How to install Adobe apps in Tiny11 or How to switch Adobe Creative Cloud Plan to Student Plan.