The Administrator account on Windows computers provides the ultimate control in the users’ hands. Using an Administrator account, you can change the software and device settings for not only yourself but other user profiles too. That’s why changing a standard account to an Administrator account can be useful if you need other user profiles to have such functions too. You can convert any user profile to an Administrator account on your Windows 11 PC. In this guide, we will show you how to change the Administrator account on Windows 11.
How Do I Change the Administrator on Windows 11? ![change-account-type-windows-11]()
There are multiple ways to change the Administrator account in Windows 11. We have mentioned below the easiest methods to change a standard user into an Administrator in Windows 11. Let’s get started:
Method 1: Change Administrator Using Settings App
You can easily convert any user profile to Administrator on Windows 11 from the Settings app. Here are the steps to change the Administrator in Windows 11:
- Press the ‘Windows + I’ shortcut keys to open the Settings App.
- Go to Accounts > Family & other users.
- Take a look at the ‘Other users’ section.
- You will see all the user profiles that have been created on your Windows 11 PC, except yours.
- Click the user profile that you need to make an Administrator.
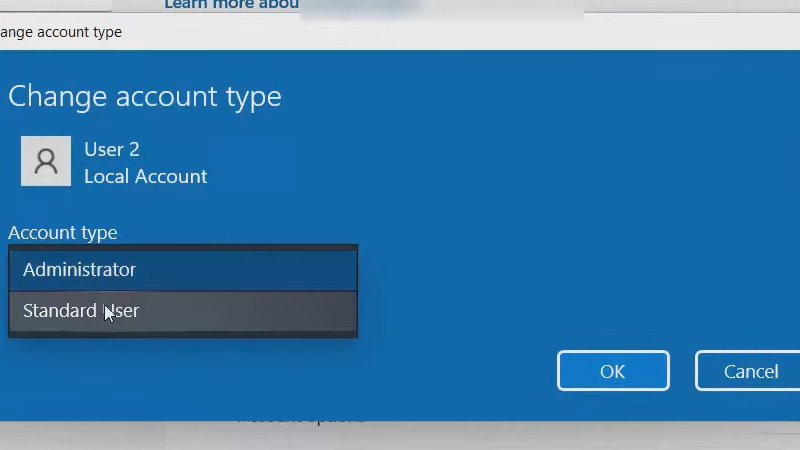
- Select ‘Change account type’.
- Open the drop-down menu under ‘Account type’.
- Click Administrator > OK.
This will change the standard account to an administrator account on your Windows 11 system. You can also change an administrator account to a standard account by selecting ‘Standard User’.
Method 2: Change Administrator Account from Control Panel
The Control Panel is a useful applet that can be used to change administrator on Windows 11. Here are the steps for the same:
- Click the ‘Search’ icon on the taskbar of your Windows 11 PC.
- Type and search ‘Control Panel’. Next, open the first search result.
- Select ‘Change account type’ right under ‘User Accounts’.
- Select the user profile that you would like to make an administrator on Windows 11.
- Click ‘Change account type’.
- Choose ‘Administrator’.
- Click ‘Change Account Type’.
- Lastly, restart your Windows 11 device.
That’s it! The selected user profile will be changed from standard to administrator.
Note: You need to use an Administrator account to change other account types.
These are the easiest methods that you can use to change your administrator account on Windows 11. Follow the steps mentioned above and you will be able to give administrative powers to any user profile. Here are some other guides from us on similar topics: How to Add Guest Account in Windows 11 and Check If Someone was Peeping into Your Windows 11 PC.