
There are several reasons behind changing your account name or an Admin name on your Mac. It can be anything like changing Admin name if you have bought a refurbished Mac. For this, Apple offers Mac users a feature that can change the user name (Admin) on their Mac computers. So, today in this guide I am going to explain to you how to change the Admin name on macOS Monterey.
Steps to Change Admin Name on macOS Monterey
Admin Name appears in different locations on your Mac like your home directory, lock screen, and user folder. You can change all the names displayed in these locations separately. To change the Admin name on your Mac you first need to switch to a different Admin account. If you do not have a different Admin account then, you need to create one by following these steps:
Create a New Admin Account
You can add a new Admin account by following these steps.
- First of all, click on the “Apple” logo in the top corner.
- Click on the “System Preferences”.
- Click on the “Users & Groups” to open the list of all the accounts logged into your computer.
- In the next window, click on the “Lock” at the bottom of the window and enter the admin login credentials.
- Now click on the “Plus” sign to add a new account.
- In the next tab, select the account type “Administrator”.
- Now, enter a name and a password.
- After all the credentials are entered, click on “Create User”.
Changing Admin Name
Once you have created a new admin account, log in to that account and follow this workaround to change the Admin name on your Mac:
- Click on the “Apple” logo on the top corner.
- Now, navigate to “System Preferences”.
- In the next dialogue tab, select “Users & Group”.
- Now, click on the “lock” and enter the login credentials.
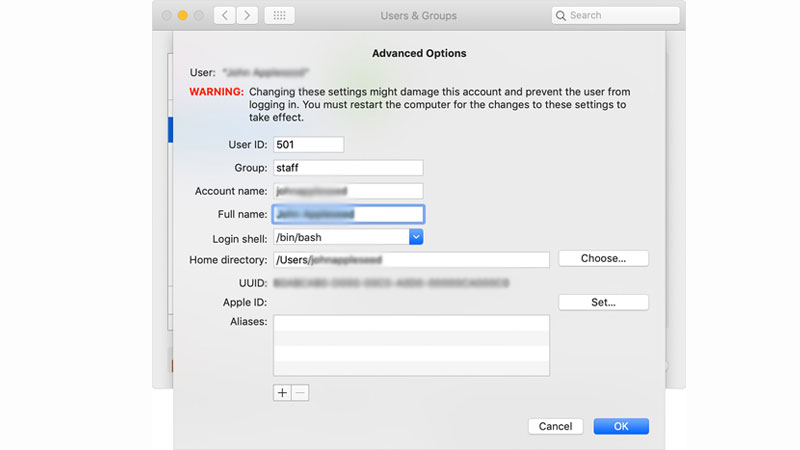
- In the next tab, control-click and select “Advanced Option” for the admin account.
- In the next dialogue box, type the new name you want to keep under the “Account Name” section.
- Type the new name again under “Home directory” to change the name displayed as the home folder.
- After this click “OK” to confirm the change.
- Now, click on “Restart” to reboot your Mac.
With this, you have successfully changed the Admin name of your Mac.
That is all you need to know about how to change or create a new Admin account. In the meantime, do not forget to check out our other guides on How to Clear System Data on macOS Monterey, and How to Enable Safari Push Notifications on macOS Monterey.