A firewall is a defense system of a computer network. With a firewall, therefore, all the accesses and the traffic that is generated in a network are filtered. This system allows you to protect your PC from any external threats and unwanted access. If you want to start using Google Chrome but your Windows firewall is blocking it, here’s how to allow Chrome to access the network in your firewall and get it started.
Steps to Allow Chrome to Access the Network in your Firewall
Google Chrome is a very popular internet browser. Despite this, in some situations, it can be blocked from entering by the Windows firewall and not work. You will then need permission communicated to the defense component that will allow you to freely download the program. As we have seen, this is nothing more than a measure to prevent attacks by malicious external threats. If you run into a ban on the part of the defense system, you can safely report an exception, of course, if we are sure that the application is safe.
How you can do that? Well, you need to add the Google Chrome program to the list of allowed applications and Windows Firewall will automatically give the program all permissions to work on the network. Let’s see, specifically, all the steps to do it.
To allow Google Chrome to work properly if it is blocked by the Windows firewall, all you have to do is follow a few simple steps listed below:
- First, go to the desktop screen of your pc.
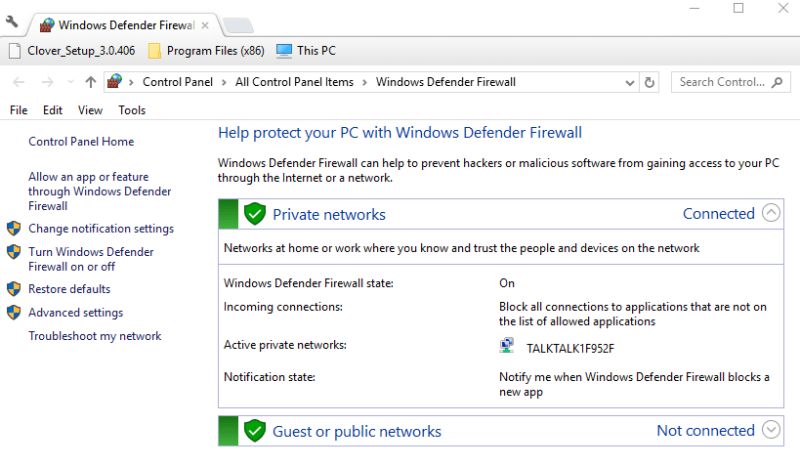
- Click on Start and click on the Search bar.
- You have to search for the text word “Allow an app through the Windows Firewall”, obviously without including the quotes.
- Now, click on the Change Settings button.
- At the bottom you will see Allow another app, just click on it.
- Now, in the next window, click on Browse and go to the location mentioned below:
C:\Program Files (x86)\Google\Chrome\Application - Just select the Chrome.exe file and open it.
- Now click on Add and ensure to check both Private and Public boxes.
- Press OK to save the changes.
- Finally, launch the Google Chrome browser on your computer and you will now be able to connect without any errors now.
With the same method, you can allow the Windows security system to accept other programs that you want to use. You will then be presented with a list of all programs to which you have given consent. In case you want to delete them from the list, just click on the one you are interested in and delete it with the right mouse button.
That is everything you need to know about how to allow Chrome to access the network in your Firewall. In the meantime, do not forget to check out our other guides on How to Disable Google Chrome Reading List and the Best Dark Mode Extensions for Google Chrome.