
There are many users who are facing Core Sync high CPU usage on their Mac notebooks. Core Sync is actually a Creative Cloud app’s background process that uses 100% of the CPU on affected machines. This problem makes the fans on the Mac to run at full speed as well. So, in this guide, I will explain how to disable Core Sync background processes on macOS, follow the steps given below to solve this issue.
How to Fix Core Sync High CPU Usage on Mac – Disable Core Sync
You can easily force quit the Adobe Creative Cloud applications process called Core Sync Helper that utilizes 100% CPU usage on your Mac. Follow the steps given below to fix Core Sync helper high CPU usage on your macOS system.
Here’s how to disable Core Sync on your Mac:
- First of all, you need to close all Adobe applications on your Mac system, including the Creative Cloud desktop app.
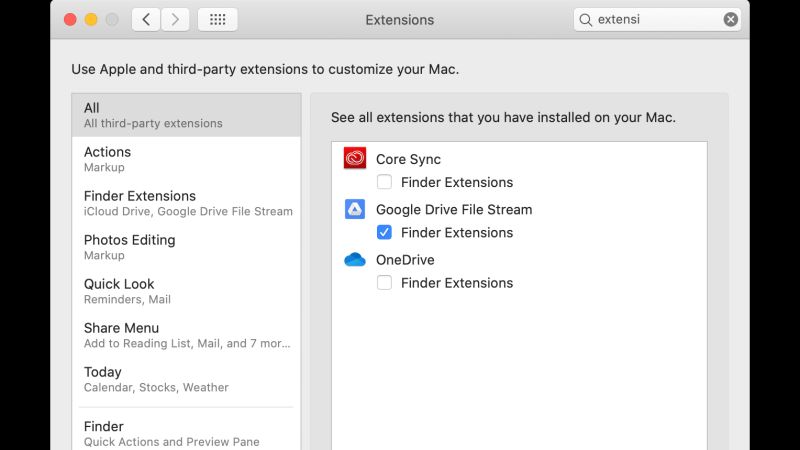
- After that open System Preferences and then go to Extensions.
- You will see a Core Sync icon, under it just untick the box if it is not unchecked already.
- Also, turn off “Core Sync Helper” in “Finder Extensions.”
- If you want to restore Core Sync, then you can simply check-mark the same box again.
- That’s it, this is how you disable or enable Core Sync on your Mac.
End the running Adobe Processes
You can also try to end the running Adobe Processes on your Mac system to solve the Core Sync 100% CPU usage issue. Here are all the steps to end the Adobe process:
- First of all, you need to go to /Applications/Utilities/ and open Activity Monitor.
- After that, choose the Views menu and then click on All Processes that will show you all the background running processes.
- In the search bar, type Adobe.
- After that press Shift on your keyboard and select all the listed processes.
- Now press the X button in the toolbar from the left side.
- Note that on the old macOS operating system, you will not be able to multi-select. So, just select each process one by one and then press the X button in the toolbar.
- After that, you need to press the Quit button.
- Finally, just wait for some time for all the processes to close. Once everything closes, do not try to relaunch it again.
That is everything you need to know about how to fix Core Sync’s high CPU usage on Mac. Do not forget to check out our other guides such as how to fix macOS Monterey Installation Failed error, or how to clean install macOS Monterey on your new MacBook Pro 2021 models.