Macs are an Essential Tool for many people to do a plethora of things. You can perform many tasks on one entity or perform multiple tasks on a single entity. But sometimes performing the same task again and again can become tedious, like resizing multiple images. To help the users with this problem, Mac has a feature called an Automator. Let us see what an Automator is in Mac & where can we use it.
What Is Automator On Mac?

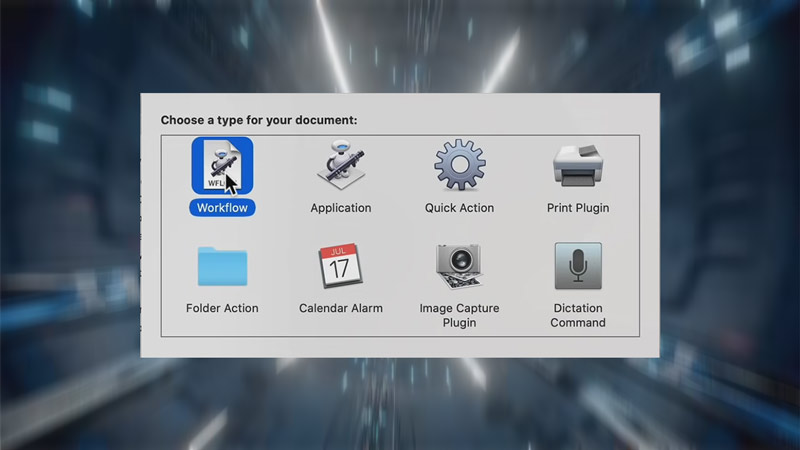
When we are performing certain tasks, we tend to repeat them. Like say if you want to do a certain task, let’s say resizing an image, for multiple images. You would select an image, resize it and then move on to the next one. Automators in Macs allows the user to make Workflows or automated Scripts that will make the Mac itself perform this task multiple times. You will be able to create an Automator of 8 types, i.e. Workflow, Application, Quick Action, Print Plugin, Folder Action, Calender Alarm, Image Capture Plugin, and Dictation Command. Here are what each of these types will do:
- Workflow: It is a self-contained set of actions that require the Automator to be running.
- Application: It is an application with a set of actions that can be run by double-clicking it or dragging the files onto it.
- Quick Action: It is a service that you can execute by right-clicking your file and then under the Services Tab, selecting Quick Action.
- Print Plugin: It allows you to edit selected files that are to be printed.
- Folder Action: It is an action that will run when a file is added to a specific folder.
- Calendar Alarm: It is an action that allows you to run or execute files at a certain time depending on your Apple Calendar.
- Image Capture Plugin: It is an action that allows you to perform certain tasks while you are importing Images into your Mac
- Dictation Command: It is a voice-activated Automator. It performs in the same way as the others but requires voice activation by double taping the Fn key and saying the correct Dictation Command Keyphrase.
In essence, an Automator will automate a certain task of the user for N number of times. Let’s see it with an example below.
Example of an Automator
A user wants to change an image type from the current extension of that image to JPEG as well as wants to resize it. Now, these two tasks on their own are time-consuming, let alone for multiple images. So here are the steps to use Automator for this task.
- Press Command + Space to open up the Spotlight Menu.
- In the Spotlight Menu, search for Automator and select it.
- Now it will ask you to create a New Document from the given 8 Options, i.e. Workflow, Application, Quick Action, Print Plugin, Folder Action, Calender Alarm, Image Capture Plugin, and Dictation Command.
- For the sake of the example, select Workflow.
- Once you have selected Workflow, you should be brought to a New Workflow Window where on the left side you will have the Actions of the Workflow & on the Right side you will have the Workflow Environment.
- In the Actions tab, there will be a search bar.
- Search for Ask for Finder Items.
- Drag it into the Environment and you will have certain options. For prompt select Choose an Image if it is on another option.
- Now in the search bar, search for Duplicate Finder Items and drag them into the Workflow.
- The two Actions that you have dragged into the Workflow should be linked automatically where the first Action flows into the second Action.
- Now in the Search bar once again, search for Scale Images. Mac will have a default variant so select that one.
- Drag it under the prior actions and it will link itself to them such that the Scale Action will take input from the Duplicate Action.
- Under Scale Images Action, select the scaling type to pixels and input the width of the images you want to resize into.
- Now save this Workflow.
- Whenever you drag an image to this workflow, it will make a copy of that image and resize it to the size you want.
- This will work with multiple images as well, simultaneously.
As you can see, Automators can make performing tasks on multiple files in Mac very easy. The Best way to understand and master it is to mess around and see what each Action can do. The more you explore the better the understanding you will get about it. This was all about Automators in Mac. Hopefully, this guide has provided you with a basic understanding of this feature in Mac. You can check our guides on Inspect Element On Mac Monterey & Download And Install Old MacOS.
