Are you wondering how to create your own private server in Windows 11 and be able to transfer and share large files without restrictions, then you can easily make your own FTP server on Windows 11. In this guide, I will explain how to set up a file server on Windows 11 below.
How to Setup a File Server on Windows 11?
If you want to see other computers on the local network when you connect with a PC running Windows 11, then you have to activate a hidden function in the system settings. In fact, it is necessary to activate a special option that is not in the default settings of Windows 11 in order to be able to join the other computers on the local network. Follow the steps given below on how to build your own FTP server on Windows 11 operating system.
- Click on the Search bar and then type Control Panel and click on it.
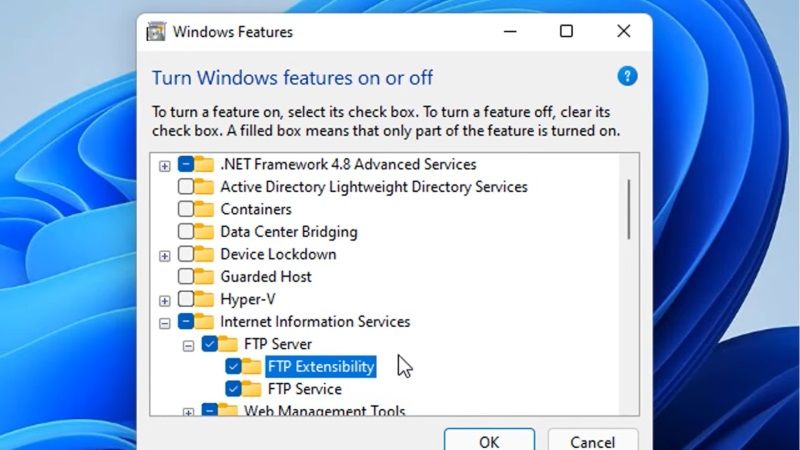
- Now, click on Programs and then click on the “Turn Windows features on or off” option.
- A window will pop up, here you need to click on the “+” button to expand Internet Information Services and tick mark the FTP Server option.
- Expand FTP Server and then tick mark FTP Extensibility and FTP Service option.
- After that, click Ok to start the installation.
- Now add a New User Account on Windows 11.
- Open File Explorer, right-click on This PC and select Show more options > click on Manage.
- A window will open, click on Local Users and Groups and then click Users.
- After that right-click and select New User.
- Enter the new user account details (such as name, password) and tick mark Password never expires option. After that click on the Create button at the bottom to complete the process and then click on Close.
- Now, make a new FTP folder that should be used to send and receive files.
- Click on the Search icon on the taskbar and then type Allow an app through Windows Firewall and click on it.
- Click on Change Settings; search for FTP server and tick mark it. Also, tick mark “Private” and “Public” network options next to it.
- Click Ok.
- After that click on Search and type Internet Information Services (IIS) Manager and open it.
- Expand NETVP and then right-click on Sites > Add FTP Site.
- Select the FTP site name and use any name in it.
- In the Content Directory, select the FTP folder that you have created earlier to send and receive files and click Next.
- On the Binding and SSL settings, leave all default settings but the SSL option to No SSL.
- Click Next.
- On the Authentication and Authorization Information, tick mark Basic, and in the Allow access to option choose All Users and tick mark Read and Write option. Once done, click on Finish.
- After that, open CMD and type ipconfig to get your IP address.
- Copy your iPv4 Address in a Notepad.
- Now, to run the FTP server you need to restart your Windows 11 PC.
- From another PC on your local network, you can now connect to your newly created FTP server. Just open file explorer and at the toolbar type ftp://(your iPv4 address) and press Enter key. Type in the FTP folder name and password and press Ok to connect to the FTP server on your Windows 11 PC.
That is everything you need to know to set up a file server on Windows 11. If you are also interested in other Windows 11 tips and tricks articles, then check out steps to fix Windows 11 Widgets not working, or how to fix Windows 11 not booting after reboot, etc.