Apple has recently released its latest operating system of macOS Ventura. There are many people who want to try it out but the problem is that either the new Mac operating system is not compatible with their Macs or computers or they do not want to spend money on it. So, how can one install macOS Ventura on an unsupported computer system? Well in this guide, we will discuss how you can easily run macOS Ventura on VirtualBox in Windows 11 or Windows 10.
macOS Ventura: How to Install or Run it on VirtualBox on Windows 11/10
If you want to install or run macOS Ventura on VirtualBox then in this guide, we will tell you the steps on how to do the same, just follow the various steps given below.
Step 1: Install VirtualBox and Extension Pack
- Download the latest version of the VirtualBox by clicking here. The file should start downloading automatically on your PC.
- Also, download the VirtualBox Extension Pack by clicking here.
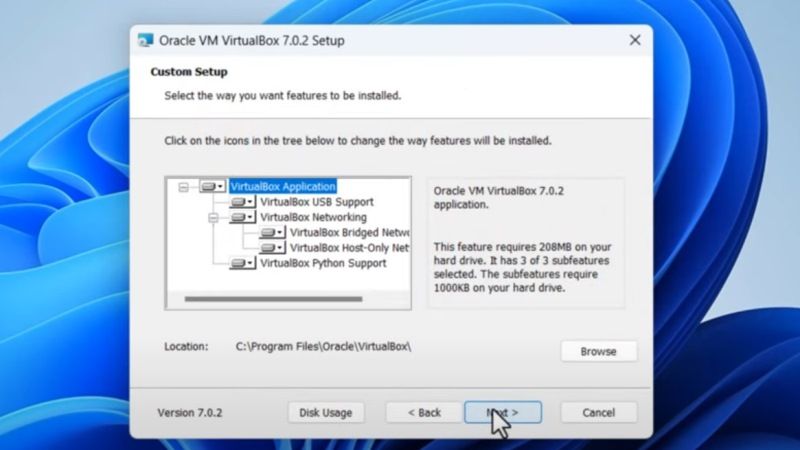
- Go to the folder where you have downloaded VirtualBox and install it on your PC.
- Launch the same VirtualBox tool and click on the Tools menu on the left side.
- Select Extensions.
- Click on the “+” (Install) icon and browse to the location where you have saved the VirtualBox Extension and then click on Open.
- Then click Install and the “I Agree” button.
- Now, go back to Welcome Screen.
Step 2: Make a new macOS Virtual Machine
- In the VirtualBox Manager application, click New on the top.
- Enter a name, for example macOS Ventura, for the new virtual machine
- Set the destination folder by browsing to a location on your PC.
- In the ISO image, select the macOS Ventura ISO image, you can download it from here.
- Type in Version Mac OS X (64-bit).
- Click Next.
- On the next window, set the RAM size (Base Memory) to at least 8GB.
- Set the virtual CPU count (Processor) to at least 4 according to your main PC CPU.
- Click Next.
- Maximize the Disk Size to 100 GB.
- Click Next.
- Finally, click Finish.
After creating a virtual machine, the next step is to customize the setting of the created machine to make it ready for installation.
Step 3: Customize Virtual Machine Settings
- To edit the settings, select the created macOS Ventura in the same VirtualBox application, and click on Settings on the top.
- In the next window, click on the Display menu and then increase the Video Memory up to 128 MB.
- Click on USB and select USB 3.0 (xHCI) Controller.
- Finally, click the OK button.
Once you have created and customized your virtual machine, it is time to install macOS on VirtualBox.
Step 4: Run VirtualBox Code on Command Prompt
- Close the VirtualBox application to apply the code (given below) to the Command Prompt.
- Then, you should change the Virtual Machine name with your VM name, for example macOS Ventura in our case.
cd “C:\Program Files\Oracle\VirtualBox\”
VBoxManage.exe modifyvm “macOS Ventura” –cpuidset 00000001 000106e5 00100800 0098e3fd bfebfbff
VBoxManage setextradata “macOS Ventura” “VBoxInternal/Devices/efi/0/Config/DmiSystemProduct” “iMac11,3”
VBoxManage setextradata “macOS Ventura” “VBoxInternal/Devices/efi/0/Config/DmiSystemVersion” “1.0”
VBoxManage setextradata “macOS Ventura” “VBoxInternal/Devices/efi/0/Config/DmiBoardProduct” “Iloveapple”
VBoxManage setextradata “macOS Ventura” “VBoxInternal/Devices/smc/0/Config/DeviceKey” “ourhardworkbythesewordsguardedpleasedontsteal(c)AppleComputerInc”
VBoxManage setextradata “macOS Ventura” “VBoxInternal/Devices/smc/0/Config/GetKeyFromRealSMC” 1
- Next, open the Command Prompt and Run as administrator.
- Then copy and paste the codes mentioned above to the command prompt.
- Close the Command Prompt.
Everything was done till here in VirtualBox with the new virtual machine is ready to install macOS Ventura. So let’s start the virtual machine.
Step 5: Start Clean Installation of macOS Ventura
- Open the VirtualBox application again and press Start at the top.
- A new window will pop up.
- Just wait for some time until some line of codes and the Apple logo is gone.
- Then, select a language.
- At the bottom right corner, click on the next arrow key.
- On the next page, select Disk Utility and press Continue.
- Select the Hard Drive.
- Click on Erase.
- Enter a name, for example macOS HDD, and then click on Erase button.
- Press Done.
- After configuring the partition, close the Disk Utility by clicking on the red dot at the top left corner.
- You will come once again to the macOS Recovery window.
- Now, select Install macOS Ventura and press Continue.
- Again click on Continue to set up the installation of the same OS.
- Click on Agree and then once again click on Agree.
- Select the hard drive that you created, macOS HDD, and then click on Continue.
- Now, wait for the installation to finish.
- Once the installation process is completed, set up your macOS Ventura for the first time using following the instructions given on the screen.
- Finally, macOS Ventura will be successfully installed on VirtualBox on Windows 11/10.
That is all you need to know about how to install and run macOS Ventura on VirtualBox on Windows 11/10. While you are here, you might be also interested to know the List Of MacOS Ventura Supported Devices.