
Excel is a powerful tool for data analysis and manipulation, but sometimes it can be tricky to work with large or messy datasets. One common problem that many Excel users face is how to remove empty or blank rows from their worksheets. Empty rows can make your data look unorganized, take up unnecessary space, and cause errors in formulas or charts. Fortunately, there are a few ways to delete these blank rows, and this guide will help you with it.
Excel: How to Remove Empty/Blank Rows (2023)
You can remove empty or blank rows in Excel by following these workarounds:
1. Using Find and Select
If you have a few blank rows scattered throughout your data set, you can use the Find and Select feature to quickly select all the blank cells in your data and then delete them. Hence, to use Find and Select feature to delete empty rows, follow these steps:
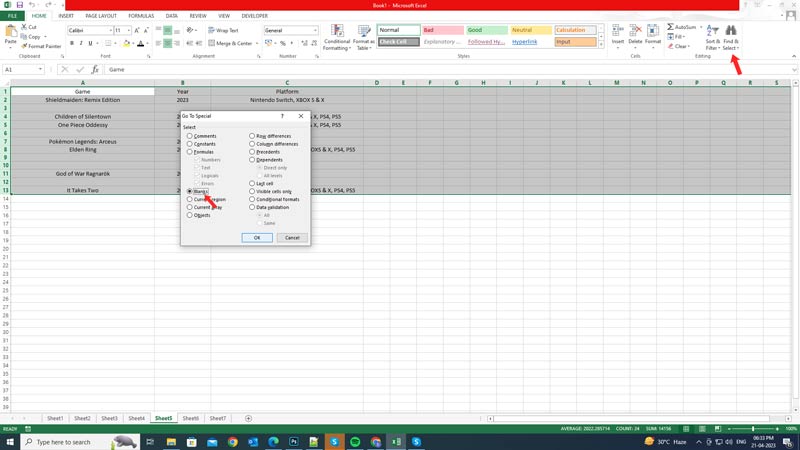
- Click the ‘Home’ tab, and select the ‘Find & Select’ button on the right side of the ribbon.
- Then select the ‘Go To Special’ option from the menu.
- In the Go To Special dialog box, select ‘Blanks’ and click the ‘OK’ button. This will select only the blank cells in your data.
- From the Home tab, click the arrow below the Delete button and select the ‘Delete Sheet Rows’ option.
- This will delete all the selected blank rows.
2. Using Filter
If you have many blank rows mixed with your data, you can use the Filter feature to filter out all the blank rows and then delete them by following these steps:
- Select the range of cells that includes all the data in the data set including blank rows.
- Then click the ‘Data’ tab in the ribbon, and select the ‘Filter’ button.
- Alternatively, you can press the ‘Ctrl’ + ‘Shift’ + ‘L’ keys on your keyboard.
- You will notice arrows beside each field name in your header row.
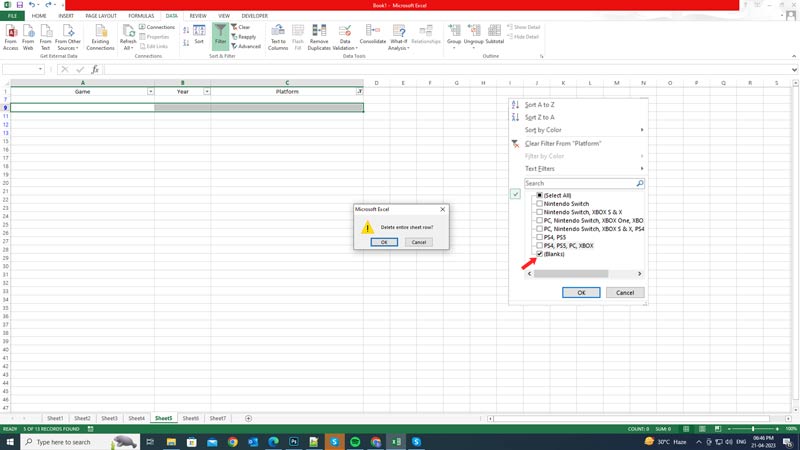
- Then click on the arrow beside the field or column with the blanks you want to remove, uncheck all the options except for “Blanks” and click the ‘OK’ button to apply the filter.
- You will see only the blank rows displayed in your data set.
- Select all the visible blank rows by dragging across their row headings or by clicking on any cell in your data set and pressing the ‘Ctrl’ + ‘A’ keys on your keyboard.
- Now press the ‘Ctrl’ + ‘-‘ buttons to delete all the visible blank rows.
- Finally, click on any arrow beside a field name in your header row, and select ‘Clear Filter from [Field Name]’ to remove the filter and display all your data.
That’s everything covered on how to remove empty/blank rows in Excel. Also, check out our other guides, such as How to count unique values in Excel or How to unhide rows in Excel.