
While using Excel, you might come across a situation where you might need to input the same value again and again. Typing those values, repeatedly, can be annoying. However, there’s a shortcut to input repeating values on your Excel sheet. This is possible by creating a drop-down list. A drop-down list in Excel allows users to select input values from the predefined set of options, and you can learn to use it with the help of this guide.
Excel: How to Insert Drop-Down List (2023)
You can insert the drop-down list on your Excel sheet either using ‘Data Validation’ or using the ‘Form Controls’ and here’s how you can do it:
1. Data Validation
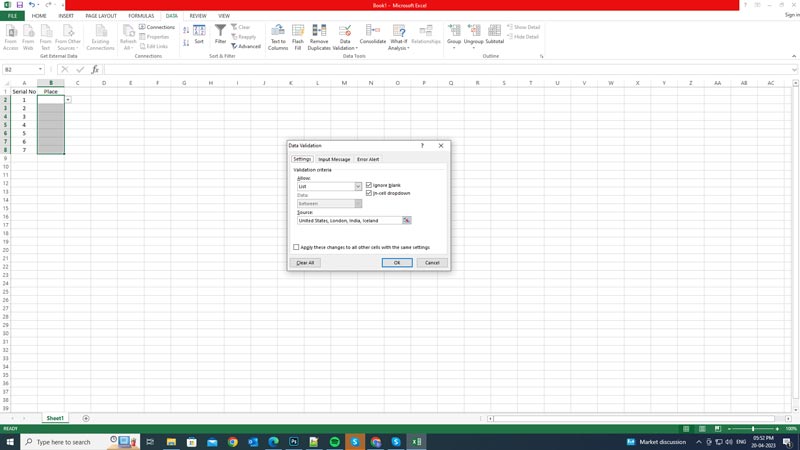
Data validation is a feature that lets you restrict what kind of data can be entered into a cell. You can use data validation to create a drop-down list from a range of cells or a list of values by following these steps:
- Select the cell range where you want to insert the drop-down list.
- Click the Data tab and select the Data Validation icon.
- In the Data Validation dialog box, go to the ‘Settings’ tab and choose ‘List’ from the ‘Allow’ drop-down.
- In the Source box, either enter the values for your list separated by commas.
- Alternatively, you can type the values in the new sheet beforehand and select a range of cells that you want to include on the drop-down. This trick is useful when you are working with large datasets.
- If you want to allow users to enter values that are not in the list, check the Ignore blank and In-cell drop-down boxes. Otherwise, leave them unchecked.
- Finally, click the ‘OK’ button to insert the drop-down list. Now you should see a drop-down arrow in the selected cell range. You can click on it to choose an option from your list.
2. Form Controls
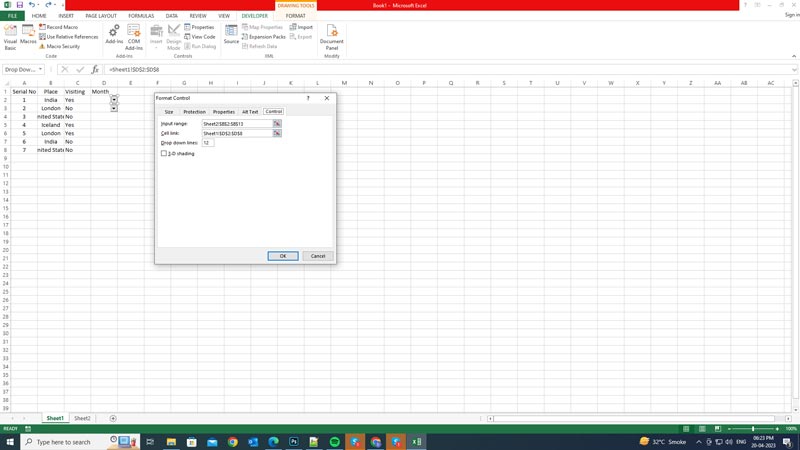
Form controls are objects that you can insert on your worksheet to create interactive elements, such as buttons, checkboxes, and drop-down lists. Hence, to create a drop-down list using form controls, follow these steps:
- Go to the Developer tab and click on Insert in the Controls group. If you don’t see the Developer tab, go to File > Options > Customize Ribbon and check the Developer box under the Main Tabs section.
- Then click the ‘Insert’ icon to expand it.
- Here, select the ‘Combo Box (Form Control)’ icon from the Form Controls section which is shown with a sheet icon with an up and down arrow on the right side.
- Adjust the size of the combo box and drag it to the cell where you want to insert the drop-down list.
- Then right-click the combo box and select the ‘Format Control’ option from the menu.
- In the Format Control dialog box, go to the ‘Control’ tab and enter the list on the ‘Input range’ field by separating each value by a comma.
- Now click the ‘Cell link’ field, and enter or select a range of cells that display the selected option from your list.
- In the ‘Drop down lines’ box, enter the number of items that you want to show in your list at a time. You can adjust this number according to your preference.
- Then click the ‘OK’ button to add the drop-down list.
- Finally, you should see a drop-down arrow on your combo box. Click on it to open the drop-down list.
That’s everything covered on how to insert a drop-down list in Excel. Also, check out our other guides, such as How to delete duplicates in Excel or How to spell check in Excel.