
There are many users who use different free online document editor for creating and editing their documents. One such free tool available for them is Google Docs. In addition, if you are looking to create hanging indent in Google Docs, then the steps required are very simple. Hanging indents are basically used for citations, references, etc. You can also try to use a hanging indent for a table of contents since the typical format involves a heading with a list of items indented below it. In this guide, let us check out how to do hanging indent on Google Docs in details below.
How to Do a Hanging Indent in Google Docs (2023)
There is a built-in tool to make a table of contents in Google Docs, however, if the titles of the document are not formatted in H1, H2, etc., you can simply use the hanging indentation to format it as a table of contents. In this guide, you will find out how to make a Google Docs hanging indent in a few simple steps.
How to Create a Hanging Indent in Google Docs
Fortunately, Google Docs offers suspended withdrawals as a built-in feature. If you’re trying to add hanging indents to a Google Doc, here’s what you should do:
Thankfully, the hanging indent offered by Google Docs is a built-in feature. In case, you want to add negative indents to a Google Doc, here are the steps for it:
- First, you need to start by selecting the text to which you want to apply the hanging indent.
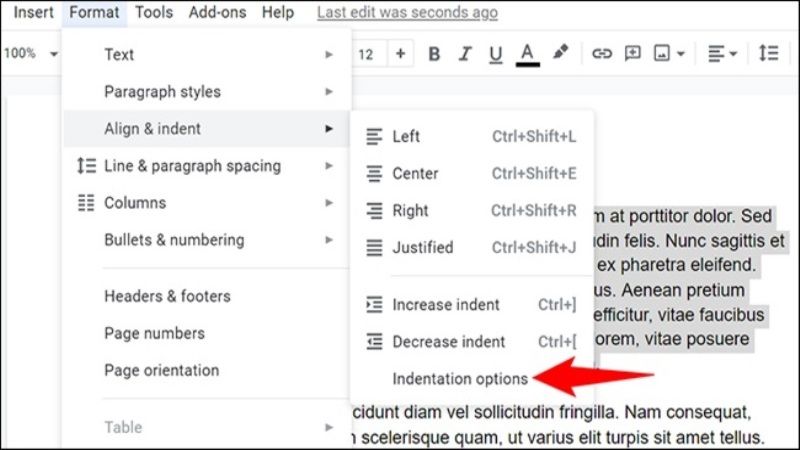
- After that click Format in the top ribbon to open a drop-down menu.
- Next, select Align & Indent and then click on Indentation Options.
- In the indentation options, you need to choose the drop-down menu under Special indent to select the Hanging option and then select Apply.
- That’s it, in this way you can use the hanging indent on your Google Docs quite easily.
How to Create a Hanging Indent using a rule in Google Docs
There is also another way to create a hanging indent using the ruler tool. If you are looking for more flexibility in the degree of indentation, it’s better (and faster) to use the ruler than to navigate the menus as in the previous method. You can see the ruler at the top of your Google Doc, but you can turn it on if you don’t see it by selecting View from the top ribbon, then Show Ruler.
After you see the ruler along the top border of your Google Docs, you will find two items on the ruler:
- First is a light blue triangle: the inverted triangle functions as the left indent marker.
- The second is a light blue rectangle: the rectangle sits above the inverted triangle and functions as the first-line indent marker.
Once you drag the triangle to the left (which automatically moves the rectangle), it will bring the selected text very much closer to the left margin. But, if you only drag the rectangle to the left, you will be only able to indent the first lines of all selected paragraphs. In that sense, follow the steps given below to create a hanging indent with a ruler:
- First, you just have to select the text.
- And then simply drag the rectangle to where the left margin begins and the triangle where you want to indent the text in the second line and beyond.
Using the ruler eliminates the need to navigate drop-down menus. It also gives you a real-time preview of how withdrawals will look. If you don’t like what you see, you can quickly drag the indent markers and change the look of the document. If adding a hanging indent spills a line or two of text on a new page, you can also consider changing the margin to adjust the space available for text in your document.
That is all you need to know about how to do a hanging indent in Google Docs. While you are here, you might be also interested to know How to Delete a Page in Google Docs, and How to Strikethrough on Google Docs.