Google Docs provides a complete solution to edit and manage doc files online. It comes with all basic and advanced features for creating/editing/saving a document file. Adjusting page margin is used when you print a document or save it in some different size. The option is to adjust the margin in the page setup section of Google Documents. This can also be done via Ruler, which allows you to manually change the width or height of the page. Here are detailed steps on document margin settings.
How To Adjust Margin using Page Setup Dialog Box?

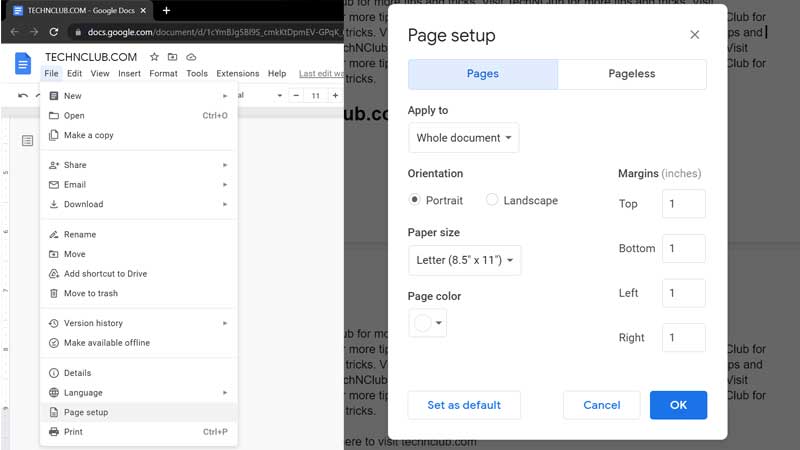
Click on File > Page setup. This will open the Page Setup Dialogue box that provides different options to modify and adjust page margins. From here you can choose to apply the margin settings to one single page or the entire doc. Here is the list of entire settings you can adjust via the Page Setup Dialogue box.
- Orientation – Switch between Portrait (vertical) and Landscape (horizontal) mode.
- Paper Size – Select between 12 different paper sizes if you are not aware of margins.
- Page Color – Add a background color to the page.
- Margins – Adjust the Top, Bottom, Left, and Right Margins.
In order to add a custom margin, you will have to select the Margin (Inches) section. Whatever number is added to the box will add margins in inches. This is one method of adjusting margins in Google Docs. Now here is the second method of doing the same using a Ruler.
How To Adjust Margin using Ruler?

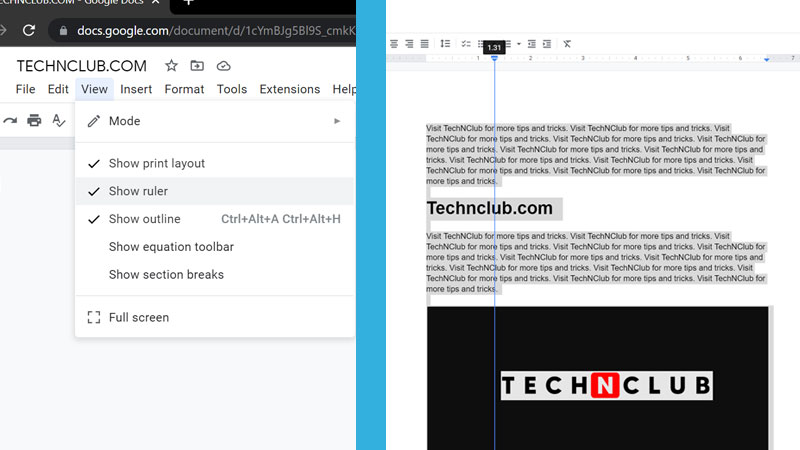
Ruler lets you adjust the margin as per your need if you are confused with setting up them in inches. You can just drag the margin from all four sides one by one. If you cannot see the Ruler in Google Docs then follow the below steps.
- Click on View > Show Ruler
- Press Ctrl + A and then drag the ruler to adjust the margin.
You will see a ruler tab on the top and sides of the page. To make the text aligned properly, do not forget to press Ctrl + A to select everything and then set the margin. Or else new margin settings will be only applied to one single line wherever the cursor is. For example, in the above pic, you can see in bold Technclub.com. If you just have to increase its left margin, place the cursor before T and then drag the ruler. But to adjust the alignment of the entire document press Ctrl + A and then do the adjustments.
These are the two ways to adjust margins in Google Docs. One is by manually typing the margins in numbers in the Page Dialogue box and the second is by dragging the rulers around the doc.
