
You may have noticed that after opening Task Manager on your Windows 11 or Windows 10 PC, you may find that an agent called WaasMedic Agent Exe is using 100% of your memory usage. Today, we will tell you how to fix the WaasMedic.exe 100% high CPU usage problem in your Windows 10 or Windows 11 operating system.
What is WaasMedic.exe Agent?
The full form of WaasMedic is actually Windows Update Medic service and it is also called WaasMedic Agent Exe. It is a part of the Windows 10 and the upcoming Windows 11 operating system.
WaasMedic.exe is a very important component of the Windows 11/10 operating system and its main purpose is to make sure that the Windows Update process is working smoothly and not disturbing the user while receiving the latest update without any issues.
If you are facing high CPU usage or 100% CPU usage by WaasMedic.exe, check out the below solutions to fix the problem.
How to fix WaasMedic.exe 100% CPU Usage on Windows 11 and Windows 10?
- Try to run System File Checker. To do that type CMD in the search box and then right-click on CMD and run it as Administrator. In the command prompt, type “SFC /scannow” without quotes and press Enter on your keyboard. It will try to find any kind of corruption that is found, and then it will simply replace them on reboot.
- Try to run DISM to repair Windows Update components. To do that, simply follow the above steps to open CMD in Administrator mode and then type the following command and press Enter to run DISM – DISM.exe /Online /Cleanup-image /Restorehealth. It will try to fix corrupted Windows Update system files.
- Try to Reset your Windows PC. To do that, first, open Settings on your Windows 11 or Windows 10 computer. Then click on Update and Security. At the left pane, select Recovery. Now, in the right pane, you will see an option called Reset This PC, simply click on Get Started. After that just follow the on-screen instructions properly.
How to disable WaasMedic.exe temporarily?
The final method is to disable WaasMedic.exe for a temporary period. To do that, follow the steps given below.
- First of all, download the Windows Update Blocker file from here and extract the file via Winzip software.
- Open Windows Update Blocker exe file and then go to its Menu. Here you need to choose Windows Service from the context menu.
- After that, you will come across the Services window, here search for Windows Update Medic Service, and then copy the service’s name.
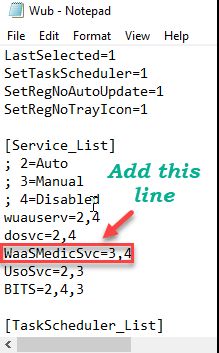
- Go back to the folder once again where you have extracted the Windows Update Blocker. Here, try to open the .ini file with Notepad and look under dosvc=2,4. Simply paste the service name there and add =3,4 in the back of it.
![WaasMedic Agent Exe]()
- Lastly, just go back to the window of Windows Update Blocker and click Apple Now to confirm the changes.
That is all information on methods to fix the WaasMedic issue. If you want to fix the issue, but don’t know how to do it, you can try the above solutions one by one. I believe that one of them can help you fix your issue.
That’s all the information to fix the high CPU usage of the WaasMedic.exe issue.