
100% Disk usage problem has become common for Windows 10 users. This problem can result in the overall slow performance of your system. Full Disk Usage can freeze your system completely. Applications will lag and will not work smoothly at all. Here are some of the best ways to reduce Disk Usage in Windows 10.
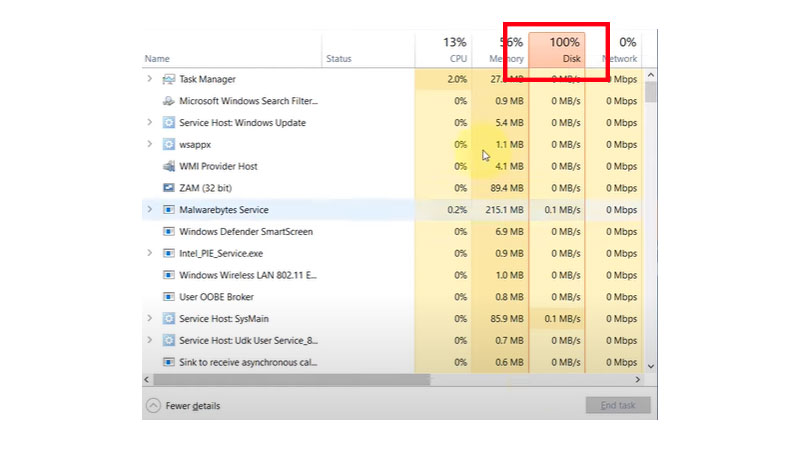
How to Check Disk Usage?
To check that your disk usage has reached 100% you have to navigate through Task Manager. Right-click on your taskbar and select task manager or you can use the keyboard shortcut key Ctrl + Shift + ESC. Under the process tab, you can track your Disk Usage here.
8 Ways To Fix 100% Disk Usage
There might be many reasons which are forcing your Hard Drive to perform at max rate. Certain apps or viruses can also lead to full disk usage.
Malware Issue
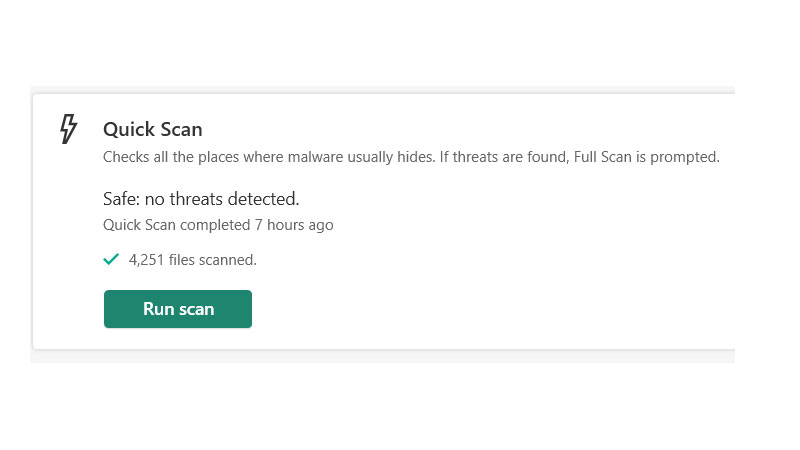
A malware infection can be a reason for the 100% usage of a disk. We suggest you scan your Windows 10 with a reputed antivirus. Malware creates space in your device which leads to 100% usage. With help of antivirus, you can clean the hidden malware from your devices and reduce disk usage. If this trick doesn’t work then you can switch to the next one.
High-Performance Option
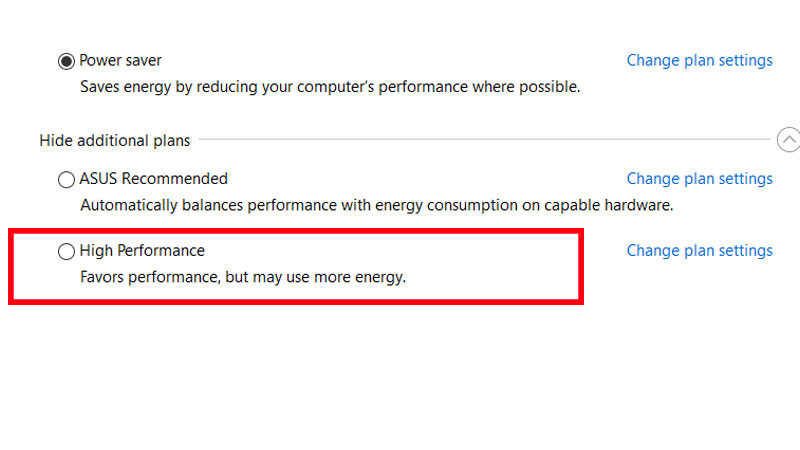
Changing the energy option from a balanced to a high-performance option may overcome the problem of 100% disk usage.
- Search for “Power & sleep” in your search bar
- Click on Power & sleep option and click on “additional power settings”
- Now activate the high-performance box
- If this hack doesn’t work change the settings to the original one and try the new solution.
Disable Windows Search
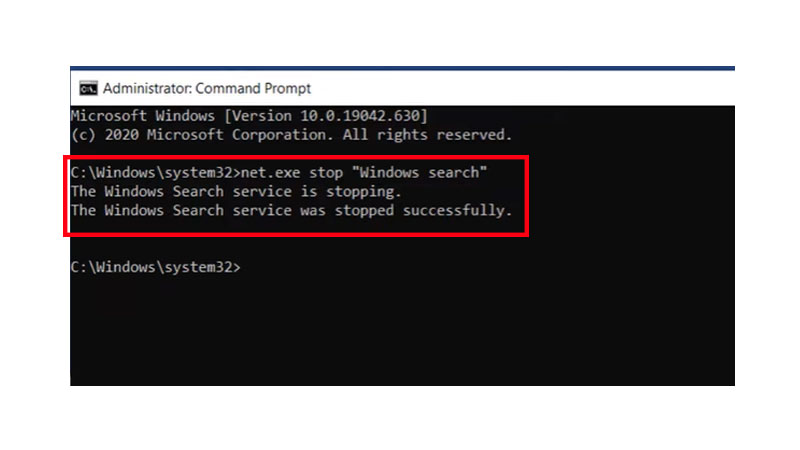
Windows search shows or indexes on your system so, you can get those files easily. In some conditions, this search may lead to high usage of disk. To find the exact reason behind your 100% disk usage you can disable windows search to check if disk usage is reducing.
- Search for Command Prompt in the Search bar, Right Click on it, and choose run as administrator option
- Enter this command net.exe stop “Windows Search”
- In response, you will know that your windows search service is been stopped successfully
- If your disk usage issue is been resolved then you can permanently disable it by pressing the “Windows + R” button on your keyboard
- A small run tab will open on your screen and now you have to enter “services.msc” and hit on “OK”

- Look for windows search, open it. Search for the “Startup type” option under the general menu and change the startup type to “Disabled”
- Click on “Apply” and hit on “OK” to save the changes.
Disable SuperFetch Service
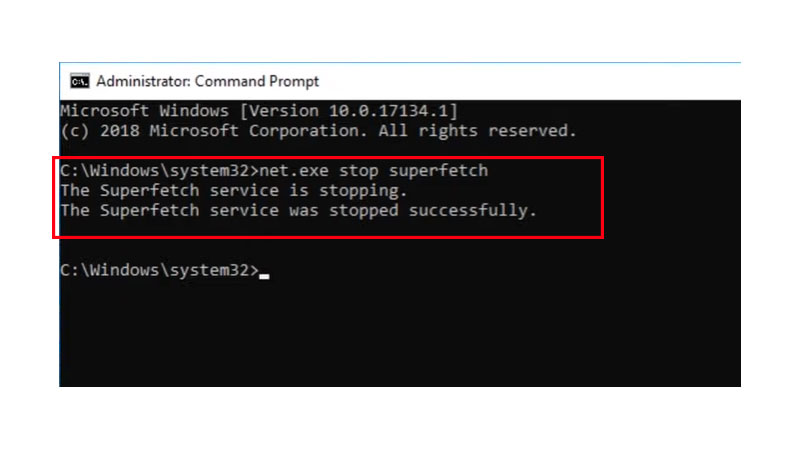
Superfetch helps your device to boot quickly or you can say it’s a bug on Windows feature that constantly examines memory usage, keeps the track of what apps we use, and add then preloads them into memory ahead which may contribute to high disk usage. By disabling this feature your problem may get solved.
- Search for “cmd” inside your search box and right-click on command prompt and “Run as administrator”
- Enter this command or copy form here, “net.exe stop SuperFetch” or “net.exe stop sysmain” and hit enter
- If this work, you can stop it permanently to do so, press “Windows + R” and enter “services.msc” and click on “OK”
- Search for SysMain or SuperFetch. Right Click on it and select “properties”, and change its startup type to “Disabled”
Reset Virtual Memory
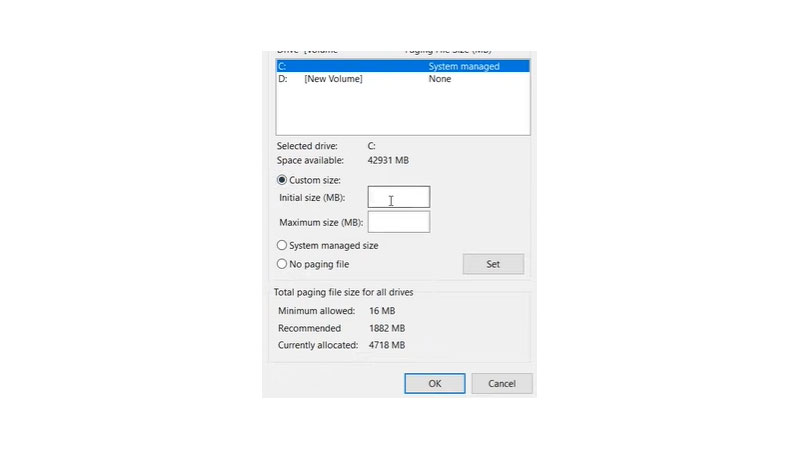
It’s a kind of memory management technique for your system, this technique gets connected with hard disk virtually with a motive to improve your system performance. This technique requests some read or writes from hard disk which leads towards disk usage.
- To Rest your virtual memory head towards “This PC”, Right-click on any vacant place.
- Choose the “properties” option, and then click on “Advanced System settings”
- System properties dialog box will appear and then choose the “advanced tab”. Under the advanced tab hit on “settings”.
- Performance options named dialog box will appear and again open the “advanced tab”. Click on “Change” and a new tab will be opened.
- Now uncheck the ‘automatically manage paging’, and tick the “Customize Size” option. Insert the initial size same as your recommended size.
- Enter the amount as per your RAM size. For 4GB Ram – 6144, 8GB Ram – 12288, or you can tick the No paging File option and hit on “OK”
Run Disk Check
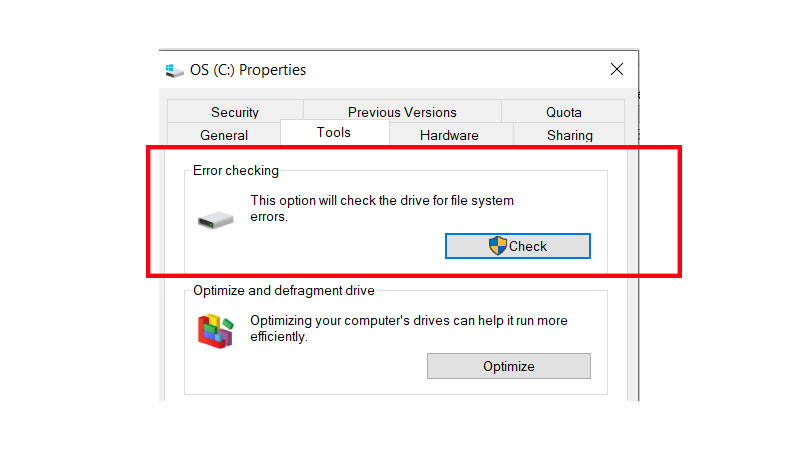
100% Disk Usage may reason for disk failure. So, you should run the check disk tool to make sure that everything is perfect.
- To run disk check open “This PC”. Right-click on any drive and choose the “properties” option
- A new dialog box will be opened, choose the “Tool” Tab.
- Click on “Check” under the Error Checking option
- It will run a scan and will check for any errors. It will suggest you fix the error if by chance any error is found
Fix Google Chrome
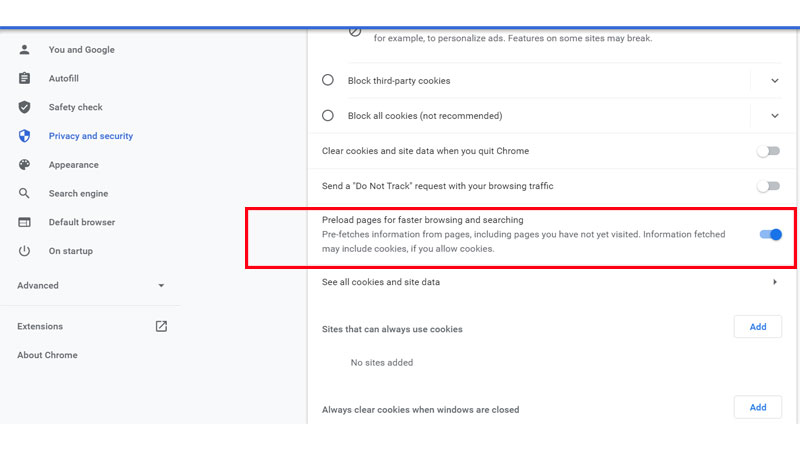
If you experienced that your chrome is working too slow. This happens because of 100% Disk Usage by change some settings of your google chrome you can overcome such problems.
- In the menu (three dots at the right corner), choose the “settings” option
- Then “Privacy and Settings” and choose “cookies and other site data”
- Scroll down till you find “Preload pages for faster browsing and searching” and then turn Off the toggle.
- You may experience slow browsing but it will fix your disk usage problem, if not then turn ON the toggle.
Reinstall Windows 10
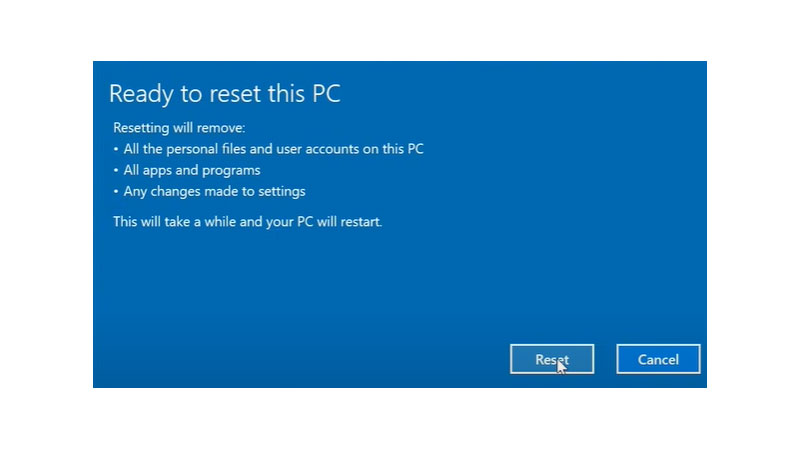
After every solution mentioned above the final way to fix your 100% Disk Usage issue is to reinstall windows 10.
- Before you use this method make sure you have a backup of your important documents.
Click on “Start”, then click on “Settings icon” - Head towards “Update & Security” > “Recovery”/ “Remove Everything”
Click on “Get Started”
Using any of these solutions you can resolve your issue immediately. If one doesn’t work then try with another method. Do not forget to backup all the data before you go with the last option of resetting Windows 10.