Windows 11 is the newest and the latest operating system offered by Microsoft with its advanced features, and security. Also, Microsoft will end its previous Windows support eventually as it did with Windows 7 after a few years. Hence it is a better idea to upgrade with time, and no doubt, users are enthusiastic about upgrading from their current Windows versions. That being said, before we start with upgrading the most important question is about your CPU’s compatibility with Windows 11. This guide will help you find whether your CPU supports Windows 11 or not.
How to check if your CPU supports Windows 11 or not?
To check the compatibility of your CPU, there are two ways. First, you can just use the preinstalled software PC Health Check (only for Windows 10), or use the second method of manually going through settings to check your CPU configuration and comparing it with the Windows 11 minimum configuration.
Method 1. Check Windows 11 compatibility with PC Health Check
Well, this function is only available for Windows 10 users if you want to upgrade to Windows 11. Windows PC Health Check can determine if the processor on your system is compatible with Windows 11. Follow the below steps to check if the CPU Supports Windows 11 using PC Health Check:
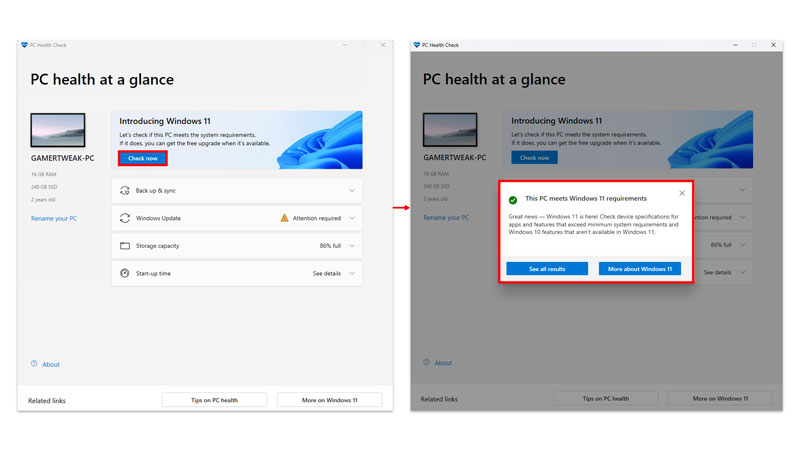
- Firstly, on your PC, search for PC Heath Check on the Windows Search bar and open it (If your Windows 10 doesn’t have PC Heath Check software, click here to download and proceed to install it).
- On opening, you will be greeted with an “Introducing Windows 11” message. Click on the Check Now button as shown in the above image.
- Once the checking is completed, it will show results whether the PC Supports Windows 11 or not.
If your PC doesn’t support Windows 11 you can click on see all results to get the detailed information.
Method 2. Check CPU compatibility using Settings
The above method gets the work done easily, but it is only limited to Windows 10. Hence, if you have any Windows versions lower than Win10, then follow this method. In this, you can go through your PC’s system configurations and specifications to check if it fulfills the minimum system configuration criteria for Windows 11. To check your PC configuration, follow the below-given steps:
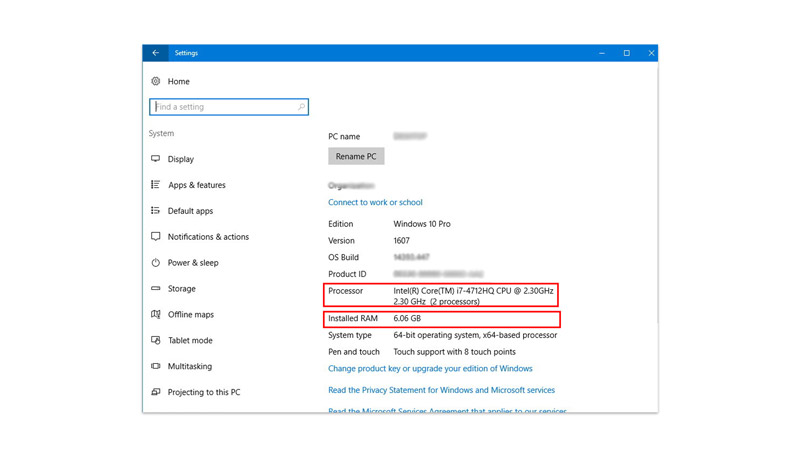
- Open Settings on your windows.
- Now click on System.
- Further, click on About to open the PC’s About section.
- Lastly, under the Device Specifications section, check for details like the Processor model and RAM.
Note the above information about the processor and check from this list of all the supported processors from Intel or AMD for Windows 11.
Minimum System Requirement for CPU To Support Windows 11
Now that you have got your get your own CPU’s system details, you can compare it with the Minimum system requirement and check if the CPU supports Windows 11 or not. Not to forget the need for a trusted platform module (TPM) chip and also, a supported processor.
System requirements:-
- Processor – 1 GHz or faster with 2 or more cores on a compatible 64-bit processor
- RAM – 4 GB
- Internal Storage – 64 GB or larger storage device
- System firmware – UEFI, Secure Boot capable.
- TPM Trusted Platform Module – TPM version 2.0.
- Graphics card – Compatible with DirectX 12 or later and WDDM 2.0 driver.
- Display – HD 720p with diagonal size 9 inches or more, 8 bits per color channel.
Steps to check the Trusted platform module (TPM) chip and its version
Microsoft suggests on its official page that PCs should require TPM version 2.0., to ensure that the CPU Supports Windows 11. Below are the steps to check for TPM and its version:
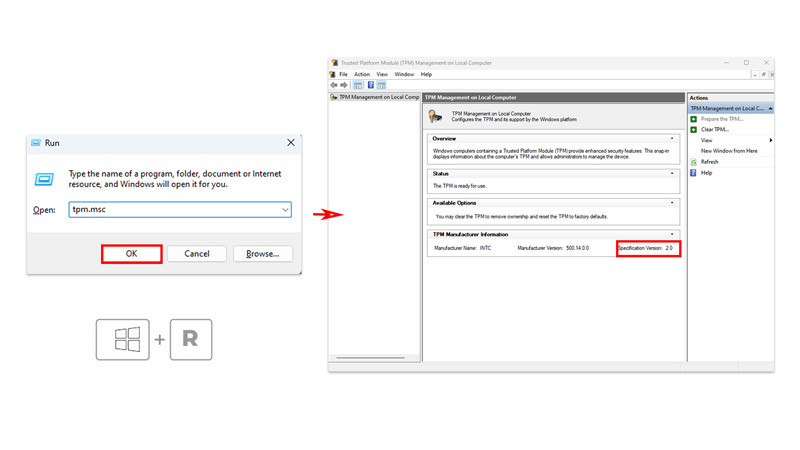
- On your keyboard, press the Windows button + R.
- Now on the prompt run screen, type – tpm.msc and hit enter.
- Next, if the TPM module is present, a new prompt will appear with all the information where you can find the version as well.
If you get any message like “Compatible TPM cannot be found“, most likely it is missing on your PC. Additionally, you can find it via Device Manager. To do so follow the below steps:
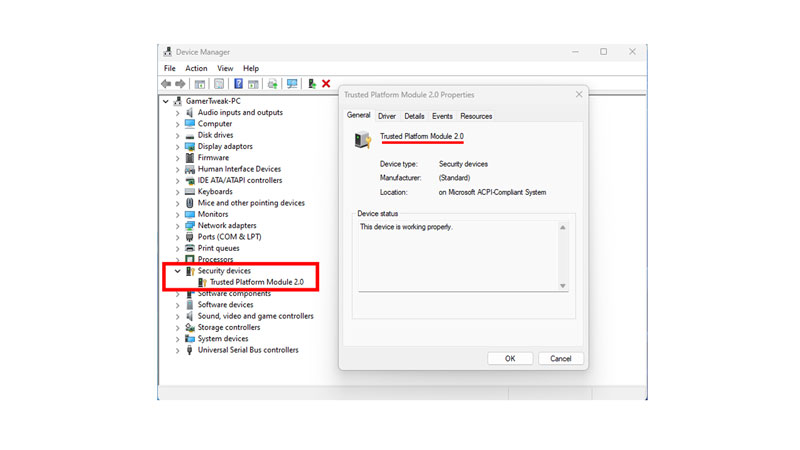
- Search for Device Manager on the Windows search bar and open it.
- Now on the list, look for Security devices, and double-click on them.
![Steps to ccheck TPM vand version via Device manager]()
- Further, click on the newly appeared subheading if the TPM 2.0 is present, you will see it displayed there.
If it doesn’t indicate anything as such, that means TPM is missing from your PC, this only happens if your Computer is very old since most new CPUs have this installed on board. In such a situation, the only option you have is to upgrade the CPU or purchase a TPM chip and install it on your motherboard. Because, as mentioned earlier, Windows 11 does require a TPM module version 2.0.
If you find all the positive affirmations about its compatibility, you can proceed to upgrade to Windows 11. And that’s everything you need to know to check whether the CPU supports Windows 11. Check out our other guide to learn How to Download Windows 11 ISO File with the Media Creation Tool or How to Run Windows 11 from a USB Drive.