If you want to increase security on your computer, you can use Windows 11 to create BitLocker on internal or external storage such as USB Flash Drive, SD Card, external hard disk, or other external storage as long as you are using the NTFS, FAT16, FAT32, or exFAT file system. BitLocker is a Windows built-in tool that allows you to encrypt your entire hard disk for enhanced security. In this tutorial, you will find out how to enable BitLocker on your Windows 11 computer.
How to Enable BitLocker Drive Encryption on Windows 11
For those who do not know, BitLocker itself is a feature that has long existed since the era of Windows Vista. This feature is very essential and can be used to encrypt a storage drive so that only people who know the password can access the partition of the same drive. So, how do you activate BitLocker on Windows 11? The following steps summarize the goal to enable BitLocker drive encryption on Windows 11.
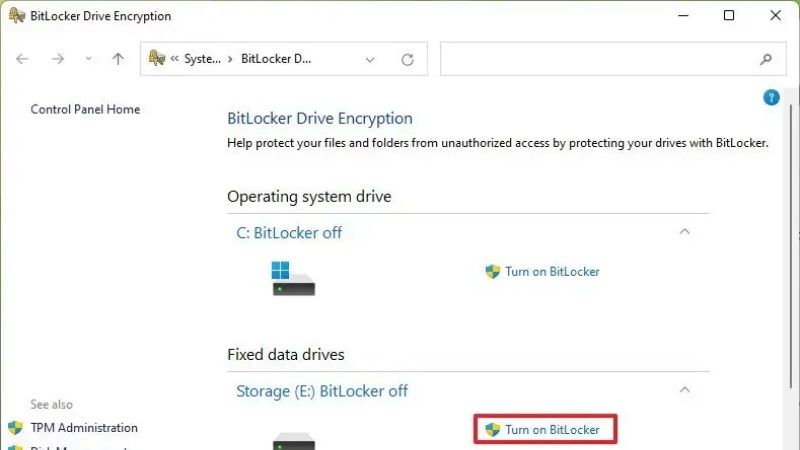
- First of all, you have to prepare which partition of the hard drive you want to encrypt. So, here for example, you can try to encrypt the E: drive partition.
- After that, right-click on the desired drive/partition, then select the Turn on BitLocker option.
If that option is not present, in the Context Menu, simply click on Show more options first, if you want the Context Menu to display the old display by default. - After you click Turn on BitLocker, you need to wait a moment and follow the following advanced steps.
- Now, on the wizard page, check the Use a password to unlock the drive option and enter the password then click Next.
- Choose where you want to save the recovery key. You can save it in a Microsoft account, in the form of a file, or in physical form (print).
- Then you can choose between encrypting only the part that already has data in it (new data that will enter in the future will be encrypted automatically). Or perform encryption thoroughly.
- Here you have to use the option of Encrypt used disk space only. Also, adjust to your choice > if you have clicked Next.
- Specify the desired encryption method between New encryption mode (XTS-AES 128-bit, only supports Windows 10 and Windows 11) or Compatible mode (AES-CBC 128-bit, supports Windows Vista, Windows 7, and Windows 8/8.1.). So here you need to use New encryption mode because you are using Windows 11.
- Finally, please click Start Encrypting to start the process.
- Note that if there is already a padlock icon on the partition, then the encryption process is complete, so every time you want to open the partition for the first time, you will be asked to enter the password you created earlier.
That is all you need to know about how to enable BitLocker in Windows 11. Also, do not forget to check out our other Windows 11 Guides for more tips and tricks around the new operating system of Microsoft.